|

|
|
ACS/ABC Inventory Software - Useful Tips
Did you know that your Almyta supported multi-level pricing?
To start with a multi-level prices, go to the Orders menu tab, Customers screen and assign price level to the customers. If you do not assign the level to a customer, the price will be defaulted to the Item Master, Unit Price. If you do not have levels in the dropdown list, double-click it and add a few rows. Please note, the prices are to be populated from highest to lowest. The level 1 price is always the Item Mater price and is the highest. The higher the level number is, the lower is the price. 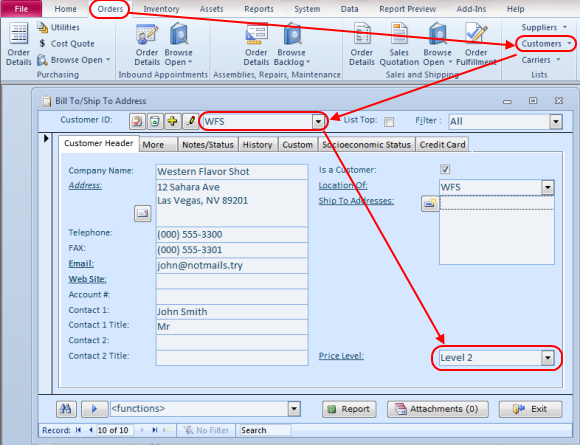 You can always view and modify price table for a particular item by double-clicking the Unit Price field on the Item Master screen. The Price Table popup will appear. The Price Table popup does not need to be opened and closed each time you change the item. You can move the popup aside and go to another item on the Item Master screen. The price table popup will follow you automatically. 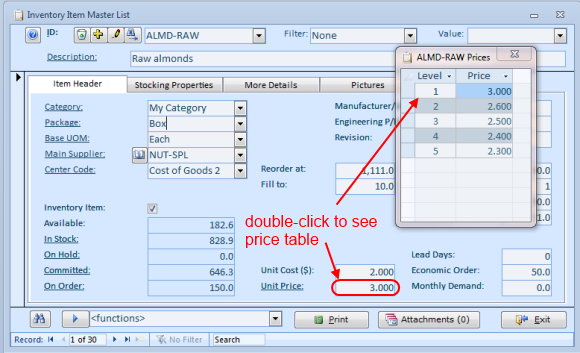 When you create a sales order and select a customer, the price level is fetched from the customer record and shown on the Order Detail screen, Line Items tab. Adding inventory items to the line items will yield defaulting sales price per customer price level. To access the Price Table popup on the order screens, right-click the item and select Price Quote from the popup menu. Like on the Item Master screen, you can move the Price Level popup aside and continue your work. The prices will change in the popup following current line items. If price does not follow click on any other row and return back. 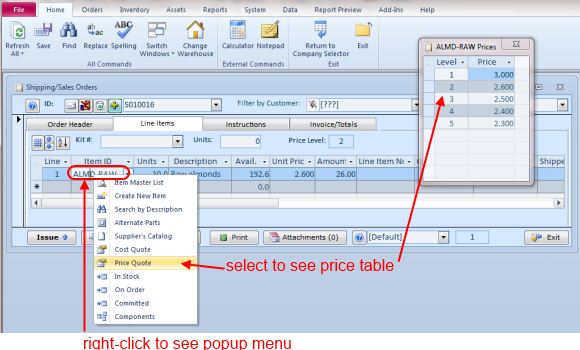 Populating the price table in-bulk made easy. Go to the Data menu tab and select Item Price Markup. The screen calculations are adding a specified percentage to the Item Master, Unit Cost. If you want to work with a certain category of items, select one at the top. Otherwise, leave the Category alone. Specify Item master, Unit Price percentage. This should be the highest. If you want to avoid changing markup for the low cost items, input a value in the "No Change to Price.." field. For instance, if you have to set: 200 percent markup for the items with cost under $1, 100 percent markup for items with cost under $10, and 50 percent markup for all other items, start with 0 in the field. Specify 200 markups for level one and lower percentage for higher levels, use either of the Update buttons. Now start with items with costs between $1.01 and $10.00 Input 1 in the no change.. field, specify new percentages (100 - level 1), use either of the Update buttons. Finally, input 10 in the No change.. field, specify percentages for items of ten dollars and up (50 - level 1), update the prices. 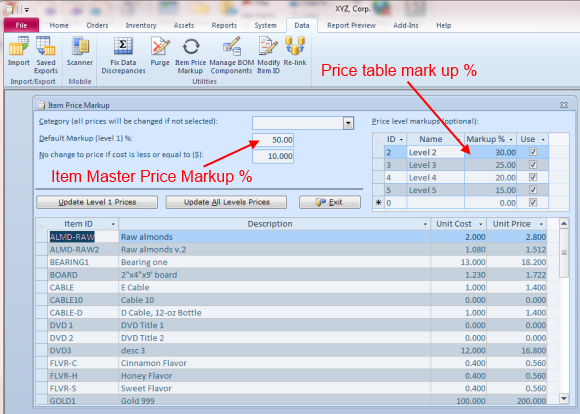 More tips: Configuring Datasheets, Changing Skin Color, Currency Rates Lookup, External Links, Serial Number Tracking, Bulk-Moving Inventory, Multi-Level Price Table, Line Items Columns, Selling Poultry, Supplier Catalog, Finding Items in the Lists, Warehouse Stock Transfers, Returning Shipped or Consumed Inventory. |

|
| Buy Now
| Help
| Software License
| Privacy Policy
| Free Software
|
| Inventory Software Module | Why Almyta Inventory Software? | Inventory Software Lessons: | 0 | 1 | 2 | 3 | 4 | 5 | 6 | |
© almyta systems 2003 - 2025