Creating the demo company
Welcome to the Almyta Control System! This tutorial will show you the
basics of using Almyta Control System for running a small business. As our
example, let us pretend that we are setting up the database for a small
coffee wholesaler.
This is the situation of Tutorial Coffee Co., our small coffee wholesaler:
It has one warehouse with one bin location, and stores there two different
brands of coffee--Folgers and Yuban Colombian--in bags. It purchases this
coffee from the Acme Supply Company for six dollars a pound and sells it to
the Coffee Retail Company for eight dollars a pound. Purchasing is done
through purchase orders, shipping through shipping orders. The inventory
currently in stock comprises three twenty-pound bags of Folgers and three
fifteen-pound bags of Yuban Colombian.
Let us input this data into the Almyta Control System. As before, we will be
using dark blue color for instructions and gray color for commentary.
Starting out
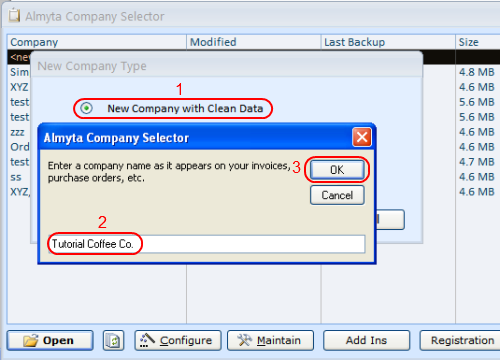
Go ahead and open up the Almyta Control System by clicking Almyta Control System icon on the Desktop. The Almyta Control System Company Selector will appear. Double-click on the "new company", select the New Company with Clean Data, click the OK button, input "Tutorial Coffee Co." as the company name, and press the Enter key. (Here and elsewhere, enter data without the quotes used in this guide.) When the next screen pops up, click Yes to open the new database.
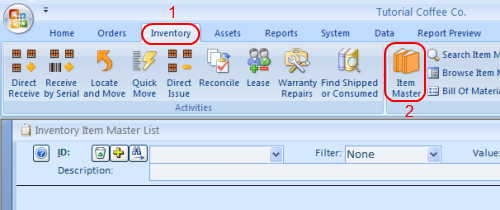
Select Inventory from menu tab. Click on the Inventory Master button. The blank Inventory Item Master List screen appears.
Almyta Control System sports a large number of functions, buttons, menus,
and screens. However, nearly everything you are going to find yourself
using often can be accessed through just one screen--the Item Master List.
We will use this keystone screen to populate the Master List with inventory
items, to enter database-wide information that will let us work with these
items, and to direct receive and direct issue items.
First, let us create our two inventory items--the two different brands of
coffee. We will create just one item, and then copy it over with some
appropriate modifications.
Populating the Item Master List
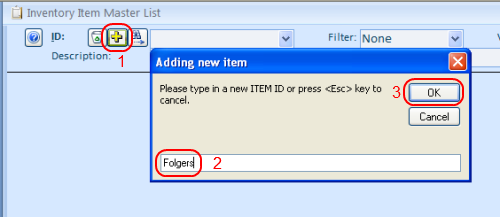
Click the yellow plus sign near the top of the Item Master List. The Adding New Item popup appears. Type in "Folgers" and click OK or hit Enter, which is faster. (Note: you should generally use short Item Ids--and if you wish to provide more detail, use the Description field.)
Next task is to populate the Item fields that describe a new inventory item.
Populating Item Master screen fields
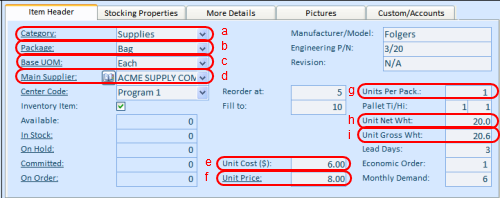
- a) Pick "Supplies" into the Category field from the drop-down list.
- b) Pick "Bag" into the Package field from the drop-down list.
- c) Pick "Each" into the Base UOM field from the drop-down list.
- d) Choose "Acme Supply Company" in the Main Supplier field. You will need to add this supplier first. Double-click the field, click Add New (Plus) button on the next screen, input Acme for the ID, and Acme Supply Company for name, close the Supplier screen, press F5 to refresh the Supplier list.
- e) Enter 6 in Unit Cost ($) field.
- f) Enter 8 in Unit Price field.
- g) Type "1" into the Units Per Pack field.
- h) Type "20" into the Unit Net Wht field--meaning that a bag of Folgers coffee weighs 20 pounds.
- i) Type "20.6" into the Units Gross Wht field.
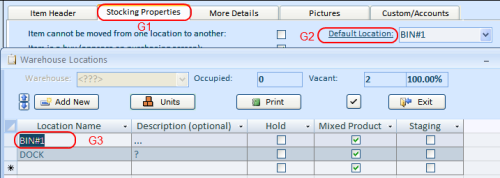
- j) Click on the Stocking Properties tab that you can see right above the Category field and spot the Location field, the one that currently says DOCK. Double-click the Default Location list, add "Bin#1" as a new location, close the Warehouse Locations screen, and pick "BIN#1" from the Default Location list.
- k) Also, just beneath the Default Location, tick on the Use check box for the Serial/Lot number.
Copying existing items to create new ones
We are going to create two items. We will add the Yuban Colombian item.
You will notice that there is a field, near the bottom of the screen, which says "select operation". Open it, select "Copy this record into a new one", and then click the Yes button.
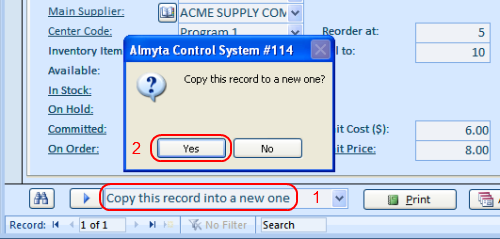
Type in "Yuban" and press the Enter key. We have created new inventory item identical to the first one.
We now have two items, which are identical in everything but their ID. We want to differentiate the Yuban item from the Folgers. For instance,-Yuban comes in fifteen-pound bags as opposed to the twenty-pound Folgers bags.
To this end, make sure that Yuban is still selected the ID field, go to the right of the screen and change the Unit Net Wht field to "15". Change the Units Gross Wht field to "15.5". Also, change the item description.
We have now created both items that we set out to, and we are done creating inventory items for the Tutorial Coffee Co. Two brand items are in existence, as you may verify by opening the Item ID dropdown list in the upper left hand corner of the Item Master List screen, or by going through the top-of-program menus to Inventory/Browse Item Master.
To get inventory into stock we must perform an Inventory Positive Adjustment. Let us take three packages of each item--that is, three bags of each brand--into stock, by receiving 60 lbs of Folgers and 45 of Yuban.
Direct Receiving
Go to the Inventory/Direct Receive screen, select Folgers item from the Item ID list, and tab to the Units field. Type in "3" in the Units field. Tab to the next field. A message screen pops up asking you to split one lot of 3 units into three. Press the Enter key to split. Now you see three rows instead of one. Select Yuban for the next Item ID and repeat the procedure. Select the Adjustment code and click the Receive button.
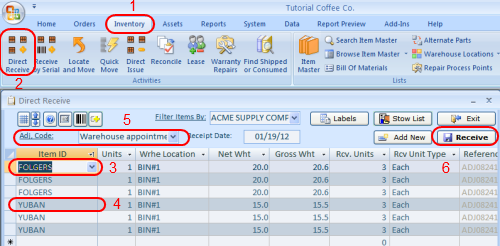
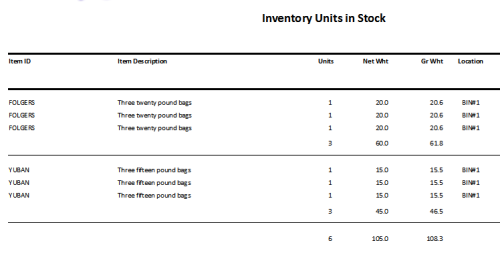
Sixty pounds or three bags of Folgers and forty five pounds or three bags of Yuban are now in stock.
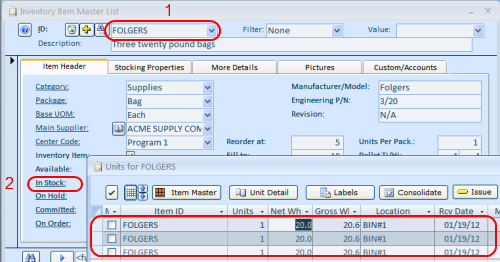
Let us verify it, go to the Inventory menu tab, Item Master, and pick Folgers in the ID list. The In Stock should show 3 units now. Double-click the In Stock field or the label. A screen with three bags in stock will appear.
Reports
To see what is currently in stock, we can also use a report. Go to Reports tab, Inventory and Assets group and select Units in Stock report. The All Reports screen appears with all its options. Use checkboxes to the left of each row to hide unwanted columns.
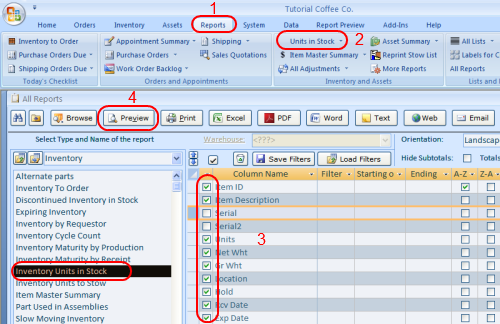
Click the Preview button to see the report.
The counterpart of receiving is issuing--and issuing in the context of Almyta Control System means to take items out of active inventory. Say the 2012 Cycle Count has revealed that one of the Folgers bags is missing. We must take it out of the active inventory-we must issue it. This process corresponds in every respect to the Receiving process we just went through.
Direct Negative Adjustments
To Issue the 20 pounds that correspond to one missing Folgers bag out of inventory, Go to the Inventory/Direct Issue screen, select Folgers item from the Item ID list, and tab to the Units field. Type in "1" in the Units field and press the Enter key. Select location and type in remarks. Select adjustment code and click the Issue button.
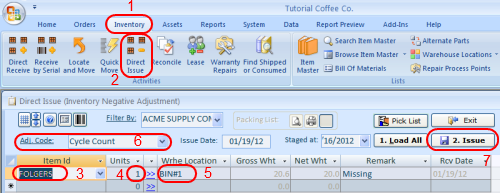
Twenty pounds of Folgers have been removed from inventory stock.
Using Purchase Orders
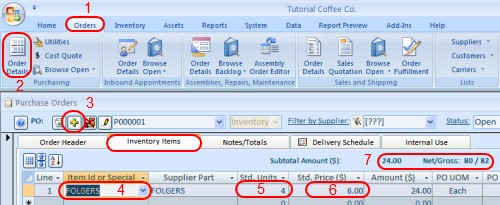
To create purchase order, go to the Orders
tab, Purchasing Group, and click the Order Details button. Click the Plus
sign button, create new purchase order, and then pick a supplier. Click on
the Inventory Items tab and pick Item ID. Type in number of units and change
the unit price or the amount if necessary. System will calculate total cost
and weight for you.
Click on the Notes/Totals tab and fill out any additional charges and/or
discount, then close the Purchase Order screen.
To receive purchase order in the inventory when stock arrives, go to the Orders menu tab, Purchasing, Order Details. Find the outstanding order and click the Receive button at the screen bottom, left. On the receiving screen, make changes to the quantities, if any, specify stocking location, and click the Receive button to finalize transaction.
The counterpart of a purchase order is a shipping order. Say we are to ship 15 pounds of Yuban over to the Coffee Retail Co. It is done like so:
Shipping Orders
To create shipping order, go to the Orders
tab, Sales and Shipping Group and click the Order Details button. Click the
Plus sign button (Create New Shipping Order), Type in the Order Header
information. Click on the Inventory Items tab and pick Item ID. Type in
number of units and adjust unit price if necessary. System will calculate
total cost for you.
Click on the Invoice/Totals tab and fill out any additional charges and/or
discount, and then close the Shipping Order screen.
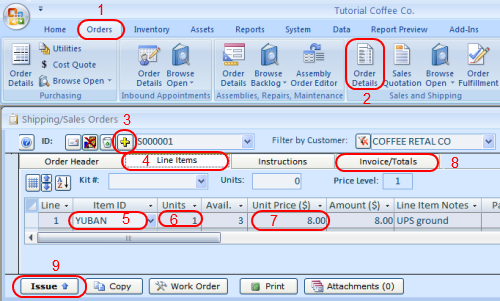
When order is ready to be shipped, click the Issue button to adjust inventory and pick item location.
Moving Inventory
To move inventory items between locations (in our case from BIN#1 to BIN#2):
Go to Item Master list, pick your Item ID and double-click the In Stock link. Pick your item and click the Move button or just double-click the Location cell. Pick a new location from the drop down list and click the Move button.
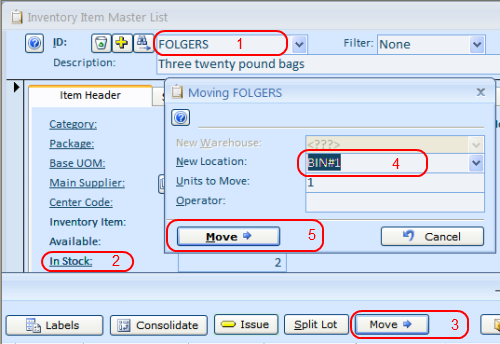
The units are moved to Bin #2.
This concludes the Getting Started with
the Almyta Control System tutorial. Please remember that you can always
have recourse to the Almyta users' manual, as well as the Almyta help
system, for more in-depth information if you need it.