|

|
|
Lesson 2 - Populating Lists and Setting up the Defaults
1. The fastest and easiest way to set up a new company is to use the
Initialize Data screen. This screen pops up automatically when you first
start a new company. You can always access this screen from the System menu.
And when you don't need it anymore, turn off the Show This Screen on Startup
checkbox located at the left bottom of the screen. There is a tree of major
system lists on the left portion on the screen.
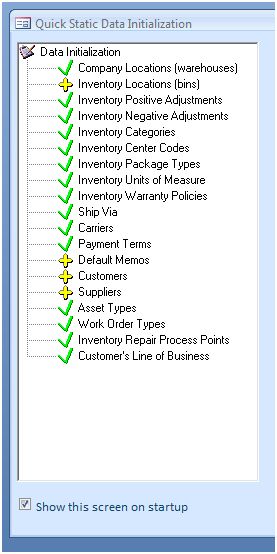 The lists with at least one entry are tagged with a green checkmark icon. The lists with no entries are tagged with a yellow plus sign icon. Click on the icon and add at least one entry to a list. 2. There are two types of lists: detailed and simple. The detailed lists display a single record per screen. The simple lists display multiple records in a spreadsheet-like format. The detailed lists have many more fields than the simple ones. There are four detailed lists: Suppliers, Customers, Carriers, and Company Locations. All other lists are considered simple ones. 3. The lists can be also separated into two other groups: dynamic and static. The dynamic lists change on a daily basis. The static lists change on a rare occasion or don't change at all. There are only three dynamic lists: Suppliers, Customers, and Carriers. The rest of the lists are pretty much static. 4. When initializing a new company try to populate static lists first. Start with your company locations. The company record is important. Without this record ACS cannot function properly. You have to enter at least one company location. If your company has only one location, make sure all four checkboxes are turned on. In other words, your company location should be the Bill to Address, Ship to Address, This Location, and Warehouse. 5. There are about thirty static lists in ACS. Chances are you will never use all of them. Besides the Company Locations, there are only six lists which you certainly want to populate. The reason for this is simple. These lists are widely used throughout the system. Even if you are not going to use some of them, add at least one entry into each such list anyway. The list names and sample entries are as follows:
6. All ACS transactions and most detailed lists reference list entries in them. To speed up data entry you need to setup the defaults for these references. After you have populated the six lists mentioned above, select Options from the System menu tab. When on the Options screen, click on the Defaults tab and select a default for each list. Do not close the Options screen yet. 7. ACS, in part, is an order entry system. Each ACS order has a unique reference number which separates it from other orders. Each purchase order, shipping order, work order must be numbered in a unique way for future reference. With ACS you can follow your traditional company order numbering conventions. But if you are starting a new business, you can use ACS default order numbering. If you are still on the Options screen switch back to the Numbers tab. Otherwise, just reopen the Options screen. There are nine rows of fields, which we call auto-numbers. All auto-numbers work the same way. Therefore we will explain the idea behind them using Shipping Order Numbers as example. Each auto-number consists of two fields: style and next number. a) The next number is pretty much what it says. It is the number to be used for the next shipping order. There is one exception though. If the next number is set to -1, ACS will not allocate the order number automatically but will rather prompt you to manually input one. This is used when you have another computer system which allocates the numbers and you are forced to use them in ACS. A sample of such configuration could be a corporate headquarters order entry mainframe. So if you want ACS to ask you for the next order number, set the Next Number to -1. Otherwise, input a positive number to start order numbering with.After you finished changing the auto number, click the OK button to save and close the Options screen. 8. If you have customer and supplier information saved somewhere else you can just import it into ACS. ACS understands any comma-delimited file format, which is common to all spreadsheet programs. In Microsoft Excel use the File/Save As menu and select CSV in the Save as Type field. In the ACS, go to the Data menu tab, Import, select Customers or Suppliers in the Import Database field, load the file, designate each column, and click the Import button. After a file is loaded you can see all its data on screen. This data is saved in a temporary place. You can modify, delete, or add records at any time before you click the Import button. After the Import the actual data transfer occurs. In case there are any problems, a descriptive message is displayed and the system scrolls to the offending record. You can fix the problem by modifying data in the record or by just deleting it and adding it later manually. 9. If you don't have customer and/or supplier lists saved somewhere, add a few most referenced records to each database manually. You can always add more records at a later time. Both screens can be accessed from the Initialize Data screen or directly. To access these screens directly, go to the Purchasing menu for Suppliers and to the Shipping menu for Customers. Close the Initialize Data screen if you have not yet done so. Your Almyta Control System is ready to be used. Last updated on December 27, 2012
|

|
| Buy Now
| Help
| Software License
| Privacy Policy
| Free Software
|
| Inventory Software Module | Why Almyta Inventory Software? | Inventory Software Lessons: | 0 | 1 | 2 | 3 | 4 | 5 | 6 | |
© almyta systems 2003 - 2024