Almyta Control System Intermediate Reference
Contents
Almyta
Control System Intermediate Reference.
Dealing
with Purchasing Units of Measure
Receiving
against Purchase Orders
Adjust
Received Purchase Orders
Managing
Warehouse Appointments
Receiving
against Warehouse Appointments
Creating
Blanket Purchase Orders
Configuring
the Purchasing Module
Creating
Maintenance and Repair Work Orders
Ordering
Parts to Satisfy Work Orders
Just
in Time Components Ordering
Buying/Selling
Goods in a Foreign Currency
Maintaining
Item Cost in the Supplier’s Currency.
Maintaining
Costs in the Supplier Catalog.
Stock Replenishment
Inventory to Order report. To quickly find out what to order, go to the Reports menu tab, Today’s Check List group, Inventory to Order. Specify the filters if you need them (we selected Category=Roasted Nuts), click the Preview or Print button.
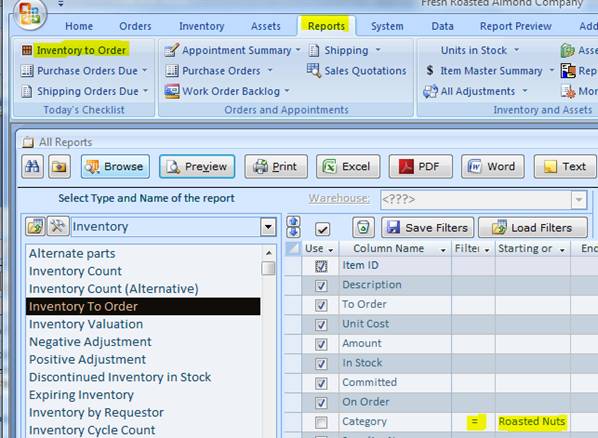
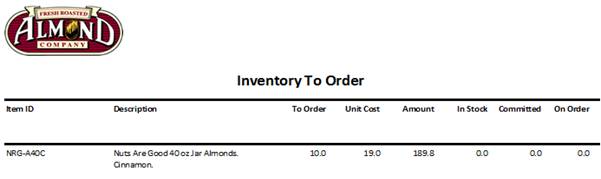
A sample report is shown below. For larger databases, it can take some time to run this report and appear that Almyta is not responding. You can continue your work in other applications until the work is done. For a thousand or more parts, leave it working for lunch.
Ordering inventory with no Supplier Catalog.
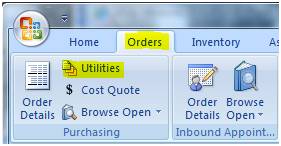
Go to the Orders menu tab, Purchasing group, Utilities.
The Purchasing Utilities screen opens. Select tab 7, uncheck Use Supplier Price Catalog, and click the View Suggested Purchase Orders button.
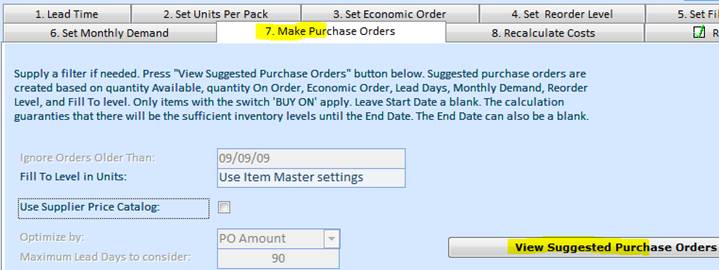
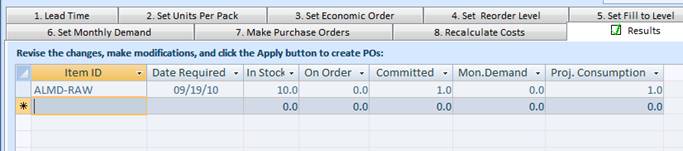
After the utility is finished running, the screen moves to the Results tab. Here, you can find a list of items to order with number of units, amount, required by date, units in stock, monthly demand, projected consumption.
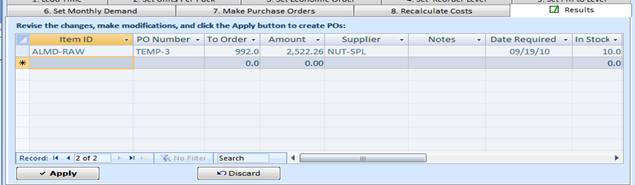
Move horizontal scrollbar to the right to view more fields: current on order, committed, monthly demand, and projected consumption. The Projected consumption is calculated based on the date range selected at the top of the screen. It depends on how far the date range spreads to the future and average monthly consumption.
On the Results tab, you can make record modifications, additions, and deletions. At the end, you have a choice of creating purchase orders (the Apply button) or discarding the whole thing.
Ordering
inventory with no Supplier Catalog.
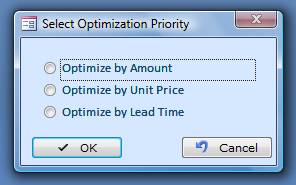
On the Purchasing Utilities screen, select tab 7, turn on Use Supplier Catalog, select Optimization type, and maximum lead days to ignore in catalog.

Click View Suggested Purchase Orders button. After the calculations are fished, the Suggested Purchase Orders screen pops up. There is a single row for each item which needs to be ordered. The columns from left to right read: item ID, units to order, base (stocking) UOM (Item Master), Supplier 1, Price 1, Units 1, Buying UOM 1, Lead Days 1, Use 1. There are two more suppliers in the row, sorted in the order of the selected optimization type: Unit Price, Lead Time, and PO Amount. Specify a date in the Requested by field. In the Deliver by field, screen shows the closest possible delivery date. If it is in red, the delivery will be late compare to the requested date. Flip on and off the Use # switches to find more appropriate delivery date and total amount. Click Make POs when finished.

Dealing with Purchasing Units of Measure
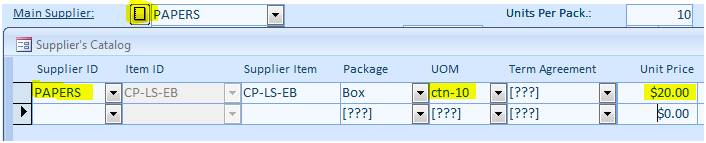
In the Stock Replenishment chapter, we have ordered 1000 reams of copy paper from our supplier PAPER. The order was issued in Reams because the Ream is our stocking unit or the base unit. In Almyta, the base unit is the smallest unit of consumption or issue. However, most likely we buy copy paper in cartons, and therefore our purchase order should calls for paper in cartons. Let us create a new unit carton of 10. Click on the Base UOM hyperlink. On Units of Measure screen, create a new unit ctn-10, set the Contains to 10, and Base Units to each. Also we need to make sure that our Ream is set to 1 of Each. The Each in this case is a common denominator.
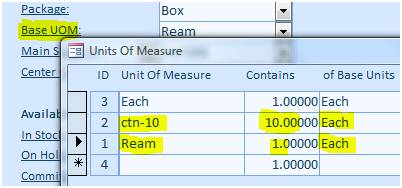
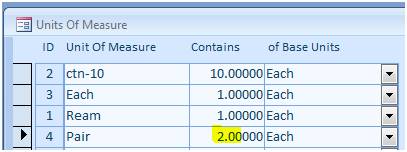
In the above, we could say that the Ctn-10 is equal to 10 Reams. However in this case, we would not be able to place any other unit of measure in the Ctn-10. Saying that ctn-10 is equal to 10 each allows us to place (convert) any other pieces related to each in Ctn-10. A sample of it would be a pair. If the pair is equal to 2 of each then we can place 5 pairs into our Ctn-10.
We need to set our unit of measures only once. Once it is set, we can specify buying units for the items. To do this, click on the Supplier Catalog button on the Item Master List screen. Select the supplier and specify Ctn-10 for UOM and price per carton (10 reams). From now on, our orders for this Item will be calling for the cartons but not the reams.
If this feature does not work, go to the System/Options
screen, Defaults tab, and make sure that the Supplier Catalog is used in the

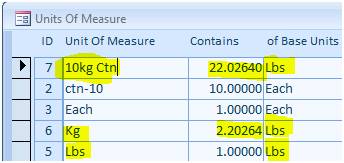
Another example of commonly used conversion is a carton to weight one. Let us create a few more units of measure:
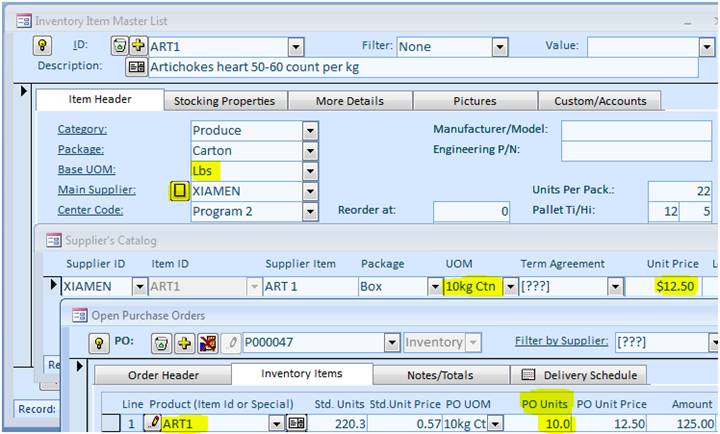
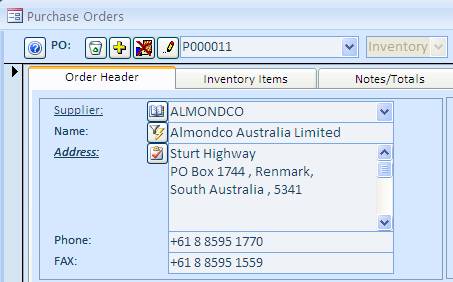
We have just created a carton with (average) weight of 10 kilograms. The below is a snapshot of three screens. First, we have created the item master record for the ART1 (Artichokes heart 50-60 count per kg). We have chosen pounds for the Base UOM because this is the unit of our consumption. Second, we have added the supplier catalog record stating then we will buy the artichokes in 10 kilograms cartons. And finally, we created a purchase order for the artichokes. On the purchase order screen, we have inputted only two fields: Item ID (ART1) and then PO Units (10 cartons). All other fields for this line item have been populated automatically by the software for us.
Managing Purchase Orders
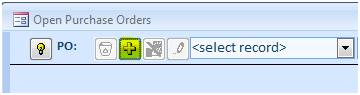
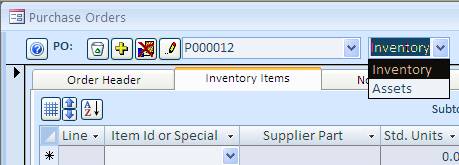
Creating a purchase order. To create a purchase order, go to the Orders menu tab, Purchasing group, Order Details.
On the next screen, click the Yellow Plus button.
Answer affirmative on the popup box or input the order number and press Enter key. The new order number and style or the user prompt appearances are controlled by the configuration. Change it in the System/Options screen, tab 1, fields (1 and 10) if needed. After a new order has been created, select the supplier.
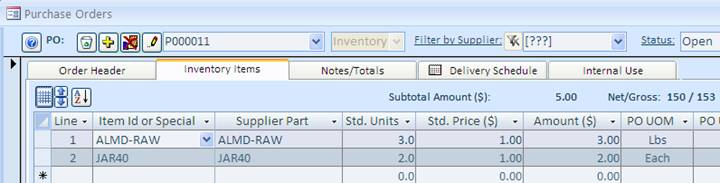
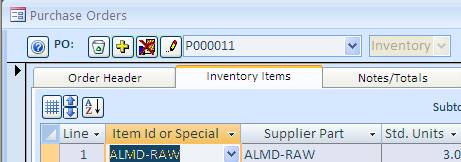
Fill out any other necessary fields and switch to the Inventory tab. Add line items to the order. For each line item, start with selecting the Item Id and then specify the Standard Units and Unit Price.
Changing
purchase order number. Purchase
order numbers can be changed before any line items have been added. If an order
contains some line items, delete them, change the order number, and then add
the line items again. To change the number, click the Pencil button to the left
of the
Change purchase order type. While there are no line items added to a new purchase order, a purchase order type can be changed by selecting it from the Type list. By default, the purchase orders are created as the inventory type.
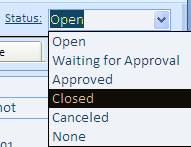
To reopen closed purchase order, select Closed in the Status field (top, right).
Find an order number, and click the Reopen button at the bottom of the screen.
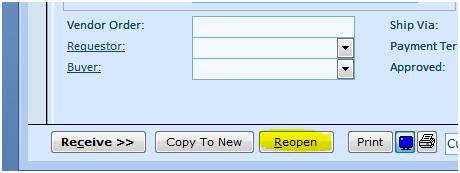
Click the Yes button to reopen order.
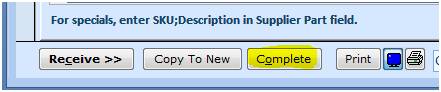
Close the purchase order by clicking the Complete button (bottom, center).
If your supplier gave you a tracking number, input it into the Waybill field. To track your shipment, double-click the tracking number. The Ship by must be populated with a supported carrier. At this moment, supported carriers are UPS, USPS, FedEx, and DHL.
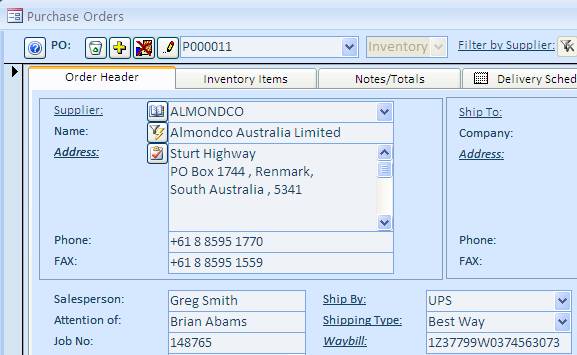
Here is a sample resulting screen.

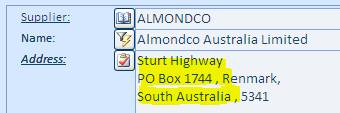
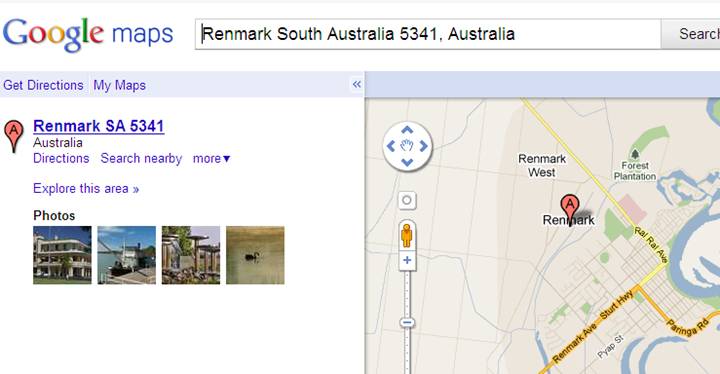
To locate supplier on the map, double-click the Address field.
The resulting screen will look like this.
The same tracking options are available on the Sales/Shipping Orders screen.
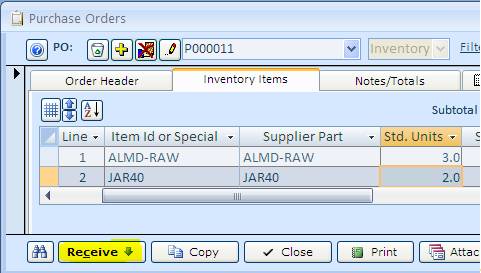
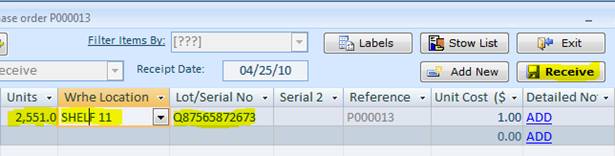
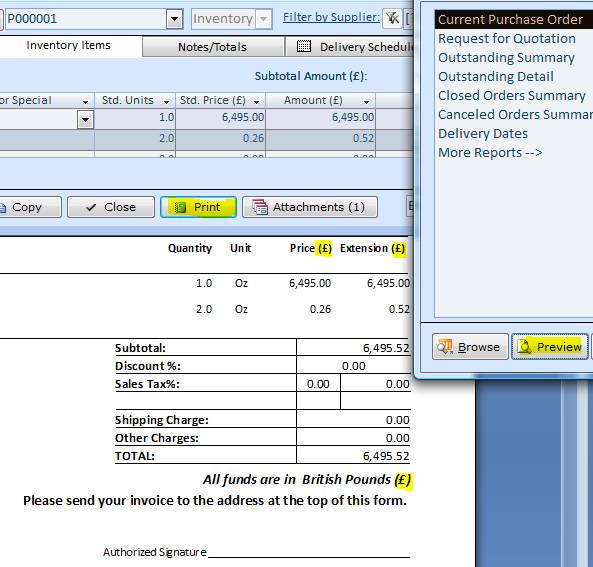
Receiving against Purchase Orders
To receive your order in the system, go to the Orders menu tab, Purchasing group, Order Details.
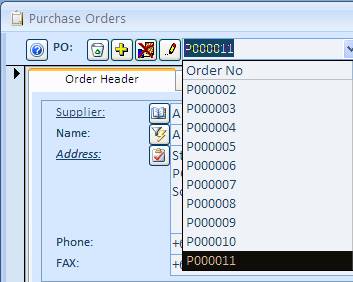
Find your order by typing it in or selecting from the drop down box.
Click the Receive button.
At this point, you can change quantities based on an actual shipment, input serial numbers if necessary, select warehouse locations, change the receiving date if needed.
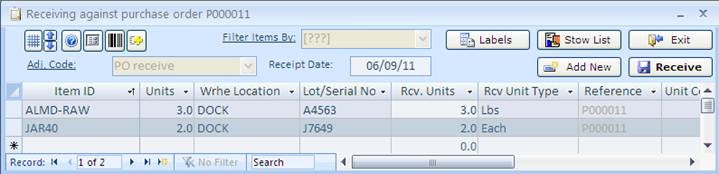
There are more columns available on this screen. To show
them use ![]() button.
button.
On this screen, you can also print inventory labels by using
![]() button, print or preview Stow List
button, print or preview Stow List ![]() , which
is a list or inventory being received with stocking bin location suggestions.
, which
is a list or inventory being received with stocking bin location suggestions.
Finally, when you are ready, use the
Receive ![]() button to save the receipt permanently in the database. Before that, the receipt is seeing only on your screen, which
is just a worksheet and nothing more.
button to save the receipt permanently in the database. Before that, the receipt is seeing only on your screen, which
is just a worksheet and nothing more.
You will be prompted to close the purchase order. Choose the Yes option to close and archive the order, if there no units due or the No option to keep it open until the next shipment arrives.
Adjust Received Purchase Orders
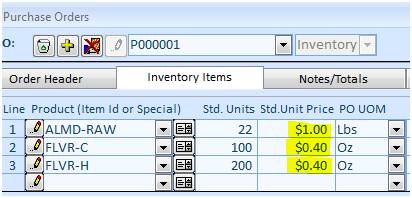
Almyta system allows user to correct the amount of units that has been received already.
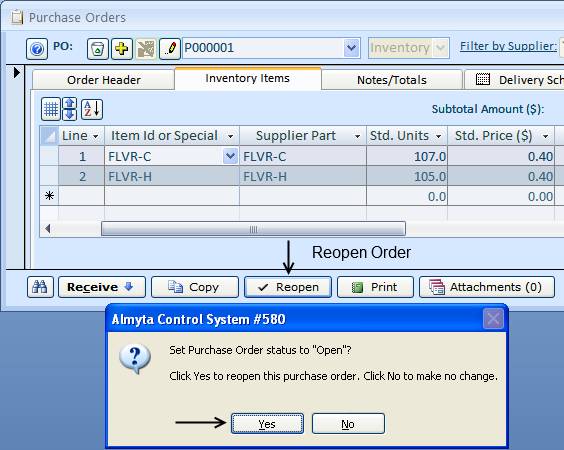
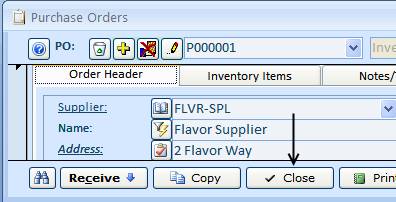
As an example we will correct the amount on received PO P000001. Originally order calls for 107 units of FLVR-C and 105 units of FLVR-H. Order was received in the system. It has “Closed” status now. The correct number of FLVR-C is 100 units and FLVR-H is 110 units.
Go to Orders tab/Purchasing group and click the Order Details button. Change status to “Closed” and find your order.
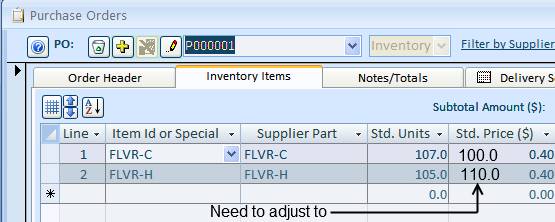
First we need to reactivate the order by clicking on the Reopen button and choosing the Yes option.
To correct the number of units, click correct

To correct the amount of unit type -7 into the Add Units field for FLVR-C and 5 into the Add Units field for FLVR-H. Click the Save button.

Verify transaction with the OK button.
System will recalculate the number of items in stock. Click the Close button to archive the order.
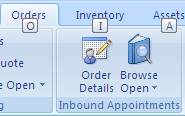
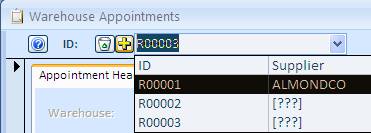
Managing Warehouse Appointments
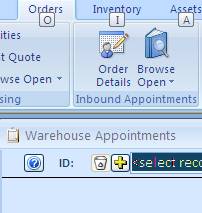
To create your scheduled shipment in the system, go to the Orders menu tab, Inbound Appointments group, Order Details.
On the next screen, click the Yellow plus ![]() button.
button.
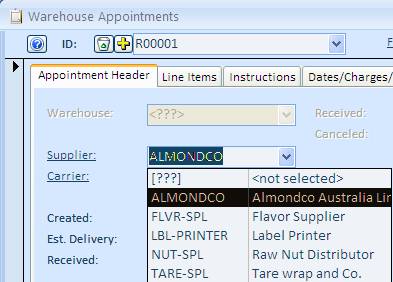
Answer affirmative on the popup box or input the order number and press Enter key. The new order number and style or the user prompt appearances are controlled by the configuration. Change it in the System/Options screen, tab 1, fields (1and 10) if needed. After a new order has been created, select the supplier. Fill out any other necessary fields.
Go to the Line Item tab. Add line items to the order. For each line item, start with selecting the Item Id and then specify the Standard Units and Unit Price, ext.
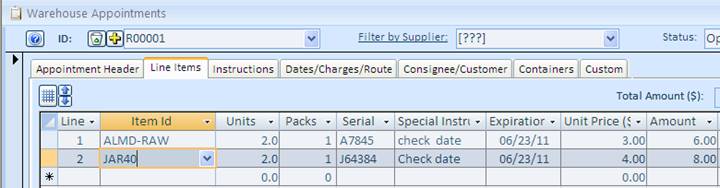
Warehouse Appointment order is created now.
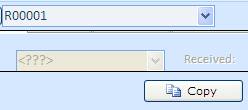
You can copy existing order using the Copy button. This is a very useful feature for brokerage (Door to Door operation).
With this function you can create New Appointment order or Shipping order.
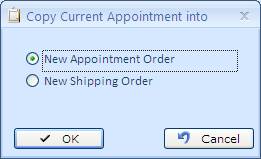
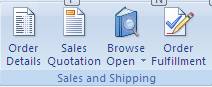
Note, that New Shipping order you will be able to see in the Orders menu tab, Sales and Shipping group, Order Details.
This order will have the same order number as the original appointment order (R00001 in this case).
Receiving against Warehouse Appointments
To receive your scheduled shipment in the system, go to the Orders menu tab, Inbound Appointments group, Order Details.
Find your order by typing it in or selecting from the drop down box.
Click the Receive button.
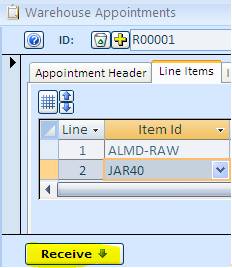
The Receiving screen will appear at this point, you can change quantities based on an actual shipment, input serial numbers if necessary, select warehouse locations, change the receiving date if needed.

There are more columns available on this screen. To show
them use ![]() button.
button.
On this screen, you can also print inventory labels by using
![]() button, print or preview Stow List
button, print or preview Stow List![]() , which
is a list or inventory being received with stocking bin location suggestions.
, which
is a list or inventory being received with stocking bin location suggestions.
Finally when you are ready, use the
Receive ![]() button to save the receipt permanently in the database. Before that, the receipt is seeing only on your screen, which
is just a worksheet and nothing more.
button to save the receipt permanently in the database. Before that, the receipt is seeing only on your screen, which
is just a worksheet and nothing more.
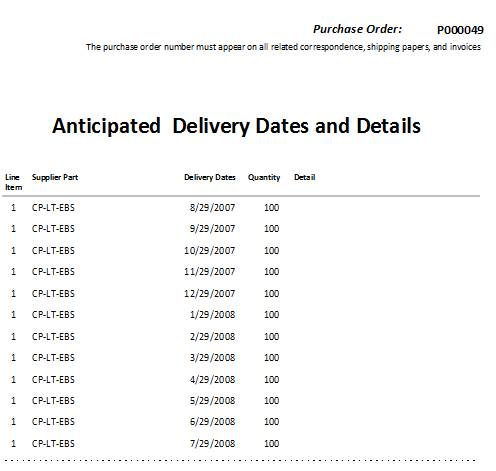
Creating Blanket Purchase Orders
A Blanket Purchase Order is a purchase order issued to a vendor for goods that are purchased on a regular basis. Almyta Control System allows you issuing blanket purchase orders with attached delivery schedule. In the following example, we create a purchase order for 1200 reams of copy paper. Our office consumes 100 reams of this paper per month. We create one blanket purchase order for the entire year and specify a delivery schedule for our vendor.
1. Create a new purchase order and switch to the Inventory Items tab. Select an item and specify a total number of units (1200).
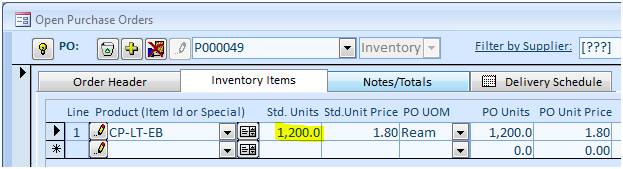
2. Switch to the Delivery Schedule tab and specify the desired delivery dates, units for each delivery, and comments if any.
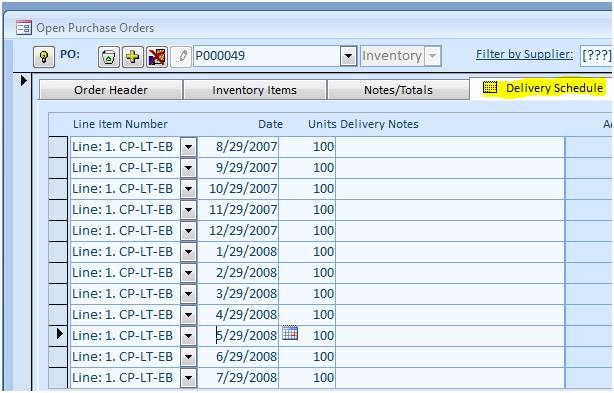
3. Our printed purchase order now will have one extra page. Page 1 (regular page)

Page2 (delivery page)
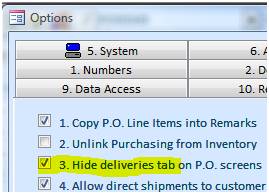
Of course, if there was no need to specify any particular schedule, we could just enter "deliver 10 boxes on first Monday of each month" in the Notes field.
If you never use the delivery schedule, you can hide the Delivery tab on the Purchase Order screen. To do so, go to the System/Options screen, tab 12, and turn on the field 3.
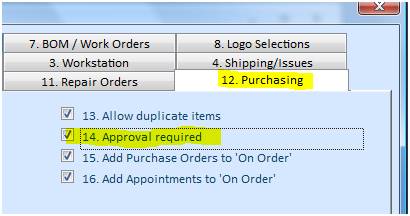
Configuring the Purchasing Module
1. Configure for purchase order approvals. In order for the approvals to work, the security must be activated. Without the activated security, purchase order approvals are not enforced. This feature is good for the informational purposes only. See Managing Security in this document, to find out how to activate the security. To start approvals working, go to the System/Options screen, tab 12, and turn on the field 14.
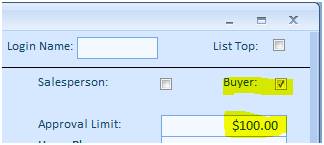
You also need to create buyers. Go to the System/Users screen (the Security group). For each buyer, turn on the Buyer checkbox and specify the Approval Limit.
Approving Purchase Orders
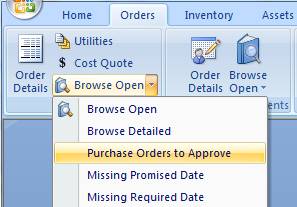
Go to the Orders menu tab, Purchasing group, Browse Open dropdown, and select Purchase Orders to Approve.
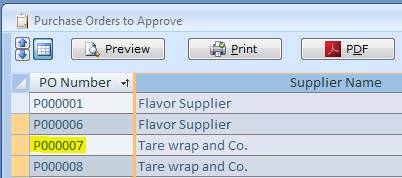
The Browse screen with all POs waiting for approval will open. Find an order that you need to approve and double-click it.
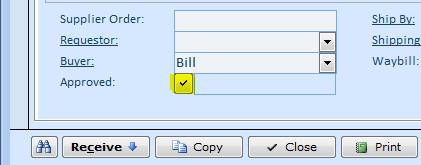
The Purchase Order Detail screen will open. Click the Check Mark button to approve the order.
Return back to the Browse screen and select another order. If you need the Browse screen to reflect your changes, press F5 or click the Refresh button.
Creating Maintenance and Repair Work Orders
To open Work Orders screen, go to the Orders/Assemblies, Repairs, Maintenance/Order Details menu.
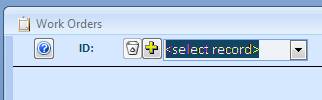
Click the Yellow Plus button to create a new order, or open the ID (“Select Record”) dropdown list and select an existing order.
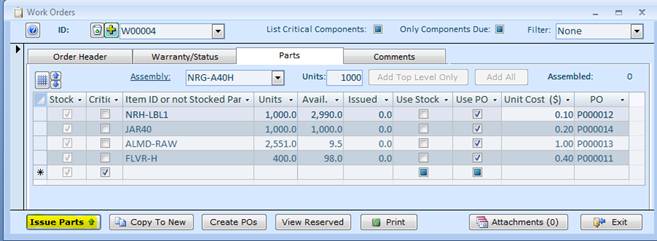
Once an order is created, populate the order header fields. If there are any spare parts or labor, switch to the Parts tab and add them in the line items. Work Orders accept three basic types of “parts” the line items: (1) regular inventory items, (2) non-inventory items (Labor/Services/fees), and (3) non-stocked items (parts not listed in the Item Master).

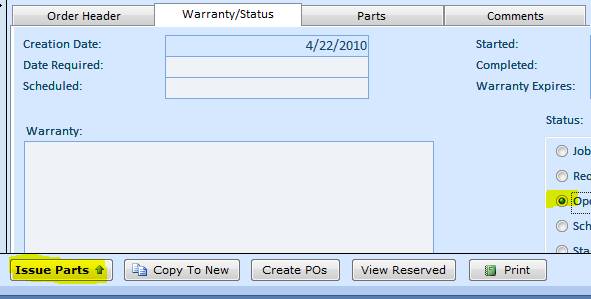
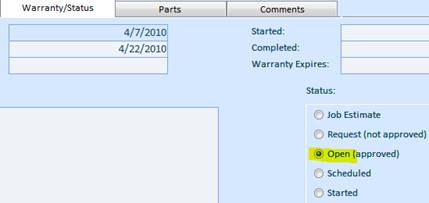
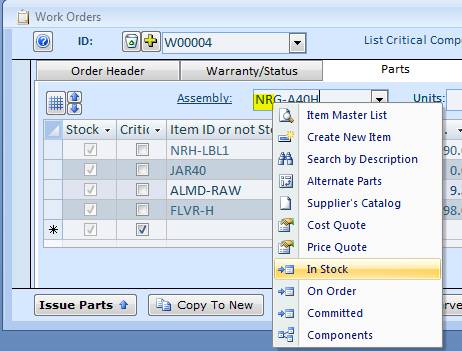
Before we can issue parts against work order, we need to approve it. Let us switch to the Warranty/Status tab and change the status to either Open, Scheduled, or Started. After work order is approved, the committed quantities for the inventory parts are increased and purchase orders can be automatically created to satisfy any shortages in parts. To see how it works, change work order status to the Open, switch to the Parts tab, and double-click the inventory part (FLVR-H). The Item Master screen will pop up.
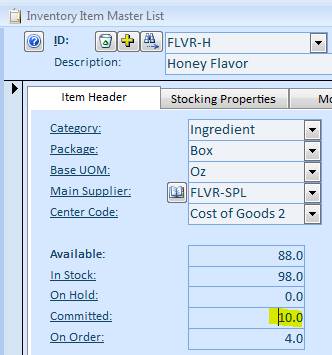
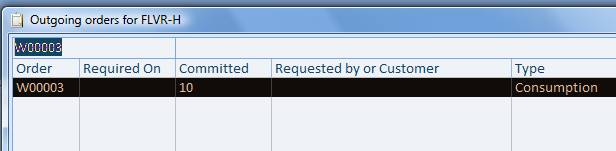
Double-click the Committed units (number 10) to see what orders these units are committed against. The screen with all related orders (work orders and sales/shipping orders) will pop up. If you want to jump an order detail from this screen, just double-click a corresponding row.
Creating Assembly Work Orders
There is a difference between maintenance or repair work orders and assembly ones. The first two only consume parts and the latter ones consume parts or raw materials and create finished goods or intermediate products. It is described in the first manual how to create bill of materials. Let us create an assembly work order. Select Order Details in the Orders menu tab, Assemblies, Repairs, Maintenance group. When Work Orders screen is loaded, click the Yellow Plus button and then switch to the Parts tab. On this tab, select an assembly Id, specify number of units to make and click either Add Top Level or Add All button.
If the
Assembly ID list is empty, create one sample BOM. Consult manual one to find
out how. After returning to the Work Orders screen, press F5
function list to refresh the Assembly ID field. There is no need to do
it if you restarted the Work Orders screen after you created a BOM.
This is what our
screen shows for assembly work order of 10000 units of product NGR-A40H.
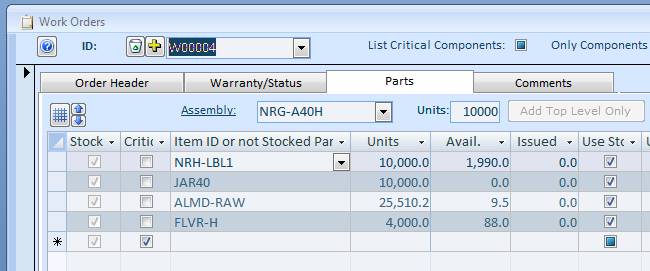
Issuing components will create 10,000 units of this product. To issue parts against any kind of work order, first approve it by changing status to either Open, Scheduled, or Started and then press the Issue Parts button.
Scheduling Jobs
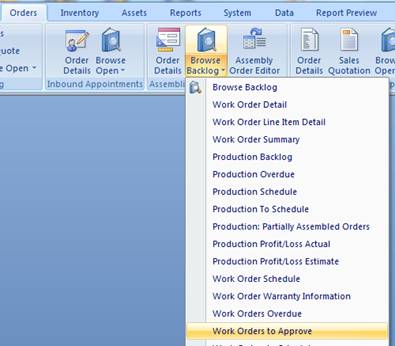
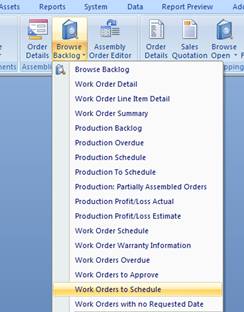
Before we can schedule job, we need to approve it. Go to the Orders menu tab and choose Work Orders to Approve under the Browse Back log menu.
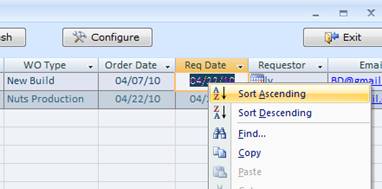
On the Browse Screen, right-click the Required Date and select Sort Ascending from the popup menu.
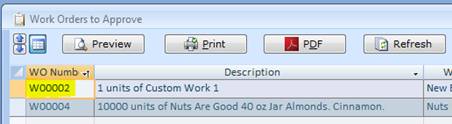
After the screen is sorted, double-click the work order number that needs to be approved today.
The Work Order detail screen will load. Switch to the Warranty/Status tab and change order status to “Open (Approved)”.
Close the Work Order detail screen and proceed (double-click WO Number) to the next order on the Browse screen. You can also press F5 or click the Refresh button on the Browse screen to filter out the approved orders.
Scheduling jobs is similar to the approval process. Select Work Orders to Schedule from the Browse Back Log menu.
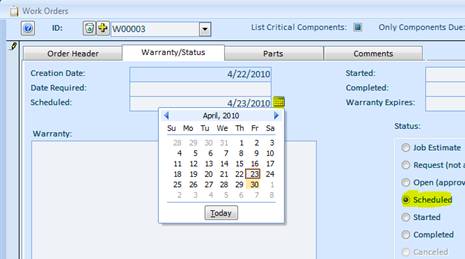
On the Browse screen, sort the orders and then double-click the order number to jump to the Work Order detail screen. Change status to the Scheduled. If the Scheduled Date field is empty, the today’s date will be inserted in there. Change this date by overwriting the value or by using the popup calendar.
Ordering Parts to Satisfy Work Orders
There are two ways to order parts (raw materials/components/ingredients/spares) needed for the work orders. First, we can use regular stock replenishment. This process will work only for approved, scheduled, and started orders. The second way is to order parts for a particular job. This will create purchase orders for a particular order and reserve the inventory when received against this order.
Create a work order, switch to the Parts tab, select an Assembly (NRG-A20H), input number of units to
assemble (1000), and finally click the Add Top Level Only or the Add All button
to populate the components. For each component that we need to create a
On the popup screen, choose optimization type (priority).
Make necessary adjustment on the Suggested Purchase Orders screen.
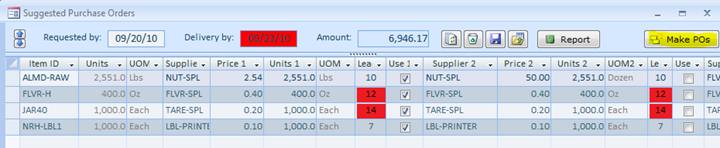
Click the Make POs button. The confirmation message will appear showing the created purchase order numbers.
Back on the Work Orders screen, each line item with a
purchase order will contain the associated PO number in the
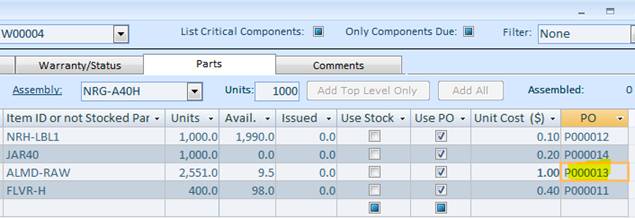
To quickly see an associated PO, double-click the
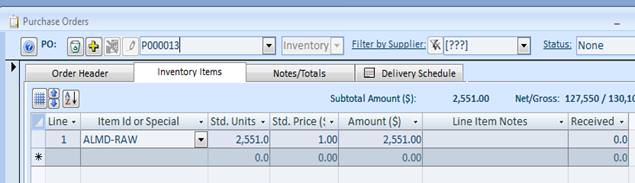
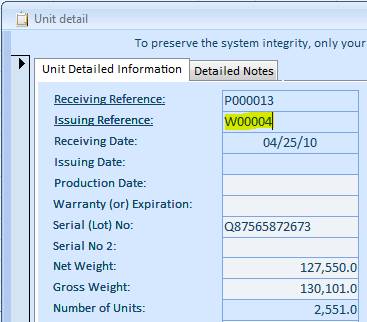
When product arrives, return to a corresponding purchase order and click the Receive button. On the Receiving Screen, verify quantity, warehouse location, input or scan serial number, if any, and click the Receive button to finalize the transaction.
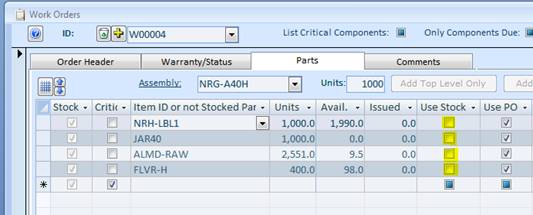
The received units are placed on hold and reserved against our work order (W00004). To move the reservation, click the Hold switch.

To find out what particular work order the inventory units reserved for, double-click serial number or click on any field in the row and then click the Units Detail button.
Assembling Finished Goods
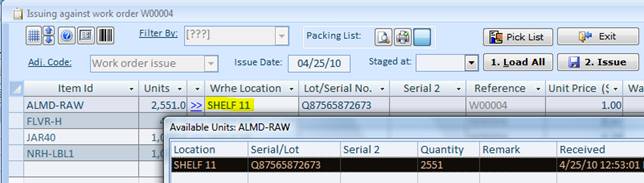
Open Work Order Detail screen and load a corresponding order. Make sure that the order has the approved status. Click the Issue Parts button.
On the Issue screen, for each line, double-click the warehouse location and then double-click appropriate inventory units or scan the serial number barcode. If there is no difference which units to pick, use the 1 Load All button first then double-click the Wrhe Location field to make any changes I f needed.
Finally, click the “2 Issue” button to write off the components and to receive the finished goods. After the Issue screen closes, we can verify that all finished units are registered. The fastest way would be to right-click the Assembly dropdown box and select In Stock from the popup menu.
Creating Work Orders for Subassemblies.
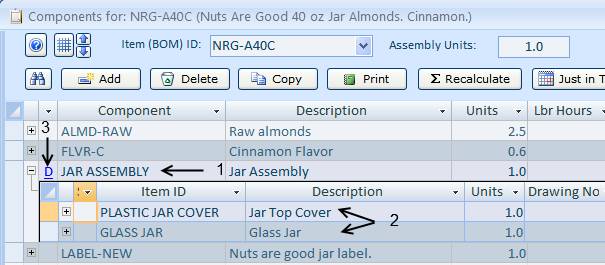
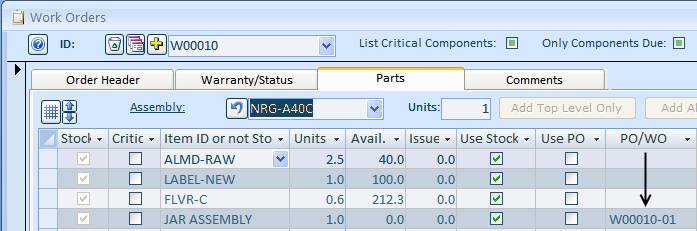
We will use an example to create this order. Assembly NRG-A40C has Jar Assembly (1). It consists of Plastic Jar Cover and Glass Jar (2). The existence of the subassembly is indicated by D letter in the second column of the component screen (3).
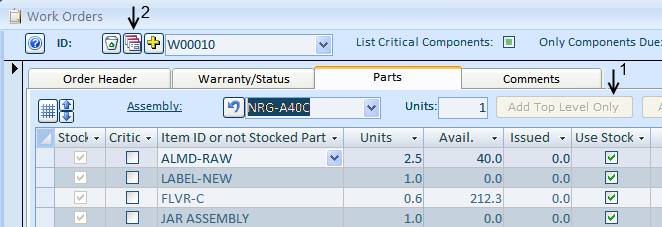
Go to the Orders tab/Assemblies, Repairs and Maintenance group and click the Order Details button. Create new order for NRG-A40C. Use “Add Top Level Only” button to add components (1). Click “Create Work Orders for Subassembly” button (2).
On the next screen type in the number of units in the “Make” field. Click the Create Orders button. Choose the Yes option on the pup up screen. Use the Recalculate button to undo the number of units.

System will create subassembly order (in this case W00010-01).
Just in Time Components Ordering
Did you know that there is a quick and easy way to order components Just in Time (JIT)?
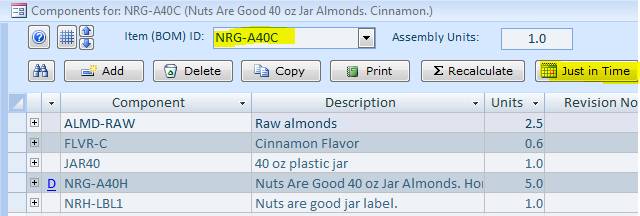
From the Inventory menu tab, open the Bill or Material screen.
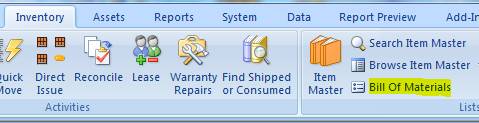
On the Bill of Materials screen, select an assembly and click the Just in Time (JIT) button.
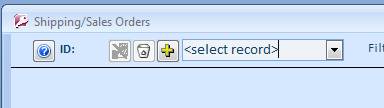
Shipping/Sales Orders
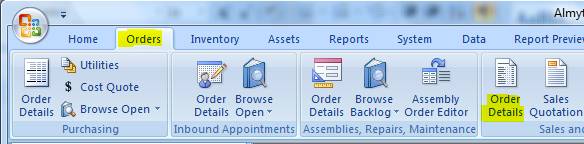
To open Shipping/Sales Orders screen and go to the Orders/Sales and Shipping/Order Detail menu.
Click the Yellow Plus button to create a new order, or open the ID (“Select Record”) dropdown list and select an existing order.
Once an order is created, populate the order header fields, select warehouse if any, and switch to the Line Items tab.
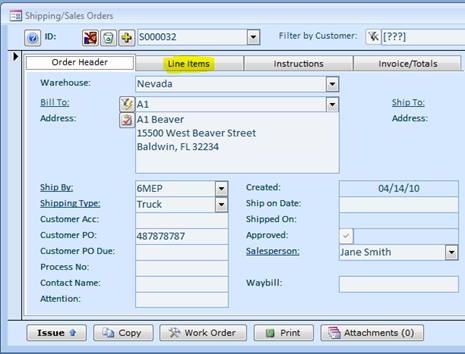
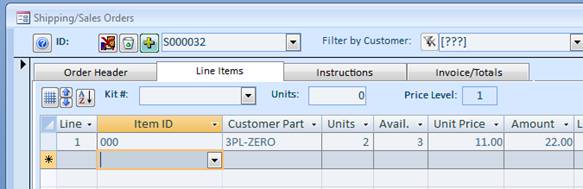
Start populating the order line items from left to right. Select an item in the Item ID column (000), input customer part number if any (3PL-ZERO), specify number of units. Change the Unit Price if different or accept the default (11.00). The default unit price comes from the Item Master List screen for the item or from the price table if it is used. The price levels are maintained on the Item Master List (double-click the Unit Price field) or by importing a price tables from spreadsheets (Data/Import menu, Price Tables import type). The Price Level itself is set on the Customers screen and on the Shipping/Sales screen is read-only. If price levels are not used, the default level is 1. There is no need to maintain the price tables in this case.
When it is time to ship inventory, return to this order, click the Print button, select Pick List for Current Order, click Print (Alt+P), or double-click the Pick List entry in the list to preview.
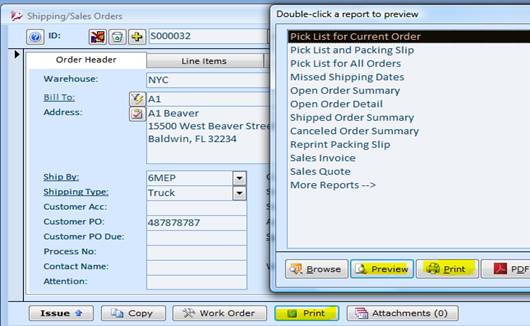
There is choice of four pick list forms in the System menu tab, Default Documents and Screens. A sample pick list should look like this.

After product is picked, tell software what exactly was picked. Click the Issue button on the Shipping/Sales Orders screen. Double-click the Wrhe Location button or click “>>” to the left of it.
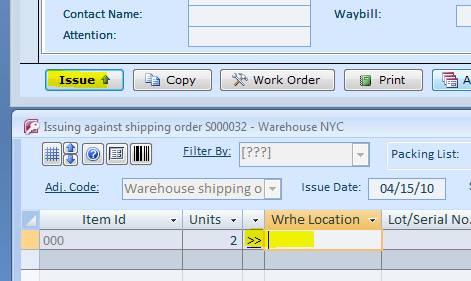
On the next screen, double-click the picked units or start typing serial number (67), or scan serial number barcode when available.
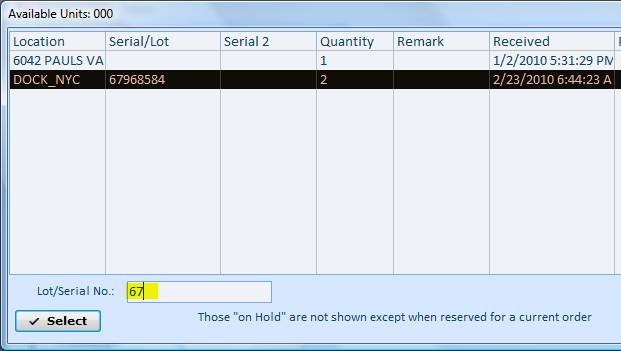
After all units are picked, click the Issue button.
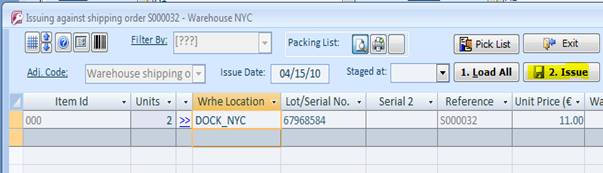
The Packing Slip will be printed for you.
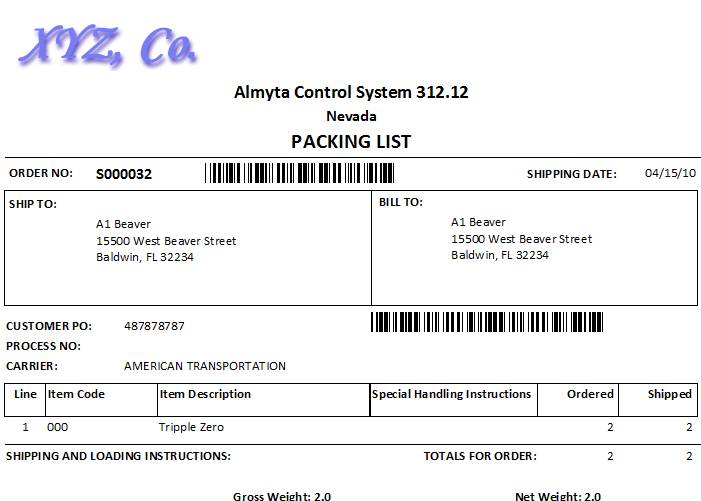
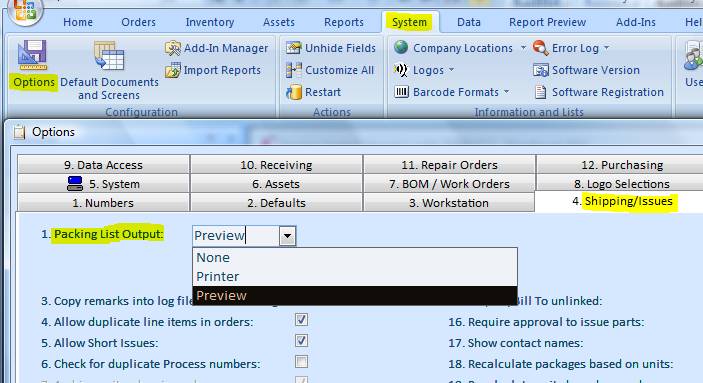
Please note that a default output device for the packing list is set on the Issue screen.

There are three types of output devices available: Screen Preview, Printer, and None. The default for the device is set in System/Options screen, Shipping tab, Packing List Output filed.
Did you know that double-clicking the address field,
opens the map?
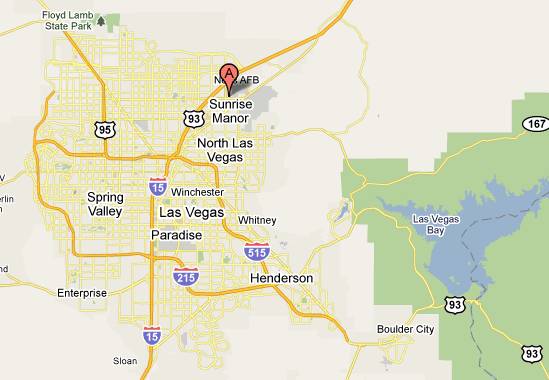
The fields with a reference to the Internet are labeled with the underlined Italic font. All Address fields can be double-clicked for looking up the maps.
Adjust Shipped Sales Orders
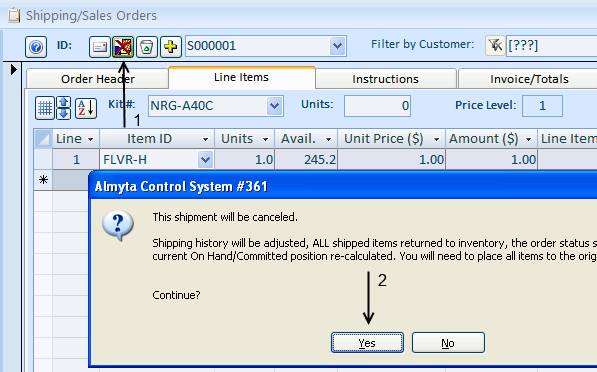
To return Shipped order to the inventory, go to the Orders tab/Sales, Shipping group and click the Order Details button. Change status filter to the Shipped and find your order.
Click the Cancel Shipment button (Crossed Hand, top, left) (1) and verify cancelation by clicking the Yes option (2).
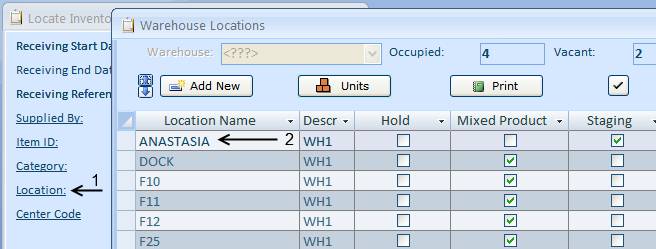
System will roll back the order and put all shipped units in the location associated with the user login name. In this case, it was Anastasia.
To restock the units, double-click on the location field (1), pick new location (2) and move item (3).

If you are rolling back the orders on a regular basis, you can add the user login name to the list of locations. To do so, go to Inventory tab/Activities group and click the Locate and Move button. Click on the Location link (1) and add new staging location (2).
You can find the rolled back order by switching to the Open status on the Shipping/Sales Orders screen. You can adjust Line Item information if you need to and ship it again with a proper amounts and serial numbers.
Buying/Selling Goods in a Foreign Currency
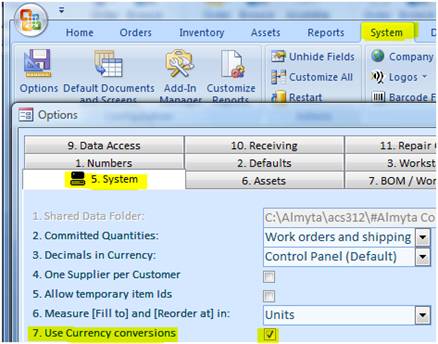
1) First, configure the software to allow foreign currency conversions. Go to the Systems menu tab, click Options on the left, switch to tab 5, and turn field 7 on. Click the Save & Close button to exit the screen.
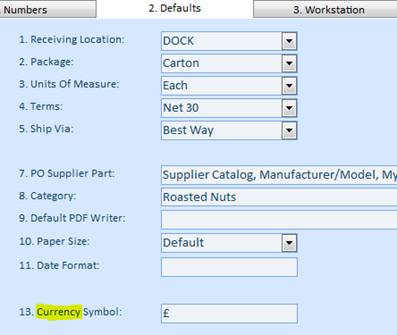
2) On the Default tab, input your currency symbol. If you do not do it, the symbol will be taken from the Windows Control Panel, Regional Settings.
3) Go to the System menu tab, and select Countries & Currencies under the Company Locations submenu.
a) Specify your currency code in the Sys Cur. Code field (USD).
b) For each country, turn the Use switch on or off.
c) Specify a currency code for each country that is used.
d) Add new countries at the bottom of the screen if needed.
e) Click the Update Rates button (Internet connection required).
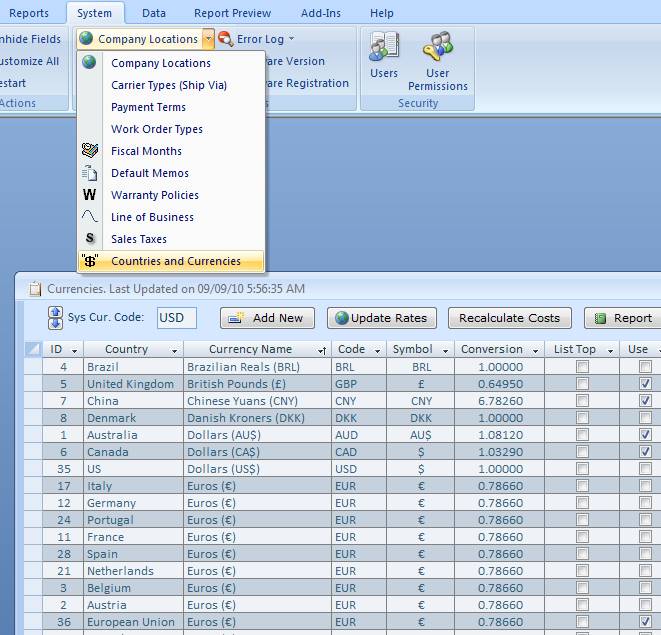
If you are using supplier’s currency cost (see Keeping Item Cost in Supplier’s Currency), click the Recalculate Costs button. For each item with the foreign currency cost, the default currency will be recalculated on the Item Master screen. BOM costs will be recalculated as well. Finally, close the Countries and Currencies screen.

The list of the selected currencies (countries) now is available on the Purchase Orders and Shipping Orders screens, a right bottom section.
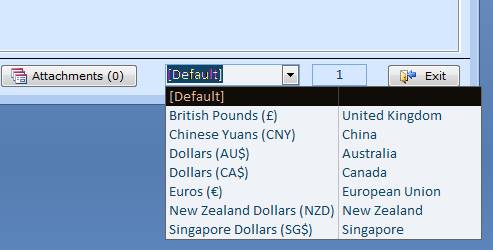
In this list, the default currency is always your computer’s local currency, the one specified on the Countries and Currencies screen and on the Options screen, Defaults tab. To make software automatically select an appropriate currency on the purchase order screen, select currency for each foreign supplier record (Orders menu tab, Suppliers screen, More tab, the Price Catalog Currency field).

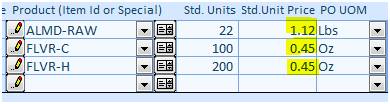
Changing currency on the Purchase Orders screen. Populate the Purchase Orders screen with line items. Select new currency at the screen bottom.
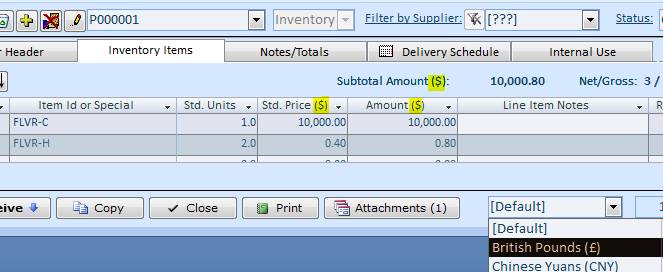
A popup with a currency conversion rate will appear. Confirm the rate and press the Enter key.
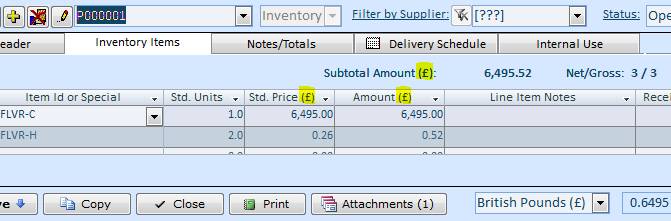
After the conversion, the purchase order printout shows all prices in foreign currency.
The default prices are copied from the Unit Cost field on the Item Master List. The prices are in your local currency. Modify prices if needed.
Select new currency on the bottom right of the screen, input current currency conversion rate.
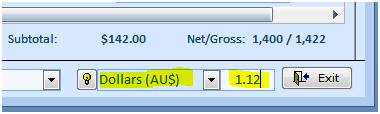
Press Enter. The screen recalculates all prices in the new currency.
Also on the Totals tab, you can still see the order total amount in your local currency.

For the shipping orders and corresponding invoices, follow the same procedures.
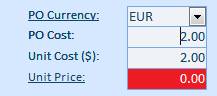
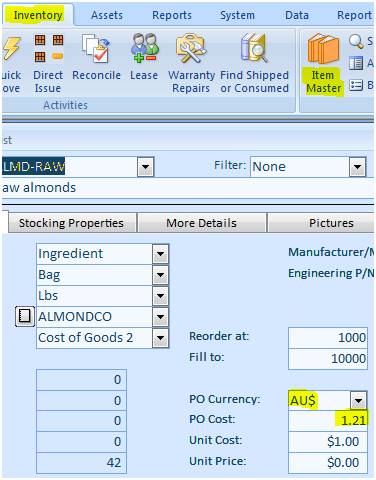
Maintaining Item Cost in the Supplier’s Currency.
When an item catalog price is listed in a foreign currency, it makes sense to keep it this way in your database. To make this feature available, go to the Systems menu tab, click Options on the left, switch to tab 12, and turn field 5 on. Click the Save & Close button to exit the screen. Now, you can specify an item cost in the supplier’s currency. On the Item Master List for each such Item, select a currency, and specify the cost in the PO Currency and PO Cost fields.
If
Maintaining Costs in the Supplier Catalog.
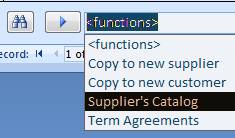
Maintaining item costs, buying units of measure, package, lead times, and currency is necessary when there is more than one supplier for an item. There are three ways of quick access to the Supplier’s Catalog screen:
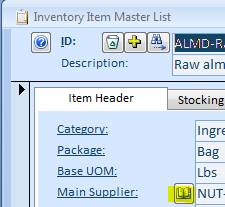
1) From the Item Master screen, select an item and then click the Open Book button next to the Main Supplier.
2) On the Supplier screen, select a supplier and then choose Supplier’s Catalog at the bottom of the screen.
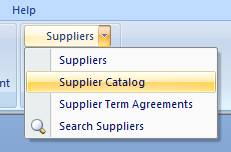
3) If there is no particular inventory item or supplier, use Orders menu tab, Supplier menu, Supplier Catalog.
Depending on the way you came from, add new records by supplying, 1) Supplier, 2) Item, 3) Both.
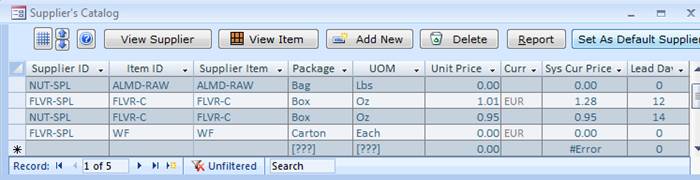
On the Supplier’ Catalog screen, the Unit Price is specified in the Supplier’s currency. If the Currency field is blank, the supplier is using the same currency as you are or you have not specified any currency in the Price Catalog Currency field on the Suppliers screen. The Sys Cur Price field is automatically recalculated down the default currency. The prices are per unit of measure selected in the catalog (buying units of measure).
When you are using the Supplier’s Catalog, on the Purchase Order screen, the item prices are picked with the following priority: the Catalog price (if Supplier/Item pair found), Item Master PO Cost (if the "PO Cost Currency" on the Item Master screen matches the PO currency), Item Master.
Maintaining Prices
There is a price level table in the software. For each item, you can specify multiple price levels. To access price table for an item, open the Item Master screen, find the item, double-click the Unit Price field. The Price table will pop up. Use the screen to modify the prices.
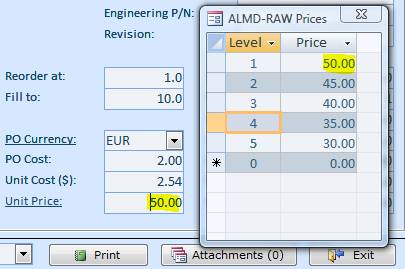
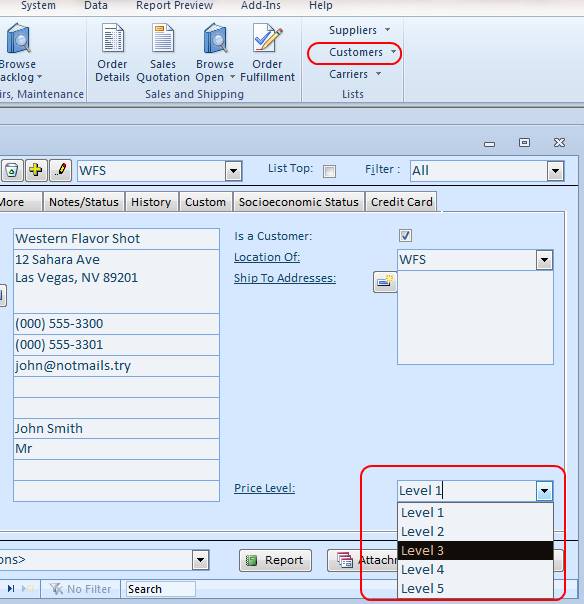
You can scroll Item Master up and down with the Prices screen on. This screen will stay on top. For each customer, default price level is 1. To change price level, go to the Orders menu tab, Customers screen, and choose a level in the Price Level field.
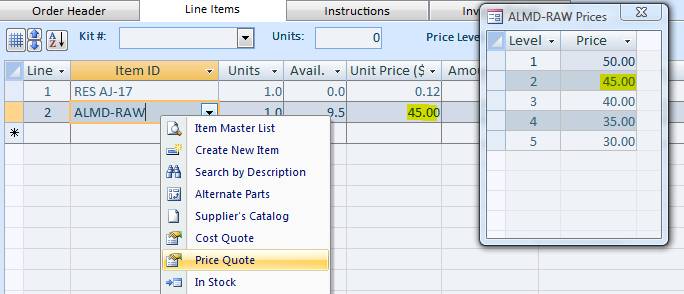
After the level is set for a customer, prices on the shipping order screen are getting selected per this level. To see the price table on the Shipping Order screen, right-click the Item ID and select Price Quote from the popup menu. You can go from one line item to another without closing the price table screen. The prices will be properly displayed as you go.
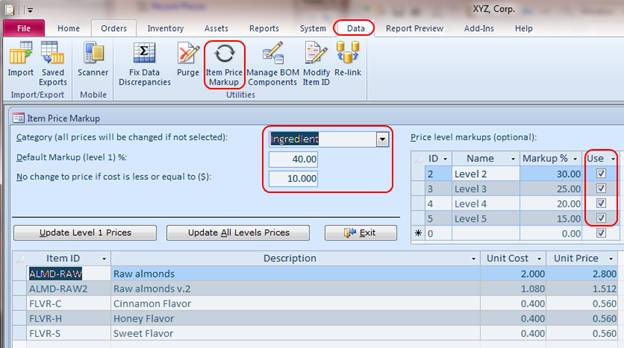
If you are using predefined price markups in percentages, to maintain the price table, go to the Data/Item Price Markup screen. Select a Category if needed (Ingredient). Set default markup percentage (40%). The default will be used to adjust the Unit Price on the Item Master screen. If you do not want to apply percentages to a low cost items, define the “low cost” in the No change to price field (10.00 your currency). Specify Markup % for each level (30, 25, 20, 15). If you want to skip certain levels, uncheck the Use switch for them. Finally, click the Update Level 1 or Update All Levels button.
Managing Security
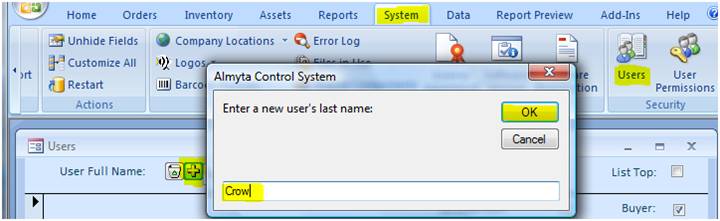
Adding users. To add users to Almyta Control System, go to the System/Users screen. Click the Yellow Plus Sign button. Enter the person's last name and click the OK button.
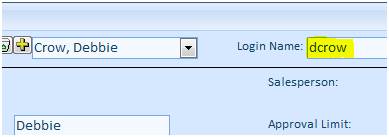
Enter the person's first name, login name, and all other information you find useful.
If you are going to use Windows authentication, which allows users to login based on their Windows login, input user’s Windows login into the Login Name field.
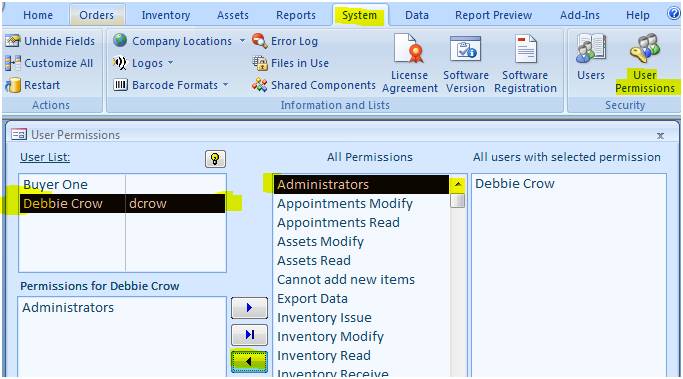
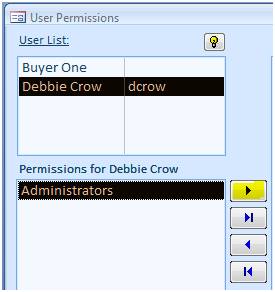
Activating the security. BACKUP YOUR COMPANY BEFORE ACTIVATING THE SECURITY. If you ever forget the administrator's login name or password, you will not be able to logon. It is a good practice to create a second administrative account just for emergencies. To activate Almyta Control System security, you need to assign the Administrators privilege to at least one user. The user becomes an administrator and can manage other users, permissions, configurations, customizations, default documents, and other important parts of the software. Go to the System/User Permissions screen. Select your administrator in the User List, Select Administrators in All Permissions, and click the Left Arrow button in the middle.
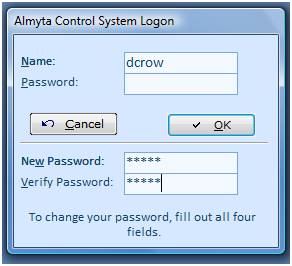
IMPORTANT. Before closing the software, make sure that the field 22, on the System/Options screen, tab 5, is turned off or the user login (dcrow) exists in Windows user list.
From this point on, all users will be forced to logon. There will be no passwords set initially. Each user will need to specify a password at logon. When doing this for the first time, users must leave the Password field blank.
Deactivating Security. On the User Permissions screen, select each user with Administrative privileges, select Administrators permission beneath the user, and click the Right Arrow button. As soon as all administrators are removed, the security gets deactivated. All other permissions can stay untouched. Without administrators they are ignored.
Changing authentication type. There are two types of authentication: Almyta and Windows. To switch between them, go to the System/Options screen, tab 5 and flip the #22 switch.
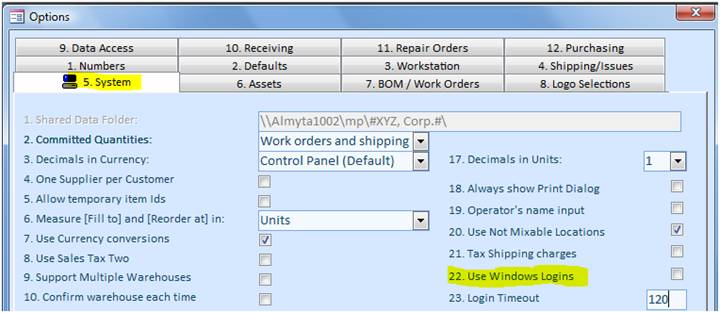
If switch 22 is turned off, the Login Timeout can be set in field 23. The timeout is set in seconds. In the example above, a login will timeout after two minutes of inactivity. Set the time out to zero to turn this feature off.