Almyta Control System - Quick Start
Contents
Almyta Control System - Quick Start
Shortcuts and Screen Navigation
Importing Data into Almyta Inventory Software
Creating Bill of Material Items
Receiving Inventory Units (Direct Positive Adjustments)
Moving Inventory Units to a Different Warehouse Location
Transferring Inventory to a Different Warehouse
Issuing (consuming) Inventory (Direct Negative Adjustments)
Using Inventory from Staging Areas
Reserving Inventory for Sales and Work Orders
Lot or Serial Number Functionality
Configuring Software for Auto-Picking
Browsing data and printing reports.
Go
to the Windows menu Start/All Programs/Almyta Control System.
2. Select XYZ Corp and click the Open button to learn how the software
operates.
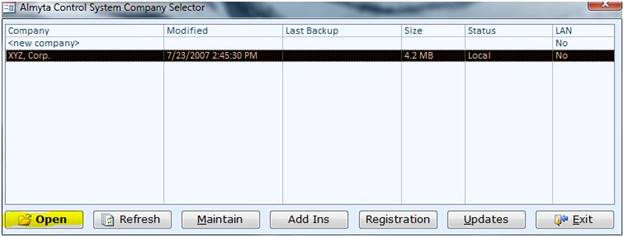
To create a new company, double-click <New Company>.
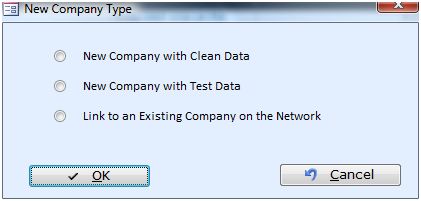
To create a real company, select New Company with Clean Data. For a new test, select New Company with Test Data. If you want to link to an existing networked company or a SQL Server hosted company, select Link to an Existing Company on the Network. On the next screen, specify a new company name for first two options, or browse the network to point to an existing company.
Navigating the Menus
The application menu is located at the top and consists of a few tabs: Home, Orders, Inventory, Assets, Reports, System, Data, Report Preview, Add-ins, and Help.
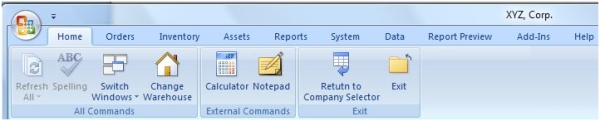
Each tab is divided into groups. In the above tab, the groups are All Commands, External Commands, and Exit.
Each group may contain a large button,
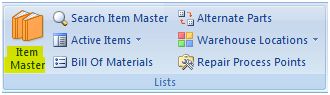
small button,
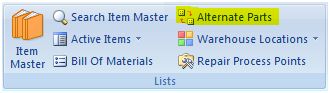
or split button.
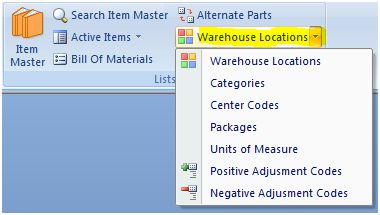
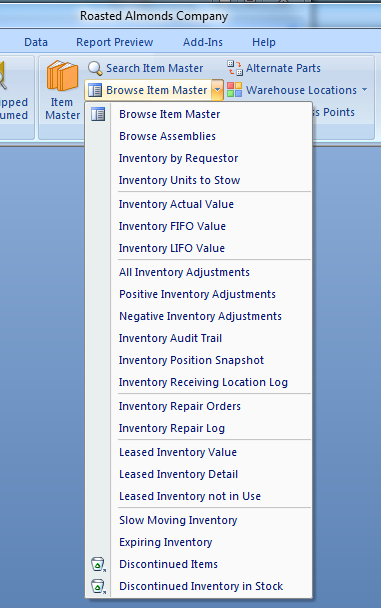
The split button has two uses. Clicking on the text (in this case, “Warehouse Locations”) opens a corresponding screen immediately. Clicking on the down-arrow, to the right of the text, opens a dropdown menu with more options.
Top Procedural Tips
Saving changes
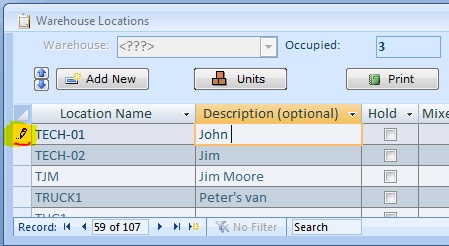
Click on the pencil located on the record selector, click on a different record, or press SHIFT+ENTER. The Pencil should change to the right arrow.
Canceling unsaved changes
Press the ESC key once to cancel changes to the last field
Press the ESC key a second time to restore an entire record.
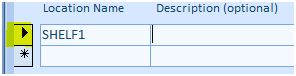
This can be done before a record has been saved (pencil in the selector). The right-arrow, in the selector, means that the record is saved or restored.
Adding a new record
To add a new record on the spreadsheet-like screens, go to the last record marked with an asterisk, or click on the Add New button on the bottom left, or click a small “new” button located at the very bottom in the record navigation panel.
 .
.
On a single-record-per-page screen, such as item master or purchase/shipping order, use the Yellow Plus Sign button located at the top left part of the screen.
Deleting a record
To delete a line item from a purchase or shipping order, click on the record selector and press the DELETE key on the keyboard.
To delete a purchase or shipping order, item master record, supplier, customer, or one of some other kinds of record, click the Trash Can button in the left top corner of the screen.
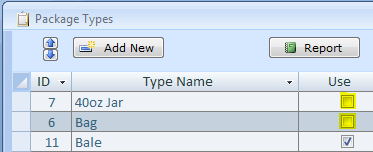
There is no way to delete a reference record such as a category or package type. To prevent the use of such record in the future, turn off the USE switch.
Common warnings
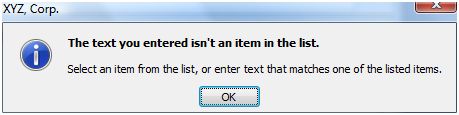
The warning “The text you entered isn’t an item in the list” appears when you input a non-existing value into the dropdown lists. Press the ESC key once to return to the dropdown list, press ESC a second time to restore an original value in the field. Press the F4 function key to open a dropdown list.
Shortcuts and Screen Navigation
Open any Almyta company and go to the Help menu tab, Data Entry and Navigation interactive tutorial to learn how to better navigate your inventory software.
Using the right mouse click for a popup menu
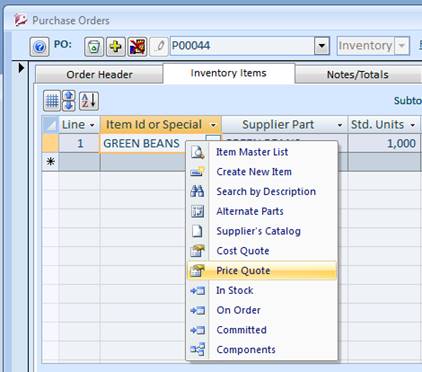
There are a few popup menus, which are useful for quick data access and browsing. Right-click the Item ID field to quickly access inventory related functions.
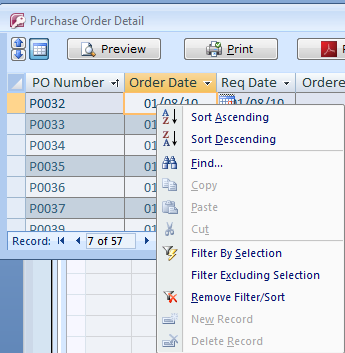
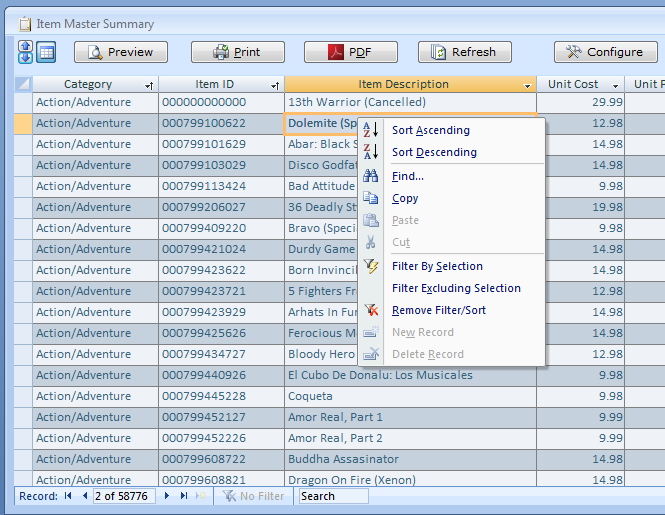
Right-click any other field to quickly access navigation and search functions.
Double-clicking fields with underlined labels
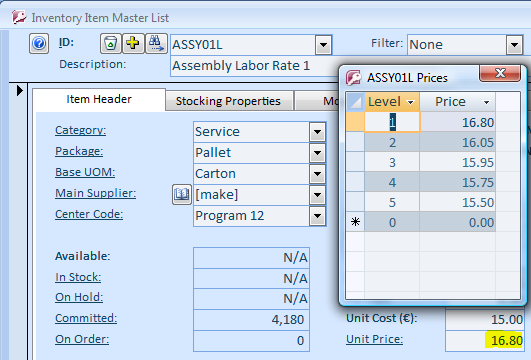
When you see an underlined label, double-click a corresponding to it field to quickly move to the data origin. In some cases, clicking on a label itself duplicates this function. Although, clicking on the underlined label is getting faded out and will be replaced with a double-click on the label or the field. Next example shows how to see item prices by a customer price level. Double-clicking on the 16.80 brings up the popup screen with all prices by level.
Unrelated note. This popup screen will stay on a top of other screens. Move it aside and browse the Item Master List screen to see prices for other items.
Double-clicking fields with certain column name
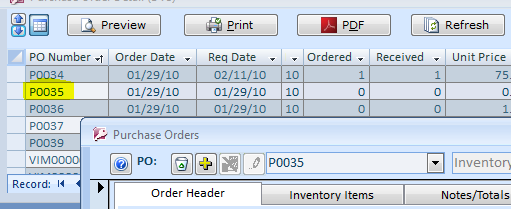
On a browse and search screens, double-click a cell to quickly go to source screen. This is a list active of column names:
"Appointment No", "SO Number", "WO Number", "PO Number", "Item ID", "Assembly ID", "Component ID", "Main Item ID", "Alt Item ID", "Asset Tag", "Parent Asset", "Assigned to Asset", "Carrier ID", "Carrier Name", "Category Name", "Category", "Customer ID", "Ship to ID", "Customer Name", "Ship to Name", "Consignee Name", "Supplier ID", "Supplier Name", "Container Number", "Repair Number", "Sales Quote No".
On the screen snapshot, double-clicking cell P0035 opens Purchase Order Detail screen and loads purchase order number P0035.
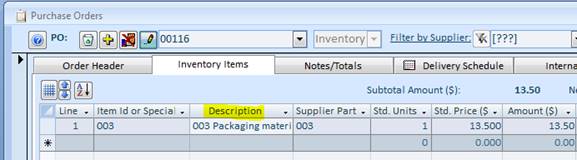
Showing/Hiding Columns on screens.
To show or hide screen columns, click the Grid button.
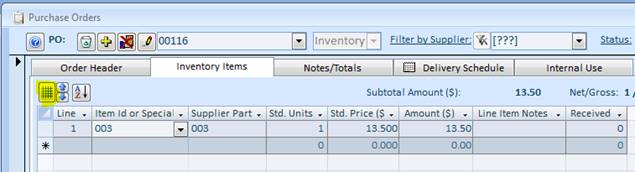
On the next screen, use checkboxes to specify which columns you want to see. We selected the Description column. Click the Save button to accept your selection.

The changes will appear on the screen immediately. They are also saved permanently (per user) and reappear next time.
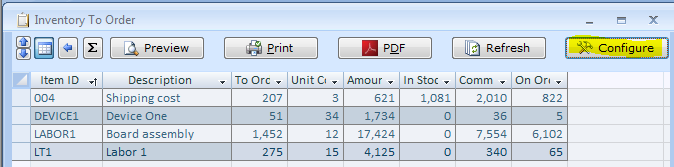
Showing/Hiding Columns on reports.
Preview a report in a screen browse mode. Click the Configure button.
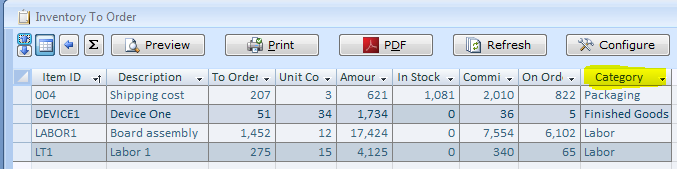
On the next screen, turn on or off a checkbox to the left of the column name. We selected the Category column.
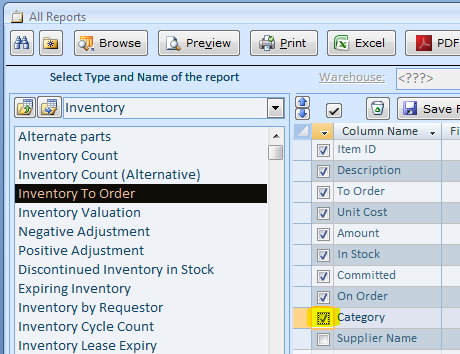
Next time you preview or print this report, the column selection will appear.
Importing Data into Almyta Inventory Software
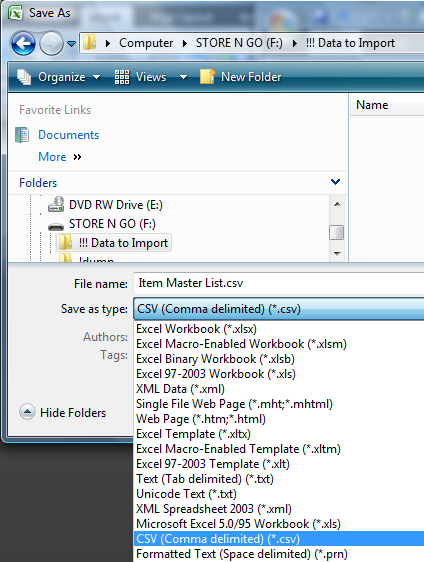
Almyta accepts data in comma-delimited or TAB delimited format also called as CSV. If your data is currently in a spreadsheet format, save it in CSV format. Sample below shows how to do it in Excel 2007-2010.
Saving spreadsheet in CSV format.
Select MS Office button or File menu tab and choose Save As

In Save as Type, select CSV format, browse for a folder to save file in, and click the Save button.
Click Yes to the popup warning then close the spreadsheet without saving it.
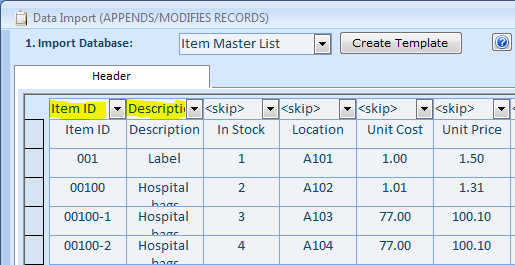
Importing Item Master List (Inventory Catalog).
Item Master list can be imported in stages. Almyta will match records by Item ID. If a matching record exists, it gets updated. Otherwise, it gets appended as a new inventory item. This allows to do bulk updates modifying only certain fields. For instance, to load new prices, you need to import only two columns, Item ID and Unit Price.
Open your company in Almyta and go to Data menu tab, Import. On the Import Data screen, select Item Master List in the Import Database field. Click the Load File button browse to the saved CSV file and double-click it. Select a value in the Column Header for each column that you need to import.
Alternatively, if the top row in CSV contains column headers (field names), check First Row is a Header tick box at the bottom and then click the Map button. A header will be selected for you for each field matching a column name.

Regardless, whether you need to auto-map fields or not, check First Row is a Header tick box if the CSV contain header row before importing.
Finally click the Import button. The import procedure will run up to a first error. If there is a problem with a row, you will see it at the top of the screen and popup message will tell you what the problem is. You can update your data right on screen and continue or you can delete the row by clicking on the arrow to the row’s left and pressing the Delete key on the keyboard.
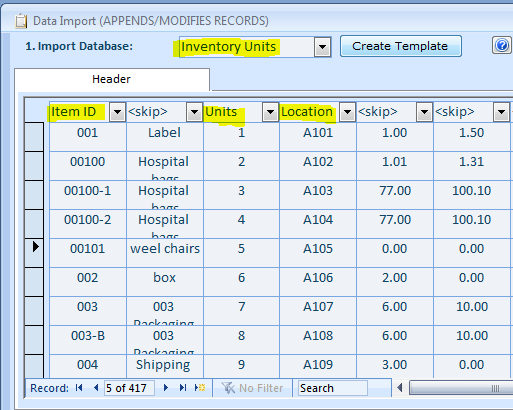
Importing current inventory units.
The mandatory fields for importing current inventory position are Item ID, Quantity (Units), Location. All other fields are optional. A list of inventory units can be embedded in the Item Master CSV file or be in a separate file. In our example above, we had two extra columns, units and location, which we skipped (columns 2 and 3). Now we can use the same file to import current inventory. The screen selections, in this case, are shown bellow.
Importing customer/supplier lists.
To import customers or suppliers list, you need to create an ID for each row. In the example below, the ID has been added to the column A. Customer and Supplier IDs help to quickly find a record in Almyta. Also in some cases, the IDs can be used to categorize the companies.

Loading and mapping the above file into the Data Import screen should look like this
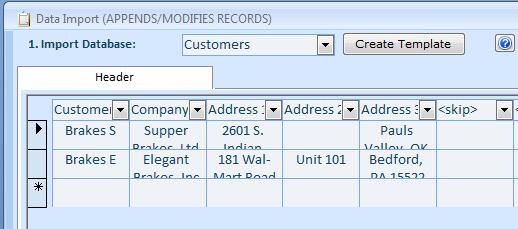
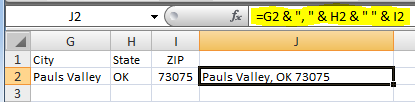
If in the list of companies, the last address line comes in three separate columns (City, State, ZIP or City, Province, Postal Code), you can use formula to combine three columns in one. Also, it would be more practical to insert a column to the left of the city and then apply formula to all column cells.
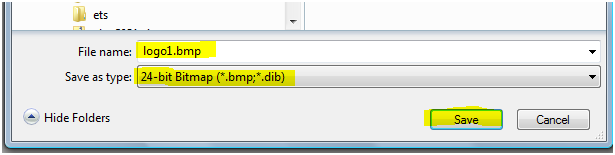
Changing Company Logo
Convert the logo into BMP format. To do this, open the logo with Windows Paint (in Windows Explorer, right-click select Open With, Paint). In Paint, select File/Save As menu, select 24-bit Bitmap, specify file name, and click Save.
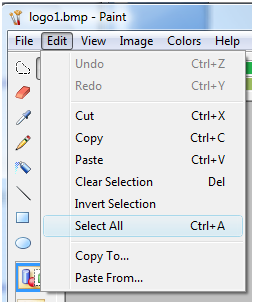
Choose Edit/Select All menu
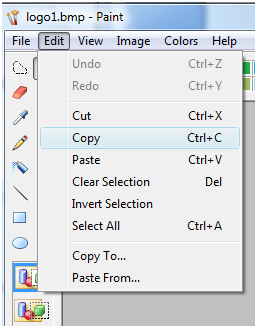
Choose Edit/Copy menu
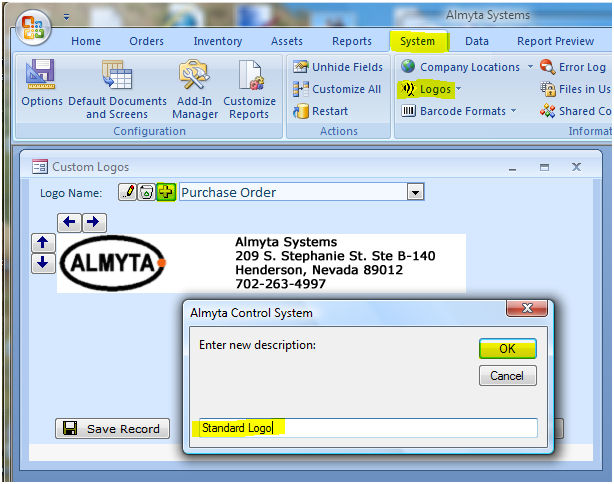
Open Almyta Company that requires a new logo. Go to the System menu tab, Logos. Click the Yellow Plus button at the top, left. Input a new logo name (Standard Logo), and click OK.
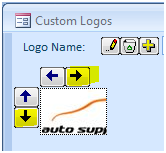
Right-click on the white square and select Paste from the popup menu.
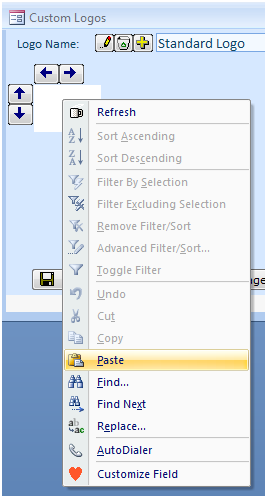
Use right and down arrow buttons to resize the image printing area and then close the screen.
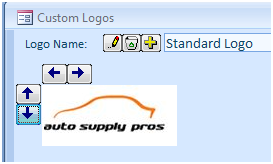
Go to the System menu tab, Options screen, 8. Logo Selection tab. Select the new logo for each report type you need it to appear on, click the Save and Close button.
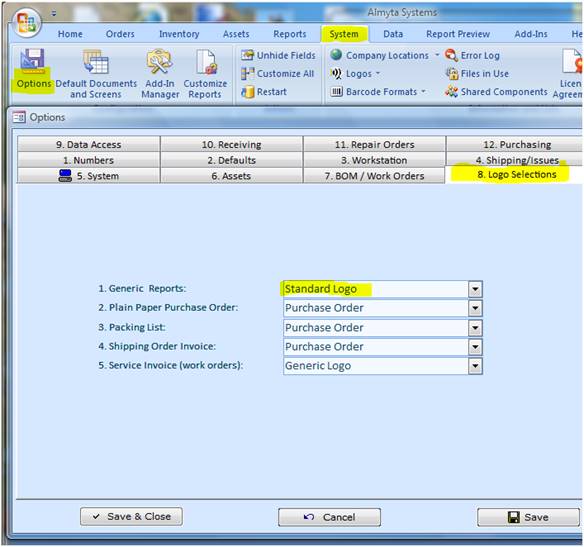
This is the resulting image printed on a report.
Creating Inventory Items
Go to the menu Inventory/Item Master.
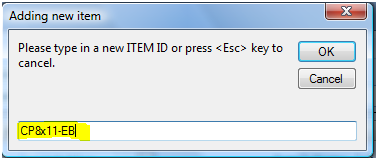
Click the Add New button.
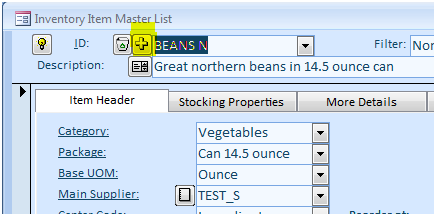
3. Enter a new item id and press the Enter key.
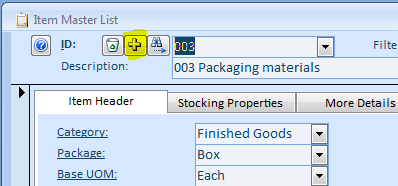
Item Master Screen Shortcuts
The Item Master screen buttons left to right:

The Trashcan button discontinues the selected item. To find a discontinued item later, select the Discontinued (not) in Stock in the top middle filter. The Item ID dropdown list will be filtered with all such items. Select an item in the list to load the record. Click the Trashcan button to restore or hard delete the record.
The Plus Sign button adds a new item.
The Pencil modifies item ID and preserves current and historical data related to this item. This is not the same as deleting and recreating and item with a new ID. The current and historical data will be mostly lost in this case.
The Binoculars button opens the Search screen. Start typing a word or words separated by space. The Search screen will filter the screen down as you type. The Search screen looks into the Item ID and the Item Description. To find all records with “phone case” in the description, something like type “ph ca”. To load a record, double-click it in the list or use the Tab key, then Up/Down Arrow keys to select a record and press the Ender key.
With one exception, right-clicking the Item ID on any screen shows a popup menu with eleven shortcuts. The menu will look like on this snapshot.

The second row.
![]()
The Globe button opens the default internet browser and follows to a web page specified in the wwwCatalog.csv file.
The catalog is expected to be in the comma-delimited format, which can be maintained in any spreadsheet application. The catalog should have two columns ITEM ID and Web Page URL. Sample row for item TLP-2844 (Zebra Label Printer), pointing to the manufacturer page, would look like this.
TLP-2844,https://www.zebra.com/us/en/support-downloads/printers/desktop/tlp-2844.html
Clicking the Globe button for the TLP-2844 printer should show this page:
The disk folder for the wwwCatalog.csv file is specified in the System/Options menu, tab 9, field 3. You can use a local a folder on a local disk or a network location like \\Server\Share\Folder.
At the Item Master bottom, the Function list can be found.
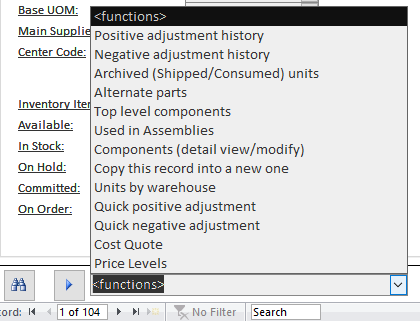
You can find there a few useful shortcuts like adjustment history and the actions like copy a current record or Quick Positive Adjustment. The blue right arrow button reapplies the selection.
Creating Bill of Material Items
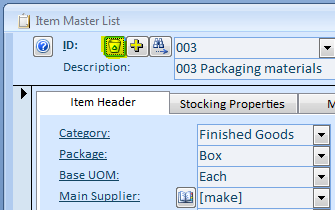
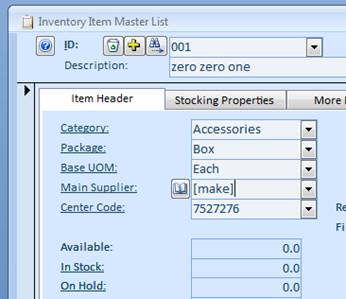
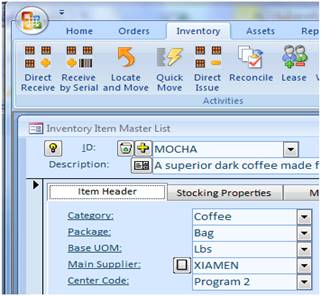
Go to the menu Inventory/Item Master and create a new item. Select Category, Base Units of Measure, Package Type. Select [make] for the Main Supplier.
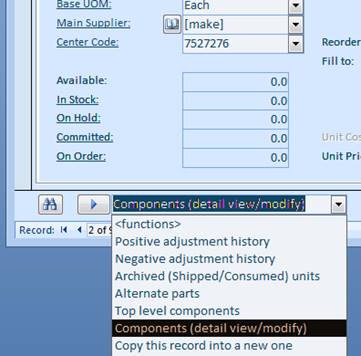
Add components to the bill of materials. At the bottom of the Item Master list screen, select Components or go to the Inventory menu tab, Lists group, Bill of Materials and select the item.
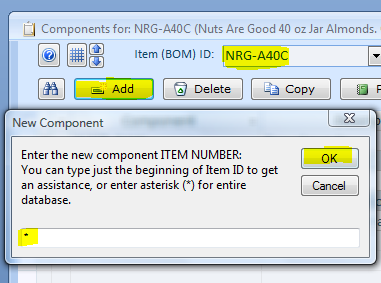
On the Bill of Materials (Components) screen, click the Add button, input a few first letters of a Component (Item) ID or just type * to see all items.
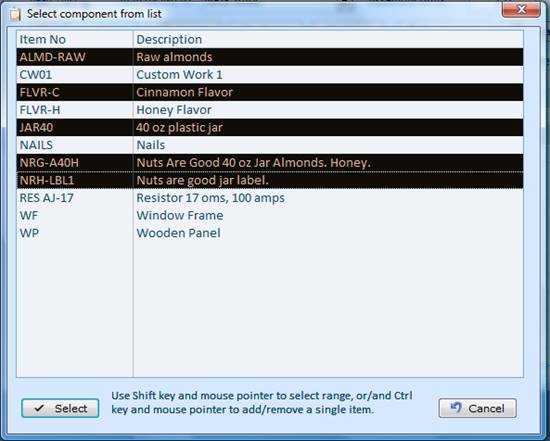
On the next screen, select all components that you need to add (use Shift and Ctrl keys for multiple selections) and click the Select button.
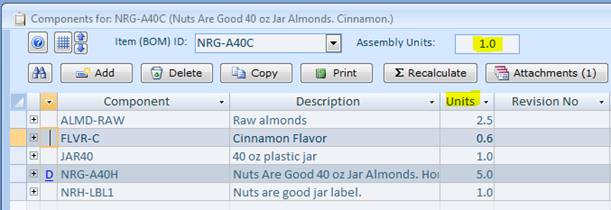
Back on the Components screen, specify number of required units for each component and in the Assembly Units, input number units that this bill produces.
To add a labor to your bill, first create special category and mark it as a service.
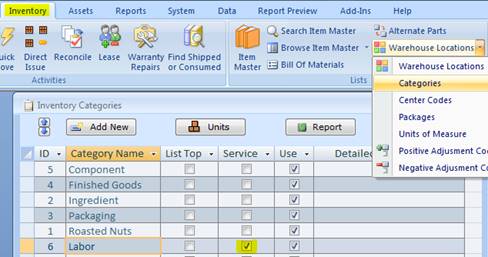
Then add labor item(s) to the Item Master List and assign the labor type category to each such item. Add labor item(s) to your bill as any other component.
Note. For the assembly items, unit cost cannot be changed by user on the Item Master List. The Unit Cost field is not editable. The cost is calculated automatically by the software.
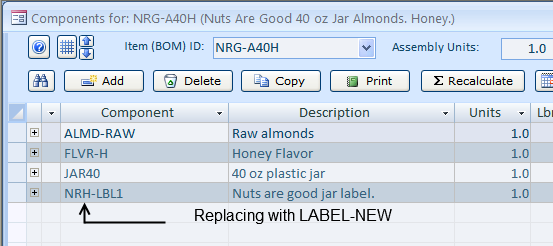
Managing Components
Almyta allows replacing or deleting component in assembly.
As an example, we will replace label NRH-LBL1 with LABEL-NEW in NRG-A40H assembly.
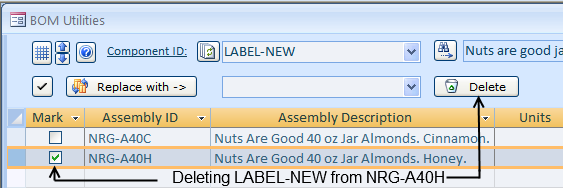
Go to the menu Data/Manage BOM Components option.

Pick a label that you wish to replace from the Component ID drop-down list. Pick new label from the Replace with drop-down list.
Make sure that the check box is marked for the assembly.
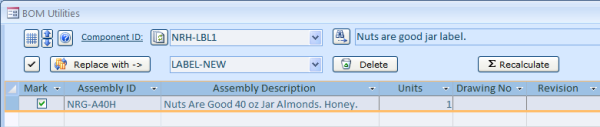
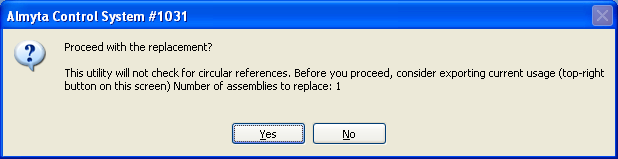
Click the Replace with button. Click the Yes option.
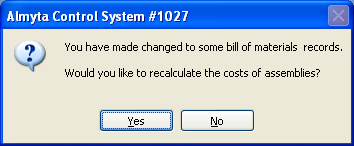
Close the screen and click the Yes option to recalculate the costs of assemblies.
Go back to menu Inventory/Lists group, Bill of Materials option. Pick NRG-A40H from the Item (BOM) ID drop-down list.
LABEL-NEW is a part of assembly now.
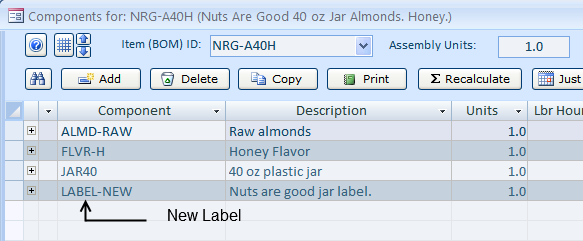
System also recalculated Unit Cost of the assembly base on LABEL-NEW price. Price of the Unit Cost assembly for the NRH-LBL1 of $0.10 is $3.70.
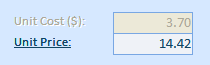
Price of the Unit Cost assembly for the LABEL-NEW of $0.05 is $3.65.

Click the Delete button to remove LABEL-NEW from the marked assembly.
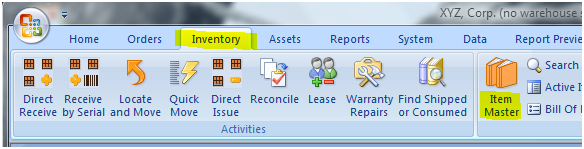
Receiving Inventory Units (Direct Positive Adjustments)
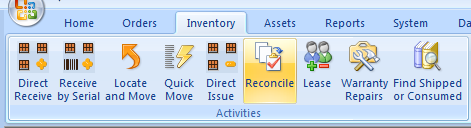
1. Go to the menu Inventory tab and click the Direct Receive
icon:

2. Select values in the Item ID column, input units, select the adjustment code
(Cash Purchase), and click the Receive button.
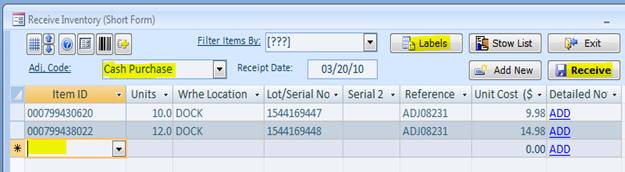
Also from this screen, we can print inventory labels

and the Stow List – the document listing all received items with a hint of warehouse locations.
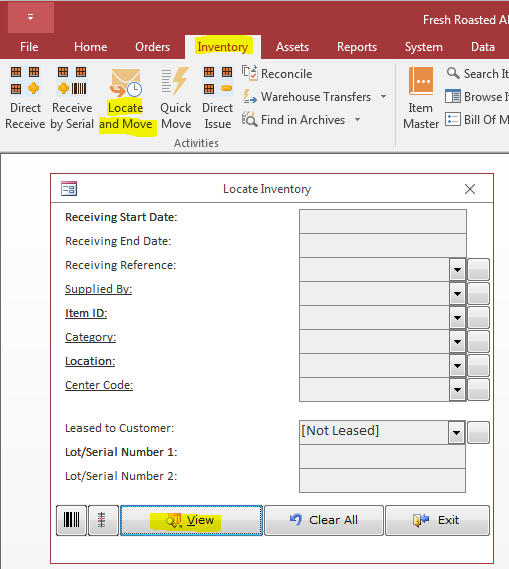
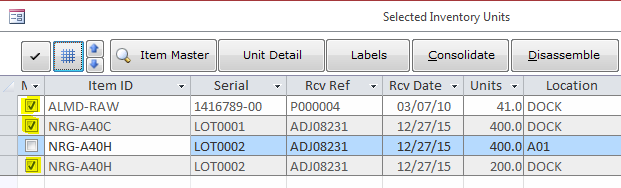
The Locate and Move screen
Go to the Inventory/Locate and Move menu. Apply filters if necessary and click the View button.
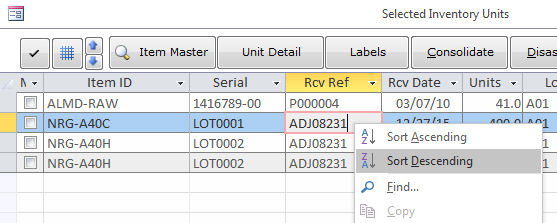
The Selected Units screen will appear. The screen supports a few functions (from left to right):

- The Item Master opens the Item Master screen and scrolls to a corresponding record.
- The Unit Detail shows an underlying detail for the current row. Shortcut: double-click the Serial Number.
- The Labels prints labels for a current row or for the selected rows.
- The Consolidate combines multiple rows into one. Use checkbox to select desired rows. Some details will be lost. The details of top row will be used as a master detail.
- The Disassemble splits a current row into its BOM components. As an example, think of a gearbox that will be split into a core, gears, shafts, bolts, and washers. This allows to stock used components and sell them separately or assemble into a new gearbox.
- The Issue opens the Direct Negative Adjustment screen and populates it with a current or selected rows.
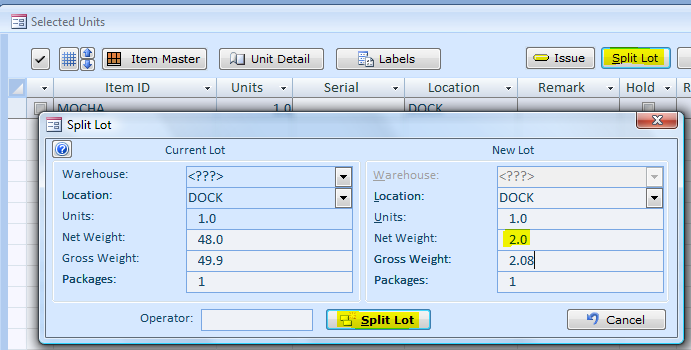
- The Split Lot creates a new row with and preserves a total weight, adds one unit if necessary. This function should be used for items when units rather represent a package like a bag of coffee. Splitting 50 kg bag of coffee (1 unit) into two bags will create two rows, one unit in each but with a total weight the same as in the original bag (50 kg).
- The Move places rows into a different warehouse location or takes a few units from the current row.
The screen can also be sorted and searched by right-clicking any cell.
Moving Inventory Units to a Different Warehouse Location
Moving a whole lot
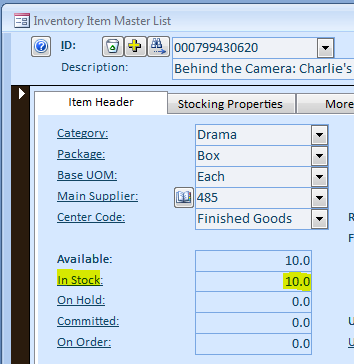
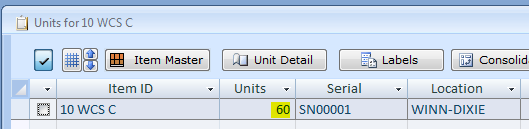
1. Let us find the received units. Go back to the Item Master List (menu Inventory, Item Master) and find one of the received Item IDs from the ID dropdown list (top left). Double-click the In Stock field.
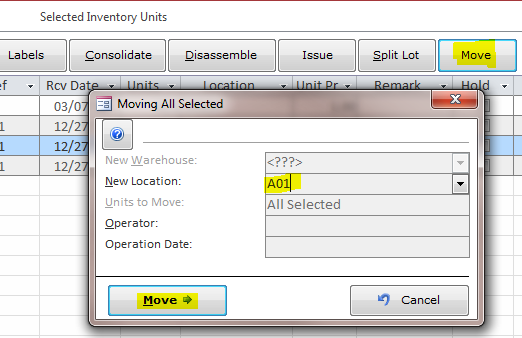
2. On the Locate and Move screen, click the Move button. You can also
double-click the Location field instead of clicking the Move button.

3. On the popup screen, select new warehouse location and click the Move button

Input “SHELF10-A” into the New Location field. If “SHELF10-A” does not exist in the database yet, Almyta will offer to add it.
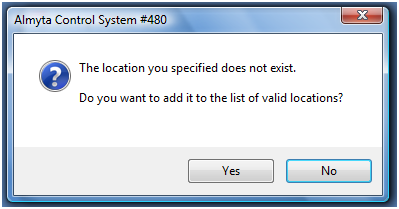
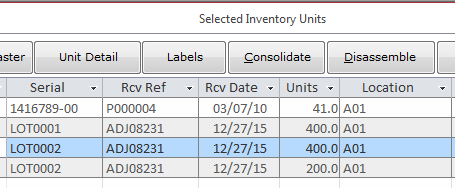
Click Yes, then click Move or just press the Enter key. On the Locate and Move screen, the location has changed.

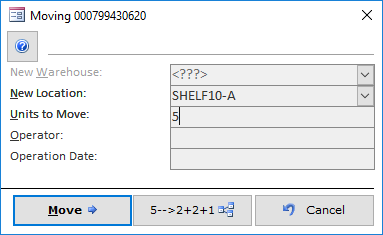
Moving a few units from a lot
Now, let us move only 5 units (out of 10) into a different location. Click the Move button again, select COPIER1 in the New Location and change 10 units to 5. Press the Enter key.
As a result, we have our units stored in two warehouse locations now.

Make a few lots out of one.
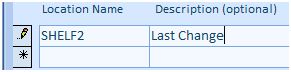
Let us first populate all fields that are common to all lots.

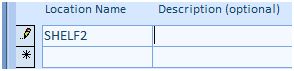
Now let us clone the lot preserving total number of units. Click the Move button or double-click the Location cell.
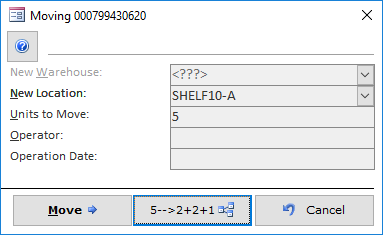
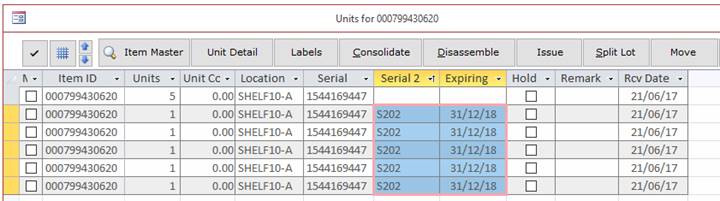
Finally, use the “5->2+2+1” button to create a smaller lots. If you need one unit per row, input 1 on the next screen and press the Enter key. The resulting screen is shown below.
Bulk Move
Use Select/Deselect button and deselect all rows if you do not see all rows on screen.
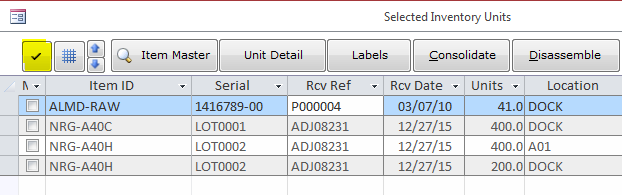
Use the checkbox on the left side of each row to select desired rows.
Click the Move button, the Yes button to confirm system warning, select new location from the list and click the Move button to finalize the transaction.
All rwo will be moved in a single transaction.
Splitting lots
In the above section, we discussed how to take a few boxes off the pallet. However, what do we do when our inventory consists of coffee bags? In this case, taking a few units from a bag would not work because the bag is the unit. The example below shows how to take two pounds of coffee out of a 50-pound bag. This makes two pounds available for shipping and leaves us with 48 pounds in the bag.
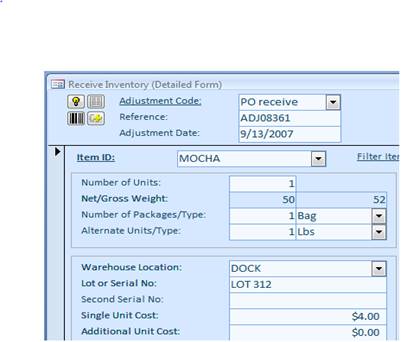
1. Let us define a 50-pound bag of coffee in the Item Master List.
2. Receive a single bag using the Detailed Receive screen. To go to the Detailed Receive screen and click the Switch View button.

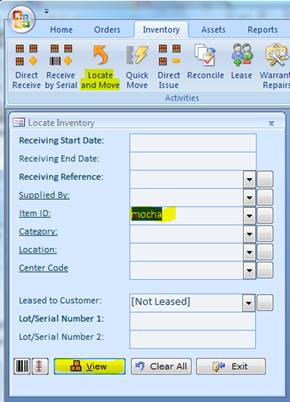
3. Before we can ship, we should locate our bag in inventory and split it in two. This procedure creates two bags and makes 2-pound bag available for shipping. Go to the Locate and Move screen.
4. Click the Split Lot button. On the Split Lot screen, specify a net weight for the new lot. Click the Split Lot button.
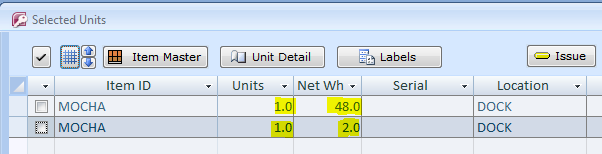
5. Here is the resulting screen. We now have two lots with one unit (bag) each.
Consolidating Lots
The lot consolidation is necessary for combining a few lots in one. This can be useful if you shipped a few cartons from one pallet, a few from another and now left with several partial pallets. To do this, mark all rows (lots) you want to pick the units (cartons) from, click on the Item ID of the “receiving” row (lot), and then click the Consolidate button. Click Yes to confirm the operation.

The resulting screen should look like this
Transferring Inventory to a Different Warehouse
Before you can use this feature, active multiple warehouses (System/Options, tab 5, field 9). All stock will be moved to the warehouse with ID equal 1 as defined in System/Company Locations.
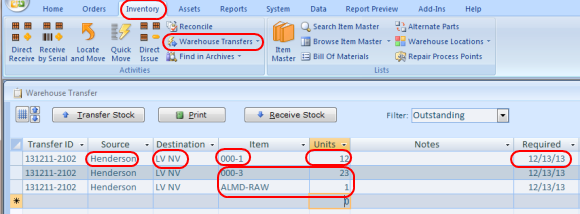
Go to the Inventory, Warehouse Transfers menu. Start filling the screen. For the first row, Source Warehouse, Destination, Item Units, and the Required Date. To continue adding the transfer, fill only Item and Units columns. The rest will be filled automatically per the first row, until you decide to change it. To start a new transfer, close the screen and do the return back or change the Transfer ID number and continue.
When you are ready to transfer inventory, return to this screen, click on any row with the transfer ID, that you are working on, and click the Transfer Stock button.
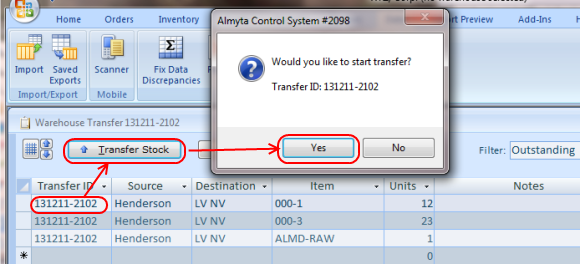
The Warehouse Transfer screen will open. Pick inventory units one by one or use Load All button, use the Pick List button if needed, and finally click the Transfer button. All inventory units will be placed in the destination warehouse, in the transfer ID location.

To place moved inventory in its actual warehouse locations, go to the Inventory/Warehouse Transfer/Receive menu.
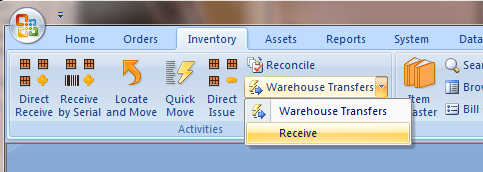
or find a transfer ID on the warehouse Transfer screen, and click the Receive Stock Button. Use checkbox on the left to select rows then click the Move button to bulk-move the units.
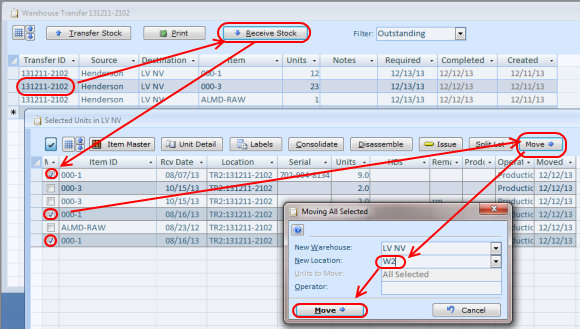
All units will be moved. Continue until all inventory units get stocked.

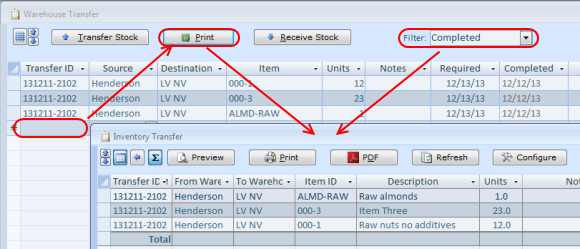
Using Warehouse Transfer screen, you can run a report with various filters. To see all records shown on screen, go down to a new record and click on it then click the Report button. To see a report for a single transfer ID, click on any row with that transfer and then use the Report button.
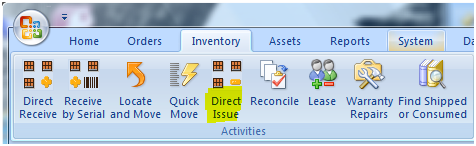
Issuing (consuming) Inventory (Direct Negative Adjustments)
1 Click Direct Issue in the Inventory tab in the menu:
2. On the Issue screen, select an adjustment code (Cycle Count), the Item ID, and specify how many units you want to issue (2). Click the “double right” arrow to the left of Warehouse Location field or double-click the Warehouse Location field itself. On the next screen, double-click a row you are picking from units from.
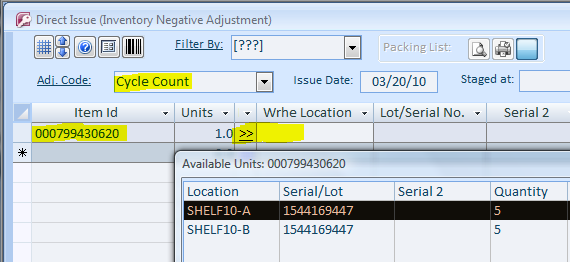
5. And finally, click the Issue button.
Using Inventory from Staging Areas
If there is a need in putting away product before shipping or consumption, consider using staging locations in Almyta. A sample of such usage could be loading a trailer and then verifying that all materials are picked properly before closing the trailer’s doors. Another example is staging the components at an assembly line, verifying quality and quantities, then consuming only what was needed, and moving the leftovers back to the warehouse. Using the staging areas reduces bulk of data entry in the software.
Loading truck trailers or staging materials at the production line.
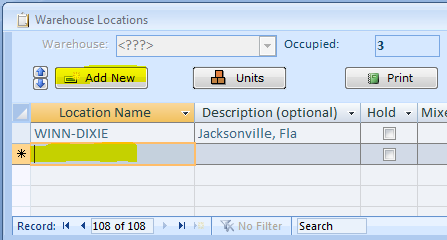
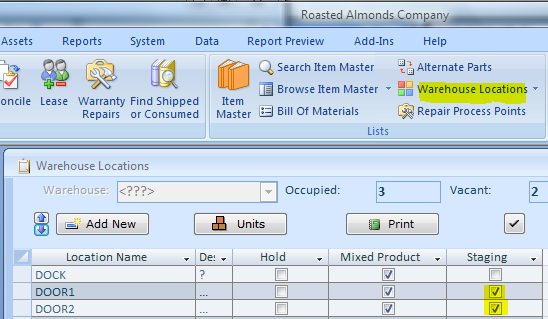
Go to the Inventory menu tab and select Warehouse Locations. Add all loading doors and mark them as Staging. We have added DOOR1 and DOOR2.
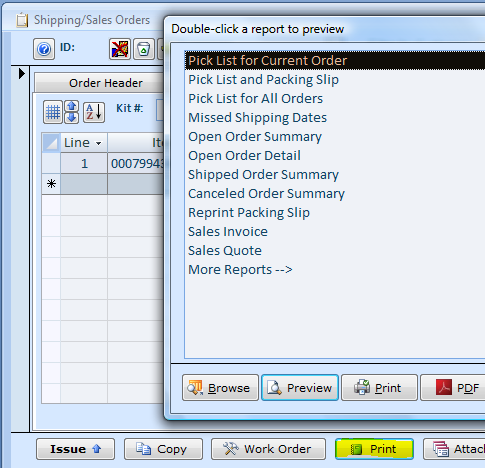
On the Shipping Order or Work Order screen, create a new order or use an existing one. Specify the door (trailer) where the order should be staged at (in).

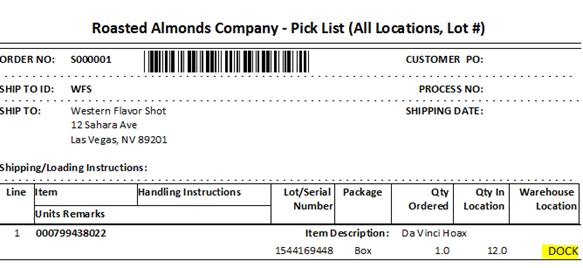
Click the Print button at the bottom of the screen and then double-click the Pick List for Current Order.
Let a material handler to pick all specified materials and mark what has been picked.
The same person can also move the materials to the door as in a step below or someone in the shipping/production office can do it. Here we do not describe such picking instances as with batch handheld devices or wireless live terminals. On the full Locate and Move screen, mark the picked units.
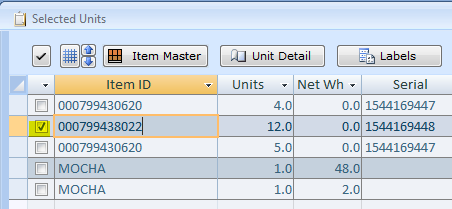
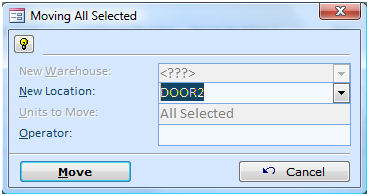
Click the Move button at the top of the screen, specify new location (DOOR2), and click the bold Move button.
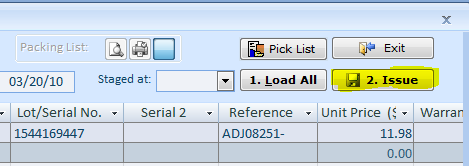
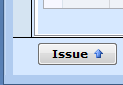
When all inventory units are staged, verify item IDs, quantities, and serial/lot numbers. Check product for possible damages. Resolve any problems with the product. If any found adjust in the software by simply moving product in and out of the staging area (DOOR2). Return to the Open Shipping Orders or the Work Orders screen and click the Issue button (bottom-left).
Select the staging area (DOOR2) in the Staged dropdown and click the Load All button.
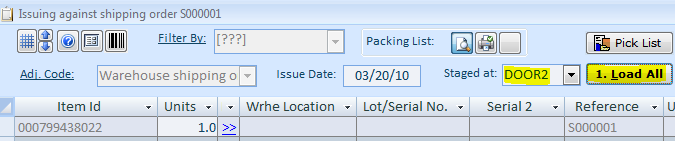
The issue screen will be automatically populated.

Finally, click the Issue button to ship or consume the product.
Reserving Inventory for Sales and Work Orders
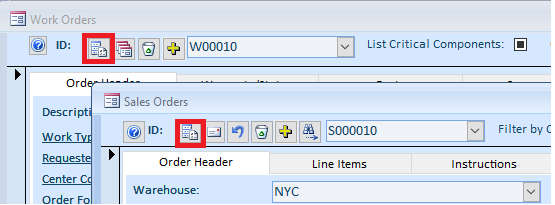
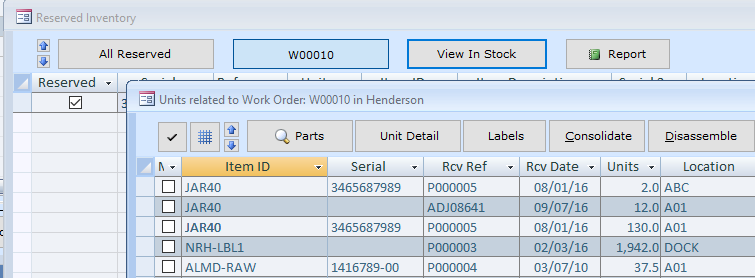
On the Sales Order or the Work Order screen, use the Manage Reserved button.
The Reserved Inventory screen appears. If there is nothing reserved, the screen will be empty. The button with the order number in its caption is a toggle button. When the button is on, the screen filters itself by reserved units related to a current order.
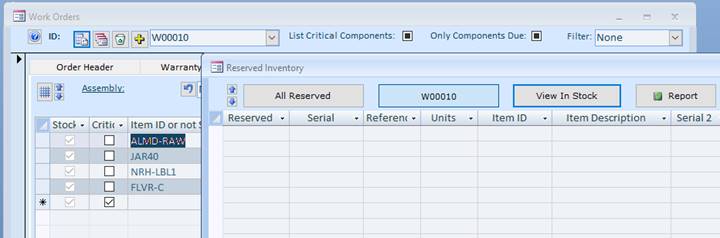
To view all related inventory, click on the Order Number button to turn it off. If there are any related units in stock, the screen will show them.

Find a row, which you want to reserve for the order, and click the checkbox on the left.
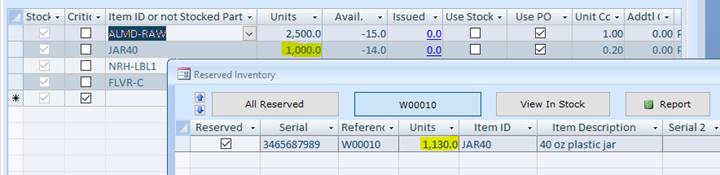
If you need to reduce number of reserved units, tab to or click on the Units cell and type in a new number of units. Save the change by going to another row or clicking on the record selector on the left.

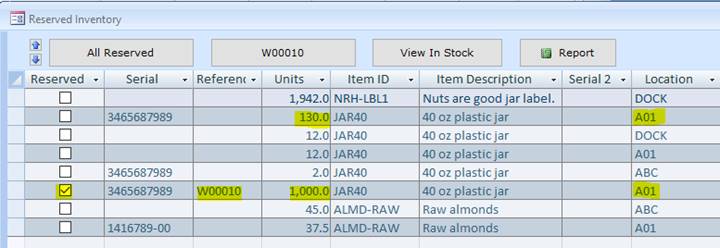
The row will be split in two. One row will show an exact number of units reserved and a second new row will show the rest number of units available for other orders. All reserved stock goes on hold automatically. To release inventory, turn off the Reserved check box. You can use All Reserved button to see reserved stock for all orders and release any units if necessary.
You can use the View in Stock button to open the Locate and Move screen. The screen will be filtered by inventory items related to the current sales or work order. It will show all related units in stock reserved or not. This function can be used to move stock around. If you choose to use Staging Areas to set aside raw materials or products as opposed to the direct reservations, you can pick and choose the inventory and move it to staging. In this case, click the Manage Reserved button on the Sales or Work Orders screen and then click the View in Stock button making no reservations.
Inventory Cycle Counts
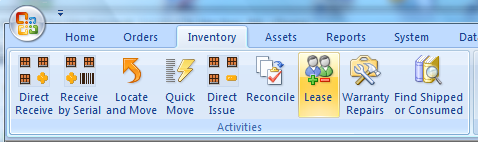
To keep your inventory counts accurate, use Reconcile function located in the Inventory menu tab.
System will advise you to use filters to freezing part or the entire inventory. Confirm the warning message. Click Yes to proceed. As an example, we will freeze locations from A01 to A20 on the next screen.

After setting up the filters, click the Start button. Confirm printing out the Cycle Count report.
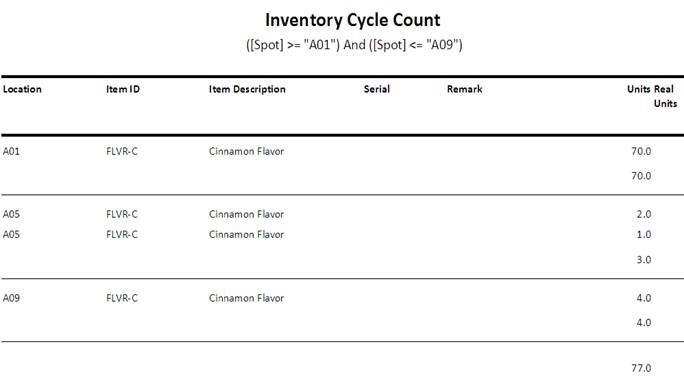
Print the report, take it to the warehouse, and use for the cycle count. Verify quantities in each location. Specify a real count in the right column if deferent. Bring the report back to the office, use the Reconcile menu again to make all necessary adjustments.
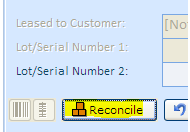
Click the Reconcile button on the next screen.
Click Yes on the next screen, to proceed with changes inventory.
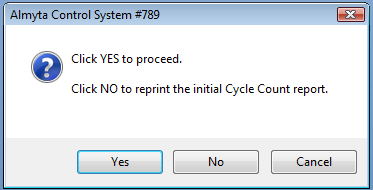
When you click the Yes button, Inventory Reconciliation screen will show up

For each row, use the Adjust button to specify the changes if needed. As an example, we will change number of units from 4 to 3 in location A09.
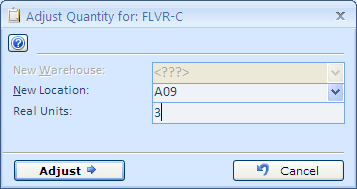
Adjusted checkmark shows up for location A09.
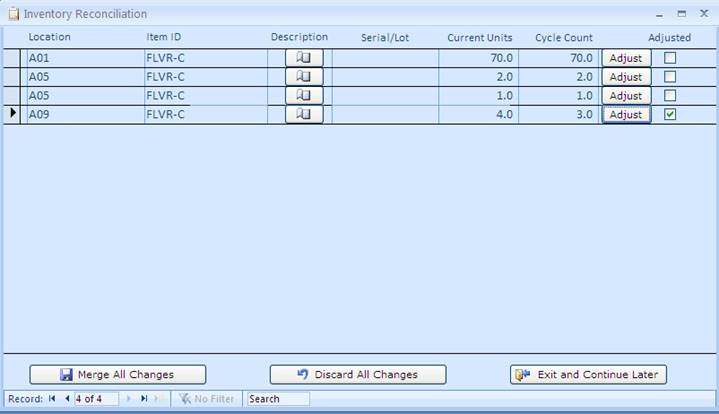
When finished with the changes, click the Merge All Changes button to save them permanently in the database. Click the OK button on verification screen. The counts are adjusted, inventory is released, and available for receiving, moving, and shipping.
If all counts appear to be accurate, there is no need for any adjustments. Return to the Reconcile function located in the Inventory menu tab.
On the Cycle Count screen, use the Release button to unfreeze all counted inventory units.

The inventory is available again for your everyday activities.
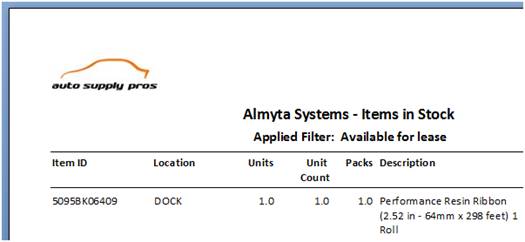
Leasing Inventory
Eighty percent of businesses use leasing to meet their equipment needs, and it is likely that your clients prefer to lease with you. Sold inventory is permanently written off the books. The leased inventory continues to stay on the books as an asset. It just becomes unavailable for selling or leasing.
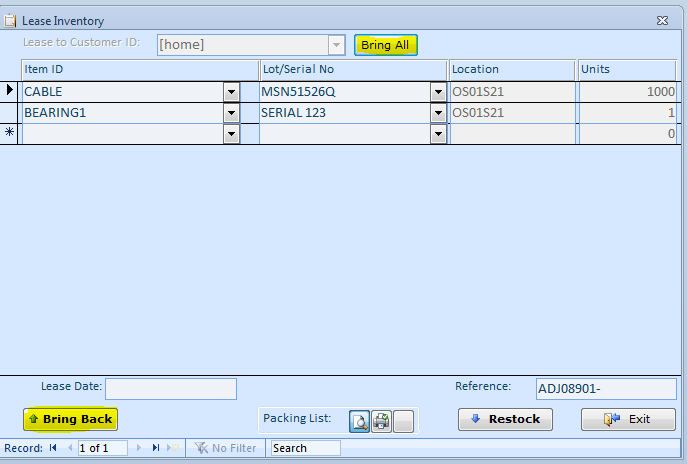
Follow to the Inventory menu tab and select Leasing in the Activities group.
On the Lease Inventory screen, select a customer in the Lease to Customer ID field. Select Item ID and then select a unit serial number. Continue with the next item. Change the Lease Date if different from today, change the reference to your invoice number, customer’s sales order, contract, or just leave a default reference. When finished, click the Lease button.
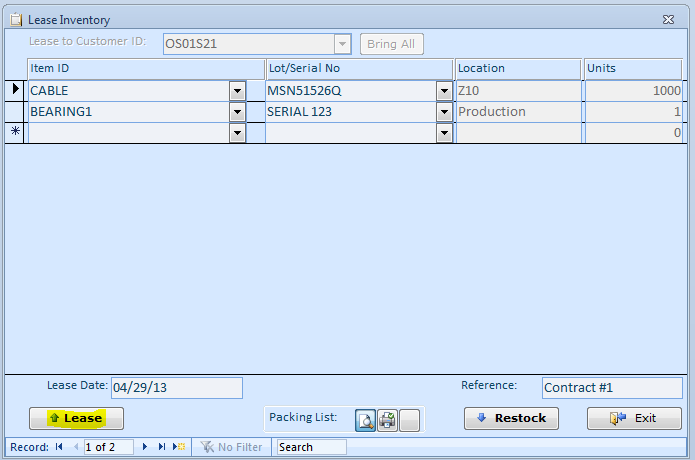
There will be “Items have been moved” message and then a packing list will appear on screen. Use Print or Quick Print button (top left menu) to send it to a printer.
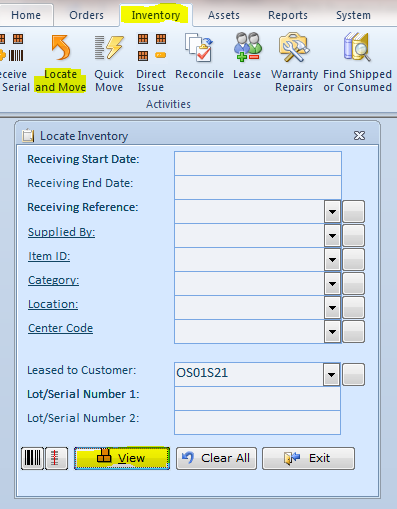
Follow to the Inventory menu tab and select Locate and Move. Select a customer in the Leased to Customer list and click the View button. You can also select “All Leased” value in this list and supply other filters if needed.
This is the resulting screen:
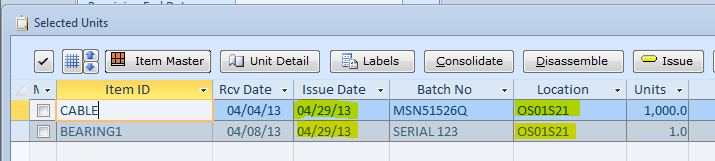
The leased inventory will show in the “Customer ID” warehouse location.
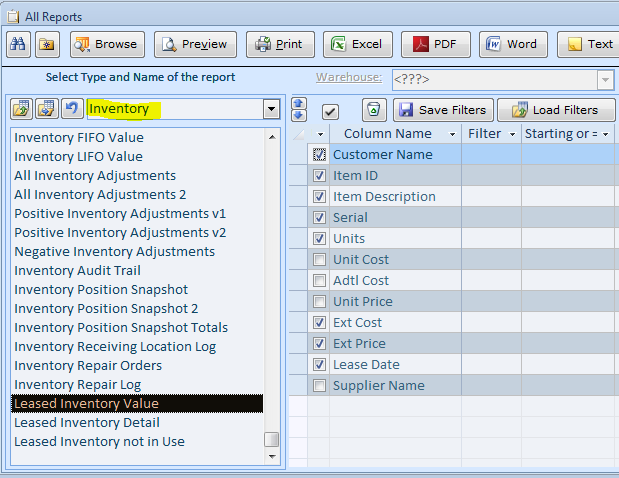
There are also a few reports associated with leasing. Go to the Reports menu tab, Inventory group and select More Reports. Scroll down the list of reports until you see Leased Inventory reports. They are located closer to the list bottom.
Returning Leased Inventory
To bring leased inventory back, simply go to the Inventory menu tab, and click Lease. In the Lease to Customer ID, select [home]. Start adding items and serial numbers one by one, or use the Bring All button and select a customer. Using the Bring All function is convenient when most of the leased inventory is getting back home. Delete the records representing inventory, which is still at the customer’s site. After finishing the data entry, click the Bring Back button.
Finding not Used Leased Inventory
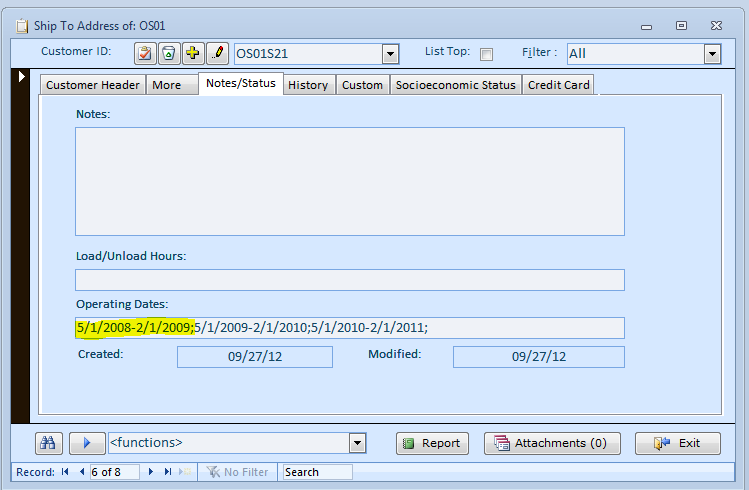
If we are leasing inventory to a customer’s site, which is operating only a part of the year, we can find what is leased but not used now. This could be the case when the customer’s site is operating on a seasonal basis. An example of such site is an amusement park or a racetrack. Before we can use this functionality, the operating dates must be entered in the customer record. Follow to Orders menu tab and select Customers in the Lists group.

On the Customers screen, select a record in the Customer ID list and switch to the Notes/Status tab. Specify the date ranges in the Operating Dates field. The dates must be entered in the following format:
[DATE 1]-[ DATE 2]; [DATE 3]-[ DATE 4]
This is an example of a site operating from May 1st to February 1st.
5/1/2008-2/1/2009;5/1/2009-2/1/2010;5/1/2010-2/1/2011;
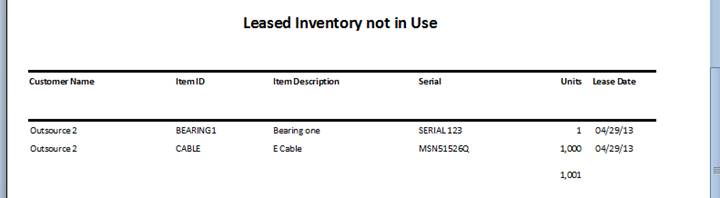
Now we can find “not in use” leased inventory. To do so, find Leased Inventory not in Use report in the Inventory section on the All Reports screen. This report should be closer to the list bottom.
This is the resulting report:
Lot or Serial Number Functionality
Serial/Lot control switches.
The how and when the serial/lot numbers are used is controlled in the Inventory/Item Master screen, Stocking Properties tab and can vary item by item.
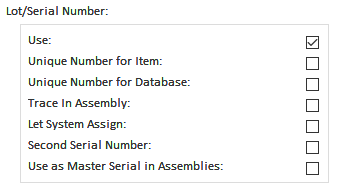
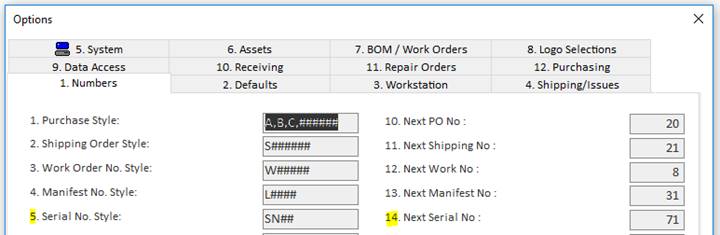
If the Let System Assign switch is turned on, the number style and value should be set prior to usage in the System/Options screen, tab 1, fields 5 and 14.
Receiving inventory with Serial/Lot numbers.
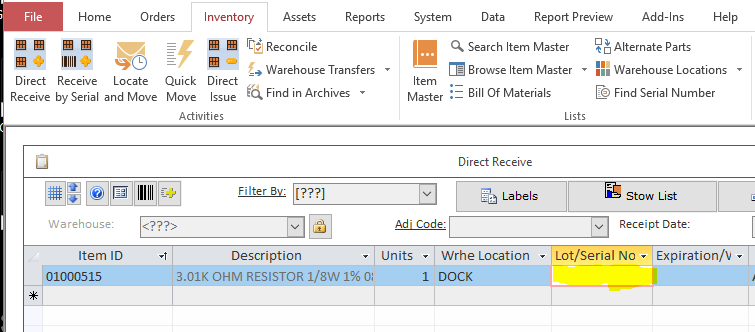
Receiving against Purchase Orders, Warehouse Appointments, and making direct positive adjustments (Inventory/Direct Receive menu). Input or scan serial/lot number into the Lot/Serial No cell.
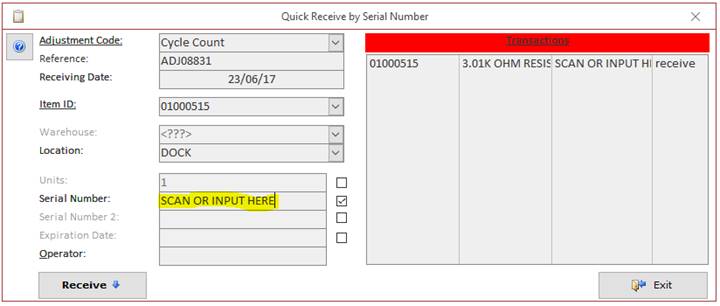
To make a quick direct positive inventory adjustment with a serial/lot number, go to the Inventory/Receive by Serial menu. Start with the Adjustment Code, change the reference and/or date if needed, select Item ID, change the warehouse location if needed, finally scan or type in a serial/lot number. If you use a scanner, the transaction will be registered immediately. If you are typing numbers, press the Enter key to record the transaction. After the transaction is recorded, the cursor will jump back to the Serial Number field, getting ready for the next transaction. All fields above will stay the same. Change any of them if necessary, especially if the next serial/lot belongs to a different Item.
Locating inventory by Serial/Lot numbers.
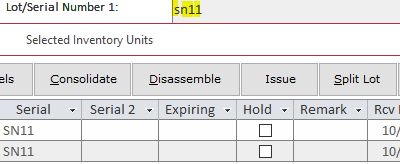
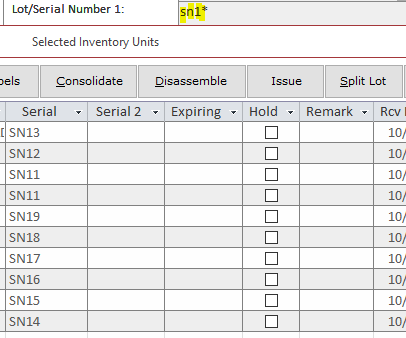
To locate current inventory by serial/lot number or by just a fragment of it, go to the Inventory/Locate and Move screen. Type in or scan serial/lot number into the Serial/Lot Number 1 field and press Enter if typing. The wildcards (*) are supported. This allows to input just a fragment of the number. The Serial/Lot numbers as any other piece of data in the database is case-insensitive. Below are some samples of search values and corresponding results.
Searching for number SN11:
Searching for all numbers that start with SN1:
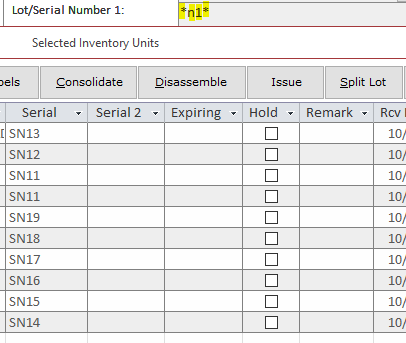
Searching for all numbers that start contain N1:
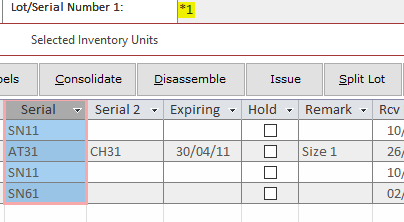
Searching for all numbers that end with digit 1:
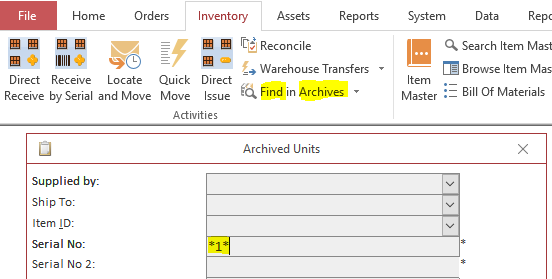
If you need to locate inventory by serial/lot number that is no longer in stock, go to the Inventory/Find in Archives, input a number or a fragment of it with the wildcards, and click the View All button. On the snapshot below, we trying to filter the archives by the numbers containing digit 1.
Finding transactional history for a serial/lot numbers
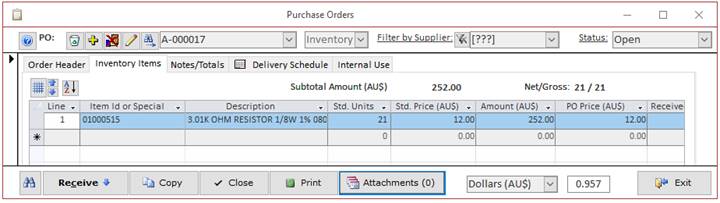
To find all movements of your inventory by serial/lot number, go to the Inventory/Find Serial Number menu. Input a number that you are looking for and press Enter. If the number exists or ever existed in the database, the screen will show each and every transaction related to it. On the snapshot below, we looked up number SERIAL 123 and found three transactions related to it.
The first row states that we received 21 units with this number. The source shows a purchase order, warehouse appointment or a direct adjustment number (PO A-000017). The destination is an initial warehouse location (DOCK). The status will always be the same for all rows, because it is related to the number itself.
From the second row, we can see that user Bill moved the entire lot from DOCK location to the LA/LB PORT location. And the third row shows that we written off 10 units from this lot.

Attaching Documents
For the attachments to work, turn off the System/Options, tab 5, switch 22 OFF.
Attaching a document to a record.
Click the Attachment button where available.
The Attachments screen appears.
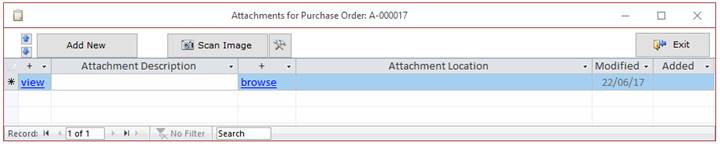
If you need to add an existing document, click the Browse link in the new record row. Browse your computer or the network and select the document.

Provide a name for your attachment.
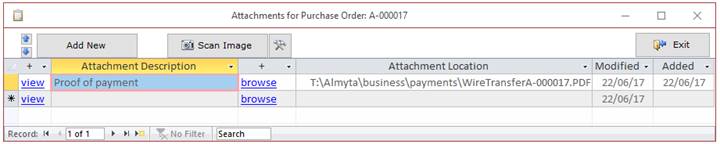
Use the View link to preview the attached documents.
If the document comes on paper and you have a scanner attached to your computer or somewhere on your network, use the Scan Image button instead of the browse link.
Configuring the attachments functionality.
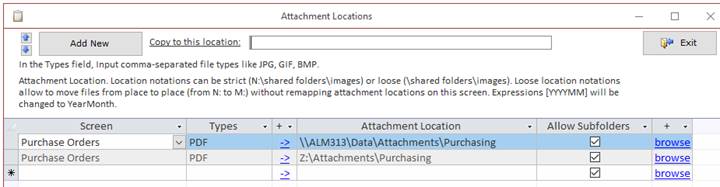
The ACS software does not copy the documents, but only saved a reference to them in the Attachment Location column. This means that the file name and a folder where these files live should be permanent. Moving the containing folder or renaming the file will break this reference. In a multi-user mode, users can reference the attachment on their local disk making them unavailable to other users. Also, users could reference files located on the network in a way specific to them only which would make the files inaccessible to others. It makes sense to create one location for the files on the network and force users to copy documents to this location and then reference these files. To set up such restrictions there is the Attachment Location screen in the System menu. It allows the administrators to specify shared attachment locations for specific screens and document type.
In the example below, the restriction will apply to all PDF documents attached to the Purchase Orders screens. An attempt to reference PDF file in any other location will be rejected showing user where the file should be. On the computer where the screen was viewed, the Z: dive was mapped to \\ALM313\Data folder. So, two definitions point to the same physical location. Only one is needed, of course. The second definition is recommended, because it is more flexible. Relocating the attachments folder from \\ALM313\Data folder to \\ALM314\Data folder will not break the references if you remap Z: to \\ALM314\Data folder. All references will be good.
There is another way of keeping all attachment in one place by copying them automatically in that place and then referencing. To do this, specify server and share in the System/Options, tab 9, field 9. You will see this folder on the Attachment Locations screen when you open it next time.

The three rows above serve as an example. You will need only one.
Having a restriction like in the first row will copy PDF documents related to the purchase orders to the \\ALM313\Disks\Data\Attachments folder.
The second row will force the copying of PDFs, JPGs, DOCXs files related to the purchase orders to the \\ALM313\Disks\Data\Attachments\2017 folder (for year 2017).
The third row will force the copying of PDFs, JPGs, XLSXs files related to the purchase orders to the \\ALM313\Disks\Data\Attachments\2017-06 folder (for month of June, 2017).
All file types not listed in the types cell will go to the \\ALM313\Disks folder.
Having “Copy to this location” specified as \\ALM313\Disks\[YYYY-MM] and the Attachment Location \Purchasing will copy files into the \\ALM313\disks\2017-06\Purchasing folder.
All folders are created automatically. They do not need to exist prior to usage.
Configuring Software for Auto-Picking
To simplify the picking process, Almyta has the Auto-Picking feature. Let us assume we always need to pick the oldest inventory units by the receiving date. To simplify the process, we need to configure the software once. Go to the System menu tab, the Options screen, tab #4.
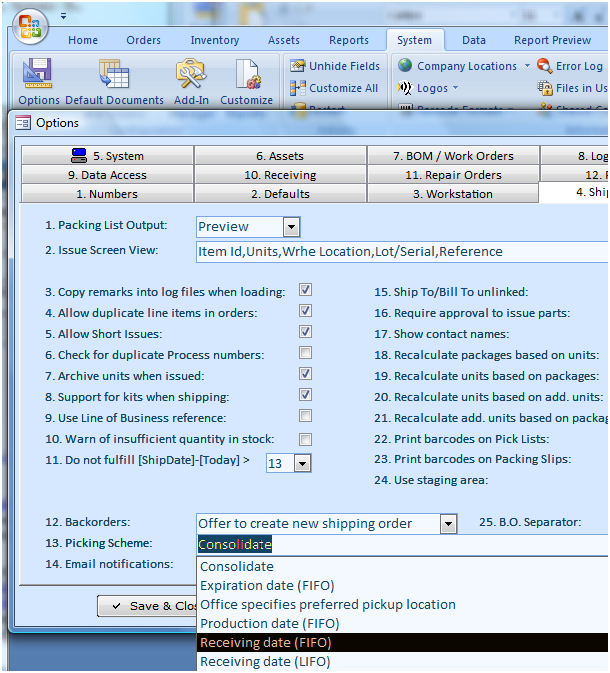
In the 13 Picking Scheme select the Receiving Date First-in-First-out (FIFO) and click Save & Close.
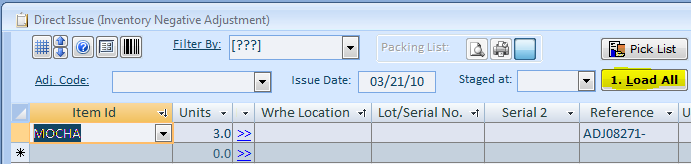
Now, on the Issue Screen, just click the Load All button and the software will make a picking decision for you.
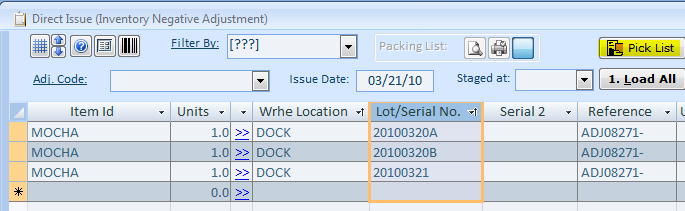
On the right site of the screen, click the Print Pick Ticket button.
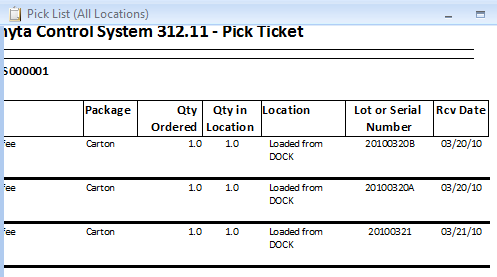
Use the #2 Issue button to finalize the issue. Use the printed pick ticket to pull the inventory out.
Browsing data and printing reports.
Browsing, previewing, and printing functions are alike. Therefore, they will be introduced together.
There is a Browse menu choice available for each order type, inventory, and assets.
The browse moves us immediately to a data browse screen. Below is the Item Master Summary browse screen.
- The Browse screen offers the following options (from left to right):
- The Up and down Arrow buttons increase or decrease the datasheet font.
- The “Freeze Columns” button prevents an auto-resize of column widths when the screen gets resized.
- Preview, Print, PDF will send a report based on a current datasheet to the screen, default printer, and a PDF file correspondently.
- The Configure button moves us to the screen with report configuration options.
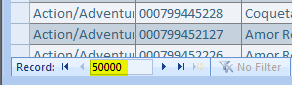
The Browse screen offers Sort, Search, Copy, and Filter functions. To sort data by any column, right-click the column and choose Sort Ascending or Descending from the popup menu. At the bottom of the screen, in the record navigation area, we can quickly move to a row number by typing the number in to the Current Record Number field.
In addition, we can quickly search for a first occurrence of any phrase or number.

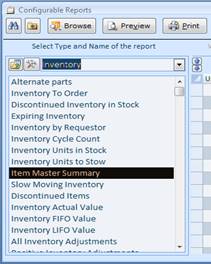
Running a report is like the browsing. In the Reports menu tab, select a desired report.
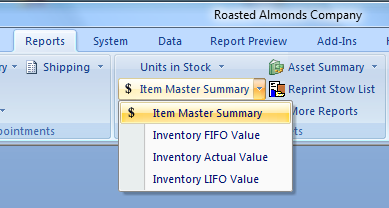
On the next screen, we can just click a desired report output button or specify desired filters and configurations, and then run our report. Also to quickly browse data, we can just double-click a desired report. The double-click is of the same function as the Browse button on the Top-Left of the screen.
Report functions and output formats

The buttons in a top row provide the following functions (left to right):
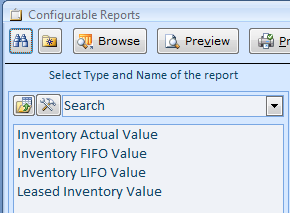
The Search button allows us to find all reports with a phrase in their name. Click the Search button, input “value” and press the ENTER key. All reports with the word “value” in their name will appear in the list of available reports.
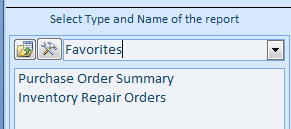
The Favorites button adds the selected report to a list of favorite reports. Click the Add to Favorites button and report will be inserted in a list of your favorite reports. To see your favorite reports, select Favorites in the Report Type list
The Browse button opens the Data Browse screen.
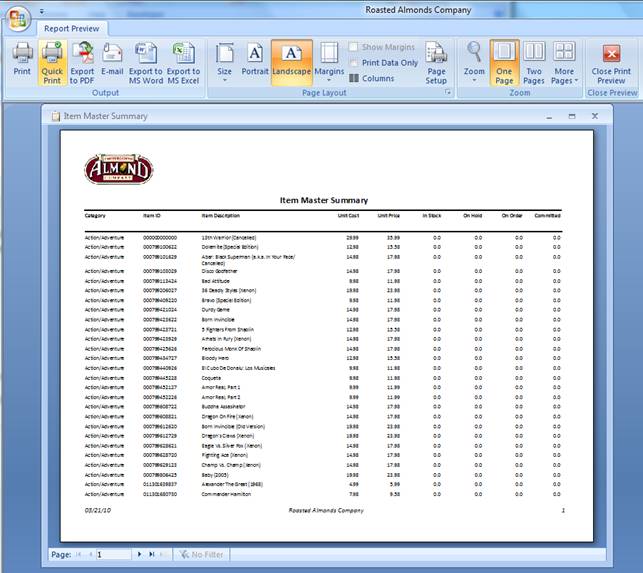
The Preview button sends a printer-formatted on screen. You can click on the report body to zoom in or out. The preview screen will change the application menu to the Report Preview. This menu contains only the report-related options. This menu is very useful in many aspects. Click Print on the left to choose a different from the default printer. Click Quick Print to send the report to the default printer right away.
The Print button sends the selected report to the default printer.
The Excel button outputs the report into Microsoft Excel file.
The PDF button outputs the report into Adobe PDF file.
The Word button outputs the report into Microsoft Word file.
The Text button outputs the report into a text file.
The Web button outputs the report into HTML file.
The Email button sends the report via email.
Report configuration functions
The next row of buttons and choices function as the following (left to right)
![]()
The Import button loads new report or modifies an existing one
The Configure button moves to a screen with the selected report definition.
The Report Type list is a list of available report types. Inside the list, we can also find “Report Usage History” and “Favorites” sections.
Up and down Arrows increase or decrease a font size of the List of Columns section below.
The Checkmark button hides/shows the unused columns.
The Trashcan button clears all current filters.
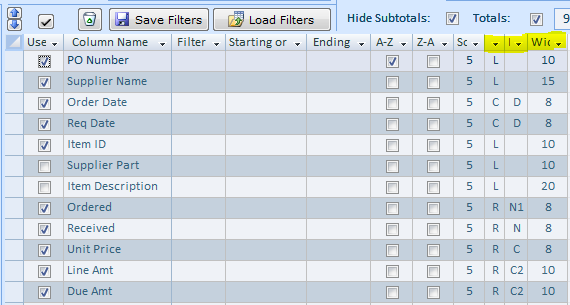
The Save Filters button preserves current filter selection for future use.
The Load Filters button restores previously saved filters.
The Hide Subtotals checkbox causes not to show the subtotal rows on the printed reports.
The Hide Totals checkbox causes not to show the total row on the printed report.
The “11” is a font size for the Browse screen or printed report.
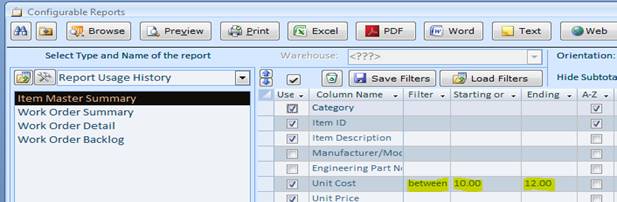
The filters section of the screen.
On the filters section, each row represents a report column. The Use switch shows or hides a column. The Filter column is a dropdown list with arithmetic operators. Starting (=) and Ending columns are placeholders for the operands. The Ending value is used only with the Between operator. The following filter setting will output only Items with a cost between 10.00 and 12.00
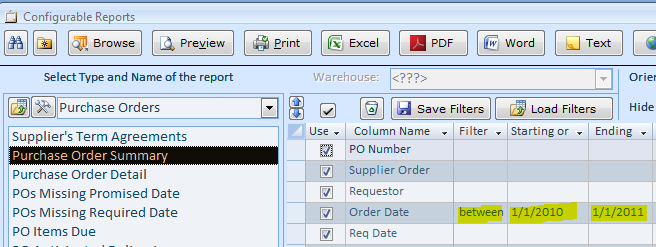
The following filter setting will output all open purchase orders created in a year of 2010.
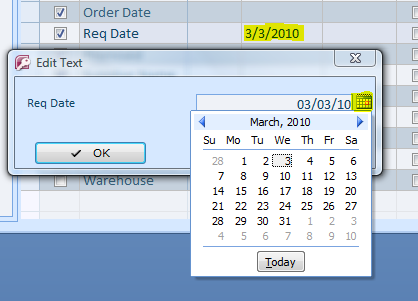
To call up a calendar for the date fields, double-click the Starting/Ending field and click the Calendar picker button.
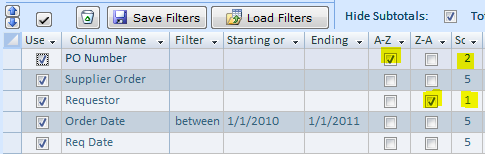
To sort a report by a specific column or columns, turn on A-Z or Z-A switch for a corresponding column. In the Sorting Priority column, specify which sorting takes place over another. The following filter/sort setting will output all open purchase orders created in a year 2010, sorted by the PO Requestor in the descending order and then by the PO Number in the ascending order.
There are three more columns on the Filters section of the screen.
Colum justification should be set to L for left, C for center and R for right. The default is L.
Column format: T-for text, D – for date, N for number with a number of decimal placed that is defined in the System/Options screen, tab 5, field 17, N1, N2, N3 for a number with the decimals equal to 1,2,3, C for a currency with a format defined in the System/Options screen, tab 5, field 3, or C1, C2, C3, for a currency with decimals equal to 1,2,3, P – for a percent format. The default format is T.
Column width is a column width relative to other columns. All column widths are added together compared to the report width and then each relative width weighed against the total relative width.
Map to the Menus
|
Function or Screen |
Tab |
Group |
Menu Choice |
|
Alternate Parts (Inventory Items) |
Inventory |
Lists |
Alternate Parts |
|
Application Add-in Manager |
System |
Configuration |
Add-In Manager |
|
Application Configuration |
System |
Configuration |
Options |
|
Application Reinitialize |
System |
Actions |
Restart |
|
Application Report Definition Import Export |
System |
Configuration |
Import/Export Reports |
|
Application Reports Default Selection |
System |
Configuration |
Default Documents and Screens |
|
Application Unhide All Screen Fields |
System |
Actions |
Unhide Fields |
|
Assemblies (Items with BOM) |
Inventory |
Lists |
Active Items / Assemblies |
|
Asset Depreciation Definitions |
Assets |
Lists |
Asset Depreciation |
|
Asset Details |
Assets |
Details |
Asset Details |
|
Asset Types List |
Assets |
Lists |
Asset Types |
|
Assets - Intangible Usage |
Assets |
Details |
Intangible Assets Usage |
|
Assets Browse Active |
Assets |
Details |
Browse Active |
|
Assets Browse Retired |
Assets |
Details |
Browse Active / Browse Retired |
|
Barcode Format Definition |
System |
Information |
Barcode Formats |
|
Bill of Materials |
Inventory |
Lists |
Bill of Materials |
|
Calculator |
Home |
External |
Calculator |
|
Carriers Detail |
Orders |
Lists |
List of Carriers |
|
Categories List |
Inventory |
Lists |
Warehouse Locations / Categories |
|
Center Codes List |
Inventory |
Lists |
Warehouse Locations / Center Codes |
|
Close Maximized Report |
Report Preview |
Close Preview |
Close Print Preview |
|
Company Locations |
System |
Information |
Company Locations |
|
Countries List |
System |
Information |
Company Locations / Countries & Currencies |
|
Currencies List |
System |
Information |
Company Locations / Countries & Currencies |
|
Custom Configurations List |
System |
Information |
Logos / Configurations |
|
Custom Label Setup |
System |
Information |
Barcode Formats / Custom Labels Setup |
|
Custom Messages |
System |
Information |
Logos / Messages |
|
Customize All System Objects |
System |
Actions |
Customize All |
|
Customers and Contacts Detail |
Orders |
Lists |
Customers and Contacts |
|
Customers and Contacts Search |
Orders |
Lists |
Customers and Contacts / Search |
|
Data Change Source |
Data |
Utilities |
Re-Link |
|
Data Export |
Data |
Import/Export |
Saved Exports |
|
Data Export to MS Word |
Data |
Import/Export |
Export to MS Word |
|
Data Fix Discrepancies |
Data |
Utilities |
Fix Data Discrepancies |
|
Data Import |
Data |
Import/Export |
Import |
|
Data Purge |
Data |
Utilities |
Purge |
|
Data Quick Initialization |
Data |
Utilities |
Quick Initialization |
|
Default Memos and Form Trailers |
System |
Information |
Company Locations / Default Memos |
|
Discontinued Inventory Browse |
Inventory |
Lists |
Active Items / Discontinued |
|
Error Log |
System |
Information |
Error Log |
|
Exit and Return to Company Selector |
Home |
Exit |
Return to Almyta Company Selector |
|
Exit Application |
Home |
Exit |
Exit |
|
Files in Use by Application |
System |
Information |
Files in Use |
|
Find a record (CTRL+F) |
Home |
All Commands |
Find |
|
Find a window (screen or report) |
Home |
All Commands |
Switch Windows |
|
Find and Replace (CTRL+H) |
Home |
All Commands |
Replace |
|
Fiscal Month List |
System |
Information |
Company Locations / Fiscal Months |
|
Help Level 1 |
Help |
Available Doc.. |
Starting Up |
|
Help Level 2 (Registered Users Only) |
Help |
Available Doc.. |
Intermediate |
|
Help Level 3 (Registered Users Only) |
Help |
Available Doc.. |
Advanced |
|
Inventory Buying Price Quote |
Orders |
Purchasing |
Cost Quote |
|
Inventory Cycle Count and Reconciliation |
Inventory |
Activities |
Reconcile |
|
Inventory Item ID Change |
Data |
Utilities |
Modify Item ID |
|
Inventory Item Master List Browse |
Inventory |
Lists |
Active Items |
|
Inventory Item Master List Detail |
Inventory |
Lists |
Item Master |
|
Inventory Item Price Markup |
Data |
Utilities |
Item Price Markup |
|
Inventory Leasing |
Inventory |
Activities |
Lease |
|
Inventory Locate and Move |
Inventory |
Activities |
Locate and Move |
|
Inventory Locations in Warehouse List |
Inventory |
Lists |
Warehouse Locations |
|
Inventory Negative Adjustment |
Inventory |
Activities |
Direct Issue |
|
Inventory Positive Adjustment |
Inventory |
Activities |
Direct Receive |
|
Inventory Positive Adjustment by Serial |
Inventory |
Activities |
Receive by Serial |
|
Inventory Quick Move by Serial Number |
Inventory |
Activities |
Quick Move |
|
Inventory Search Archives |
Inventory |
Activities |
Find Shipped or Consumed |
|
Inventory Search Item Master |
Inventory |
Lists |
Search Item Master |
|
Inventory Warranty Repairs |
Inventory |
Activities |
Warranty Repairs |
|
License Agreement for the Application |
System |
Information |
License Agreement |
|
License Information for the Application |
System |
Information |
Software Registration |
|
Line of Business List |
System |
Information |
Company Locations / Line of Business |
|
Logins |
System |
Security |
Users |
|
Logos List |
System |
Information |
Logos |
|
Negative Adjustment Codes List |
Inventory |
Lists |
Warehouse Locations / Negative Adjustments |
|
Notepad |
Home |
External |
Notepad |
|
Package Types List |
Inventory |
Lists |
Warehouse Locations / Package Type |
|
Payment Terms |
Orders |
Lists |
Payment Terms |
|
Positive Adjustment Codes List |
Inventory |
Lists |
Warehouse Locations / Positive Adjustments |
|
Purchase Orders Browse Canceled |
Orders |
Purchasing |
Browse Open / Canceled |
|
Purchase Orders Browse Closed Received |
Orders |
Purchasing |
Browse Open / Partially Received and Closed |
|
Purchase Orders Browse Open |
Orders |
Purchasing |
Browse Open |
|
Purchase Orders Browse Open Received |
Orders |
Purchasing |
Browse Open / Partially Received and Opened |
|
Purchase Orders Browse Past Due |
Orders |
Purchasing |
Browse Open / Past Due |
|
Purchase Orders Detail |
Orders |
Purchasing |
Order Details |
|
Purchase Orders Utilities (Auto Create) |
Orders |
Purchasing |
Utilities |
|
Refresh Screen Data (F5) |
Home |
All Commands |
Refresh All |
|
Registration of the Application |
System |
Information |
Software Registration |
|
Repair Process Points List |
Inventory |
Lists |
Repair Process Points |
|
Sales Taxes List |
System |
Information |
Company Locations / Sales Taxes |
|
Security Activation and Maintenance |
System |
Security |
User Permissions |
|
Shared Components Used by Application |
System |
Information |
Shared Components |
|
Ship Via (Carrier Type) |
Orders |
Lists |
List of Carriers / Carrier Types |
|
Shipping Order Browse All |
Orders |
Sales and Shipping |
Browse All |
|
Shipping Order Browse Canceled |
Orders |
Sales and Shipping |
Browse All / Canceled |
|
Shipping Order Browse Completed |
Orders |
Sales and Shipping |
Browse All / Completed |
|
Shipping Order Browse Open |
Orders |
Sales and Shipping |
Browse All / Open |
|
Shipping Order Details |
Orders |
Sales and Shipping |
Order Details |
|
Shipping Order Fulfillment |
Orders |
Sales and Shipping |
Order Fulfillment |
|
Supplier Detail |
Orders |
Lists |
Suppliers |
|
Supplier's Catalog |
Orders |
Lists |
Suppliers / Supplier Catalog |
|
Suppliers Search |
Orders |
Lists |
Suppliers/ Search Suppliers |
|
Supplier's Term Agreements |
Orders |
Lists |
Suppliers / Supplier Term Agreement |
|
Units of Measure List |
Inventory |
Lists |
Warehouse Locations / Units of Measure |
|
User Permission |
System |
Security |
User Permissions |
|
Users List for a Current Company |
System |
Security |
Users |
|
Version of the Application |
System |
Information |
Software Version |
|
Warehouse Appointments Browse Canceled |
Orders |
Inbound Appointments |
Browse Open / Canceled |
|
Warehouse Appointments Browse Open |
Orders |
Inbound Appointments |
Browse Open |
|
Warehouse Appointments Browse Received |
Orders |
Inbound Appointments |
Browse Open / Received |
|
Warehouse Appointments Detail |
Orders |
Inbound Appointments |
Order Details |
|
Warehouse Selection |
Home |
All Commands |
Change Warehouse |
|
Warehouses List |
System |
Information |
Company Locations |
|
Warranty Policies List |
System |
Information |
Company Locations / Warranty Policies |
|
Work Order Browse All |
Orders |
Assemblies… |
Browse All |
|
Work Order Browse Canceled |
Orders |
Assemblies… |
Browse All / Canceled |
|
Work Order Browse Completed |
Orders |
Assemblies… |
Browse All / Completed |
|
Work Order Browse Past Due |
Orders |
Assemblies… |
Browse All / Past Due |
|
Work Order Browse Requested |
Orders |
Assemblies… |
Browse All / Requested |
|
Work Order Browse Scheduled |
Orders |
Assemblies… |
Browse All / Scheduled |
|
Work Order Browse Started |
Orders |
Assemblies… |
Browse All / Started |
|
Work Order Details |
Orders |
Assemblies… |
Order Details |
|
Work Order Types |
Orders |
Lists |
Work Order Types |
Map to the Options
The Options screen can be found in the System tab, Configuration group. A significant part of the software configuration is set on this screen.
|
Tab or Field Name |
Option Description |
|
1. Numbers tab |
|
|
|
|
|
1. Purchase Style |
Purchase Order Number format: PREFIX#####SUFFIX. PREFIX and SUFFIX could be any fixed text. Number of # characters designates a minimum length of the numbered portion. The leading zeroes are added on the left if actual number is shorter. For a sample format P##### and the Next PO number 123, the resulting PO will be P00123. There is one more format supported for the PO numbers. If you have PO Types and you want them to be included in the PO numbers, use A,B,C,##### format for types A, B or C. The user will be prompted for the type A, B, or C. The PO number will look like this C00123, where C is the user-selected type.
|
|
2. Shipping Order Style |
PREFIX#####SUFFIX |
|
3. Work Order No. Style |
PREFIX#####SUFFIX |
|
4. Manifest No. Style |
PREFIX#####SUFFIX |
|
5. Serial No. Style |
PREFIX#####SUFFIX |
|
6. Item ID Style |
PREFIX#####SUFFIX |
|
7. Invoice No. Style |
PREFIX#####SUFFIX |
|
8. Appointment No Style |
PREFIX#####SUFFIX |
|
9. Repair No Style |
PREFIX#####SUFFIX |
|
10. Next PO No |
The next number to be assigned to the next PO. The number is incremented by one each time a new order is created. Set this field to -1 to be prompted for a new PO number. |
|
11. Next Shipping No |
Positive number for auto, -1 for manual assignment |
|
12. Next Work No |
Positive number for auto, -1 for manual assignment |
|
13. Next Manifest No |
Positive number for auto, -1 for manual assignment |
|
14. Next Serial No |
Positive number for auto, -1 for manual assignment |
|
15. Next Item ID |
Any positive number will automatically assign Item Id, -1 will prompt user for new ID, any number less than -1 will prompt user for a new ID with an option to assign the ID automatically (<SYSTEM>). The next number -123 will produce an ID with 123 in it and field 15 will be decremented to -124. |
|
16. Next Invoice No |
Positive number for auto, -1 for manual assignment |
|
17. Next Appointment |
Positive number for auto, -1 for manual assignment |
|
18. Next Repair No |
Positive number for auto, -1 for manual assignment) |
|
19. Sales Quote Style |
The same as the Shipping Order Style |
|
20. Next Sales Quote No |
Positive number for auto, -1 for manual assignment |
|
21 Credit Note Style |
PREFIX#####SUFFIX |
|
22 Next Credit Note |
|
|
2. Defaults tab |
|
|
|
|
|
1. Receiving Location |
A default for the Default Location on the Item Master |
|
2. Package |
A default value for the Package on the Item Master |
|
3. Units of Measure |
A default value for the Base UOM on the Item Master |
|
4. Terms |
A default value for the Terms for Customers and Suppliers |
|
5. Ship Via |
A Default value for the Ship Via for Customers and Suppliers |
|
7. PO Supplier Part |
A priority in which the Supplier Part number will be searched and selected when a new line item is added to a purchase order. |
|
8. Category |
A default value for the Category on the Item Master |
|
9. Default PDF Writer |
A default PDF printer. This printer will be used when Report Preview, Export to PDF button is clicked. |
|
|
|
|
3. Workstation tab |
|
|
|
|
|
1. Workstation Name |
Current computer network name |
|
3. Workstation Location |
A warehouse where the computer is located. |
|
5. Workstation Configuration |
A configuration currently used by the software. The configurations can be added in System tab, Logos/Configurations. |
|
6. Show tip buttons on screens |
When ON, the Light Bulb button is visible on screens. |
|
|
|
|
4. Shipping/Issues tab |
|
|
|
|
|
1. Packing List Output |
When a shipping order is issued, the packing list is automatically printed to this device. |
|
2. Issue Screen View |
A short form of the Issue screen is using this format by default. |
|
3. Copy remarks into log files when loading |
The remarks for each unit will be copied into the history log. This information can be later accessed by custom reports. |
|
4. Allow duplicate line items in orders |
Allows an addition of duplicate Item IDs to the shipping order line items. |
|
5. Allow Short Issues |
Allows to ship orders short, when not all items are available. |
|
6. Check for duplicate Process numbers |
Duplications will not be allowed for the Process Numbers. Turning this switch on will no force the rule for the existing orders. |
|
7. Archive units when issued |
After getting issued, all inventory units will be copied into the archives rather than being simply deleted. The archives can be accessed later by reports or browsed on screen by going to the Inventory tab, Activities group, Find Shipped or Consumed button. |
|
8. Support for kits when shipping |
When ON, the kits can be shipped without pre-assembly. Two fields will appear on the Shipping Orders screen, Line Items tab: Kit # and Units. Selecting Kit # and specifying number of Units will populate the order line items with the kit's components. |
|
9. Use Line of Business reference |
When ON, the Line of Business reference is shown on the Customers and Contacts screen. |
|
10. Warn of insufficient quantity in stock |
When ON, the software will show a warning message for each line item with insufficient quantities in stock. The warning is shown when the line item is being modified. |
|
11. Do not fulfill [Ship Date]-[Today] > |
The orders with the Shipping Date this many days in the future will not be fulfilled by functions found on the Order Fulfillment screen (Orders tab). |
|
12. Backorders |
When shipping short, the software will use one of the following “Do not make shipping backorders ", "Offer to create new shipping order", or "Always create new shipping order" depending on a selection in this field. |
|
13. Picking Scheme |
When the Load All button on the Issue screen is pressed, the inventory units are selected based on this field's value. The choices are these: (1) Consolidate, the units are first picked from a location with the smallest number of units. (2) Expiration Date, the units with the soonest date are picked first. (3) Office Specifies, when selected the Pick Form field on the Shipping Order Line Items become available and pick from location can be set in advance by a person creating an order. (4) Production Date (FIFO), the units with the oldest production date are picked first. (5) Receiving Date (FIFO), the oldest units by the receiving date picked first. (6) Receiving Date (LIFO), the most recent units by the receiving date picked first. (7) Serial/Lot numbers from lowest to highest, all units are sorted by serial number in ascending order. The picking starts from the top. (8) Undefined, this means no preference. (9) Warehouse decides, this is the same as Undefined. |
|
14. Email notifications |
This will email to up to three sales representatives based on a selection in this field. Conditions: (1) A sales representative should be assigned to this customer on the Customer screen, the More tab. (2) The sales representative must have a valid email address (System B173tab, Security group, Users). (3) Field 5.1 is other than "Never Send" |
|
15. Ship To/Bill To unlinked |
When ON, the Ship To address will not be filtered by Bill to address on the Shipping Order screen. Otherwise, the Ship To is always a drop off location of the customer record selected on the left in the Bill To field. |
|
16. Require approval to issue parts |
When ON, each shipping order should be approved before inventory is shipped. Conditions: (1) System Security must be active. (2) The approving user should be a salesperson and have an approval limit higher than the order total amount. |
|
17. Show contact names |
When ON, each time the Bill To address is selected on a shipping order screen, the contact names will be shown in the popup message. |
|
18. Recalculate packages based on units |
When ON, changing the Ordered Units on a shipping order forces recalculation of the number of Packages. The number of packages is calculated based on this formula [Packages]=[Ordered]/ [Item Master List].[Units per Pack] |
|
19. Recalculate units based on packages |
When ON, changing the Packs on a shipping order forces recalculation of the Ordered units. The number of units is calculated based on this formula [Ordered Units]=[Packages]*[Item Master List].[Units per Pack] |
|
20. Recalculate units based on add. units |
When ON, changing the SO Units (additional units or units of issue) on a shipping order forces recalculation of the Ordered units. The number of units is calculated based on UOM conversion: [Ordered Units] = [SO Units] *[Item Master List].[UOM]/ [SO UOM] |
|
21. Recalculate add. units based on packages |
When ON, changing the Packs on a shipping order forces recalculation of the SO Units. The number of units is calculated based on this formula: [SO Units] =[Packages]*[Item Master List].[Units per Pack] *[SO UOM]/ [Item Master List].[UOM] |
|
22. Print barcodes on Pick Lists |
When ON, the Shipping Order Number barcode is printed at the top of a standard Pick List. |
|
23. Print barcodes on Packing Slips |
When ON, the Shipping Order and Customer PO barcodes are printed at the top of a standard Packing List. |
|
24. Use staging area |
When ON, the Staging Area dropdown list becomes available on the Issue screen. When the area (staging warehouse location) is selected, the Load All button will pick only items from this area. In a case of shortage, the rest should be loaded manually by clicking on the Whse Location field for each not loaded line item. |
|
25. B.O. Separator |
This separator will be used to specify backorder number. If the original order number is S123, the backorder is receiving number S123:2. Where colon is the separator. |
|
|
|
|
5. System tab |
|
|
|
|
|
1. Shared Data Folder |
The place where the data files are located on a local drive or a file server. This does not apply to the SQL Server configurations. |
|
2. Committed Quantities |
The Committed quantities on the Item Master List screen are calculated based on this selection. |
|
3. Decimals in Currency |
The currency type fields show this number of digits after the decimal point. |
|
4. One Supplier per Customer |
When ON, a customer can receive inventory only from the supplier selected on the Customers screen, More tab. |
|
5. Allow temporary item Ids |
When On, a temporary Item ID can be received. A permanent Item ID can be assigned later when becomes available. |
|
6. Measure [Fill to] and [Reorder at] in |
The Fill To and Reorder At points are measured in these units. |
|
7. Use Currency conversions |
When ON, the currency dropdown field becomes available on the purchase and shipping orders. This allows to create orders in foreign currency. |
|
8. Use Sales Tax Two |
When ON, the Sales Tax Two field becomes available on the purchase and shipping orders screens. This is useful for Canada, Australia and others with two taxes. |
|
9. Support Multiple Warehouses |
When ON, multiple logical warehouses become available. To add new warehouse, go to the Company Locations in the System tab, Information group. |
|
10. Confirm warehouse each time |
When ON, a warehouse selection is shown each time the inventory related report or screen is called. |
|
11. Discount. Items In Stock |
When ON, an item discontinuing, that is in stock, is allowed. |
|
12. Email |
This is a global switch for the emails sent by the software. Turning it off stops email generation by all modulus. |
|
13. Supplier/Customer Warnings |
Always ON. On the Suppliers and Customers screens the Red Stop button is available in the top-right corner. Use this function to receive a reminder when this supplier or customer is selected on the shipping or purchase order screen. |
|
14. Default additional units to standard |
When ON, the additional units (PO Units and SO Units) are always defaulted to the Item Master units. |
|
15. Inventory movement tracking |
When ON, the data for the Audit Trail report is collected. |
|
16. Equipment Leasing |
When ON, the Inventory Leasing functions are available. |
|
17. Decimals in Units |
The inventory unit type fields show this number of digits after the decimal point. |
|
18. Always show Print Dialog |
When ON, reports are not sent directly to a Windows default printer. The Print dialog is shown allowing user to select a different printer and printer parameters such as margins, orientation, source paper tray, etc. |
|
19. Operator's name input |
When ON, a user is forced to input his/her name into the Operator field. |
|
20. Use Not Mixable Locations |
When ON, two different Items cannot be placed into the same locations. |
|
21. Tax Shipping charges |
When ON, the sales tax will be applied to the shipping charges as well as to the order subtotal. This can be used in countries like Australia, for instance. |
|
22. Use Windows Logins |
When ON, the software will verify that the current Windows login name exists in the User screen, Login field. The User Name and Password popup is bypassed. |
|
23. Login Timeout |
If not zero, this specifies a number of seconds to keep current user logged into the software. After this, the User Name and Password will popup. This option does not work with the 5.22 (Windows Logins). The software security must be activated for this option to be in effect. |
|
24. Central Location: |
When ON, this location considered as a central one (main warehouse). This option is valid for multiple physical sites installations when database replication is used. |
|
|
|
|
6. Assets tab |
|
|
|
|
|
1. Asset Tag Style |
The same as 1.1 (PO Style) |
|
2. Method 1 |
Default depreciation Method 1 |
|
3. Method 2 |
Default depreciation Method 2 |
|
4. Hide lookup list for assets (for larger databases) |
When number of asset records goes into thousands, turn this switch on to speed up the Assets screen loading. |
|
5. Next Asset Tag No |
Next number used to assign to a new tag. When set to -1, user is prompted for a new tag ID. |
|
6. Lifetime 1 (in months) |
Default asset lifetime for the depreciation method 1 |
|
7. Lifetime 2 (in months) |
Default asset lifetime for the depreciation method 2 |
|
|
|
|
7. BOM / Work Orders tab |
|
|
|
|
|
1. Maximum Levels |
Maximum bill of materials assembly levels. |
|
2. BOM Installed |
Bill of Materials module is available. |
|
3. Copy Serial No |
For one-time kind of assemblies, a serial number and the remarks for the finished unit gets copied into the associated bill of material record. This is useful when assembling unique product. |
|
4. Copy Remark |
The same as above, but applied to the finished unit remarks. |
|
5. Chemistry sheets |
When ON, Chemistry Sheets can be associated with inventory units. |
|
6. Create Chemistry record using default |
When ON, A default Chemistry Sheet can be used to attach to each new finished unit. |
|
7. Backorders for Work Orders |
Backorders for work orders are created based on this selection. |
|
8. Backorder Separator |
This separator is sued to create a backorder number. For the original order W123, a backorder number will be W123:2 |
|
9. Do not auto populate the Issue screen |
When ON, user will select the components to consume on the Issue screen. The screen will not be pre-populated. |
|
10. Allow partial assemblies |
When On, user is prompted "How many units to assemble?" when issuing work order components. |
|
11. Components are critical by default |
When ON, a new work order is created with all components marked as critical. |
|
12. Add Assemblies to 'On Order' |
When ON, The On Order quantity of the work order assembly is increased to reflect future production. |
|
13. Print Item Detail on a Work Order |
When ON, the assembly detailed notes are shown on the work order printout. The detailed notes can be found on the Item Master List screen, the More Details tab. |
|
14. Do not reserve purchased inventory |
When OFF, if a purchase order is created from the Work Order screen. The received inventory units will not be reserved for this work order, but rather become available for other uses. |
|
15. For POs, associate customer with supplier |
When ON, a purchase order is created for a supplier associated with the customer selected on the work order. Condition: Option 5.4 must be ON. |
|
|
|
|
8. Logo Selections tab |
|
|
|
|
|
1. Generic Reports |
All reports will show this logo |
|
2. Plain Paper Purchase Order |
A standard purchase order printout will show this log |
|
3. Packing List |
A standard packing slip will show this logo |
|
4. Shipping Order Invoice |
A standard shipping invoice will show this logo |
|
5. Service Invoice (work orders) |
A standard work order invoice will show this logo |
|
|
|
|
9. Data Access |
|
|
|
|
|
1. Do NOT Use Transactions |
When ON, the transactions will not be used and inconsistent updates become possible. Turning this switch on is not recommended. |
|
2. Default Record Locking |
The choices are: (1) No locks. User can start editing records without locking them. If another workstation modified the record before the user had a chance to save the changes, a popup screen will prompt to save changes to the clipboard or discard them. In other word, the first who saves a record wins. (2) All records, locks all records in the underlying table. (3) Only edited record gets locked. |
|
3. Images' Folder |
There small and large images seen on the Item Master List screen, Picture tab are saved in this folder. |
|
4. Number of Update Retries |
How many times the software will attempt to save over a currently locked record. |
|
5. ODBC Refresh Interval (Sec) |
All open screens are automatically refreshed from an SQL server after this number of seconds. Applies to an SQL server configurations only. |
|
6. Refresh Interval (Sec) |
All open screens are automatically refreshed from a file server after this number of seconds. Applies to a file server configuration. |
|
7. Update Retry Interval (Milliseconds) |
If current a record is locked by another user, the software will try to save the record again after this number of milliseconds. |
|
|
|
|
10. Receiving tab |
|
|
|
|
|
1. Receiving Screen View |
The default view for the Receiving screen short form. |
|
2. Allow User to Select Receiving Screen View |
When ON, a user can change the default Receiving screen view. |
|
3. When receiving against PO or Appointment do not populate receiving screen |
When ON, the receiving screen is not getting pre-populated with the line items. This is useful when receiving only a few line items at a time. |
|
4. Assist in serial number assignment. Enter first number and get the rest populated. |
When On, input the smallest serial number at the top of the pre-populated receiving screen and have the rest of numbers populated based on an increment. This is useful for receiving consequential serial numbers. |
|
5. Fulfill shipping orders on receipt |
When ON, the inventory receiving forces the software to check for any shipping backorders and inform a user if such orders were found and ready to ship. |
|
6. Do not split line items when receiving |
When OFF, the line items on the Receiving screen is not split into packages. To receive inventory package by package (pallet by pallet), the Item should have the Serial Number switch ON (Item Master screen, Stocking Properties tab) and Units per Pack to be greater than 1. For instance, if Units per Pack is 12 and Serial Use is ON, inputting 120 units on the Receiving screen, splits the screen into 10 rows. This allows specifying a serial/lot number for each package without selecting the same Item ID 10 times. |
|
7. Maximum number of rows (pallets) to split into |
To prevent errors, the Receiving screen will not split into more than this number of rows. |
|
|
|
|
11. Repair Orders tab |
|
|
|
|
|
1. Screen startup filter default |
When the Repairs screen is loaded, all orders are filtered by this selection. |
|
2. Create new order with this status |
When new repair order is created, it receives this status assigned to it. |
|
3. Order complete status |
When a repair order becomes completed, this status is assigned to it. |
|
4. Repair unit type |
The repair selection is allowed for the inventory unit type chosen in this field. |
|
|
|
|
12. Purchasing tab |
|
|
|
|
|
1. Copy P.O. Line Items into Remarks |
When ON, the purchase order line item remarks will be attached to the issuing logs |
|
2. Unlink Purchasing from Inventory |
When ON, the purchase orders can be received without the inventory position adjustments. The Received field on the Line Items tab of the Purchase Order screen will be unlocked and available for editing. |
|
3. Hide deliveries tab on P.O. screens |
When ON, the Deliveries tab get hidden on the Purchase Orders screen. |
|
4. Allow direct shipments to customer |
When ON, the Ship To dropdown list on the Purchase Orders screen is populated from Company Locations and Customer Locations. This makes possible to create purchase orders for drop shipments. |
|
5. Use foreign currency prices |
When ON, the PO Currency and PO Cost fields appear on the Item Master List screen. |
|
6. Order in multiples of |
|
|
7. Print PO on |
When Letter Head is selected, a standard purchase order header including a preselected logo will not be printed leaving a space for a preprinted letterhead. |
|
8. Filter inventory by |
The Item ID dropdown list is filtered down by the selection in this filed. |
|
9. Record Additional Unit Cost |
The selection forces to distribute shipping costs evenly between the received units. |
|
10. Total Shipping Charges |
The total shipping charges, distributed between the received units, are figured based on this selection. |
|
12. PO Requestor Email Notification |
Position ON. Emails are sent to the PO requestor in an event of receipt, approval, promised date change, or promised/requested date missed. Conditions: System Security is active, field 5.1 is other than "Never Send", a requestor selected on a PO, the requestor has a valid email address. Any buyer's PC will attempt to email notifications on startup. |
|
13. Allow duplicate items |
When ON, adding duplicate Item IDs is allowed for the purchase order line items. |
|
14. Approval required |
When ON, the receiving purchase orders is not allowed. The purchase order printout will show "this order is not approved" warning at the top. Conditions: (1) System Security must be active. (2) The approving user must be a buyer and have a sufficient approval limit (System tab, Security group, Users). |
|
15. Add Purchase Orders to 'On Order' |
When ON, the On-Order quantities are incremented based on the purchase order quantity. |
|
16. Add Appointments to 'On Order' |
When ON, the On-Order quantities are incremented based on the appointment quantity. |