
Always backup your QuickBooks company before importing files created by this interface.
After the import is finished, run a corresponding report(s) in QuickBooks to quickly check the results. Restore your company if dissatisfied, resolve the problem, and retry. The QuickBooks Interface for Almyta Control System (referred to as "the interface") allows a transfer of inventory transactions, originally recorded in the Almyta Control System, to the QuickBooks accounting software. It serves the dual role of communicating the transactional changes that took place in Almyta Control System to QuickBooks and synchronizing inventory between two software packages. The interface can export the following Almyta Control System transactions to QuickBooks:
Positive Inventory Adjustments (Receipts)
Customer Shipping Orders (Invoices)
Negative Inventory Adjustments
The first two transactions are specified explicitly on an "Export to QuickBooks" tab of the interface window. The Negative Inventory Adjustments can be generated as a result of the synchronization initiated using the "Synchronize QB Inventory" tab.
To install the interface, see the Installing Add-Ins chapter in the Advanced document found in the Almyta Help menu tab.

After installing, access the interface from the Add-ins Menu tab.

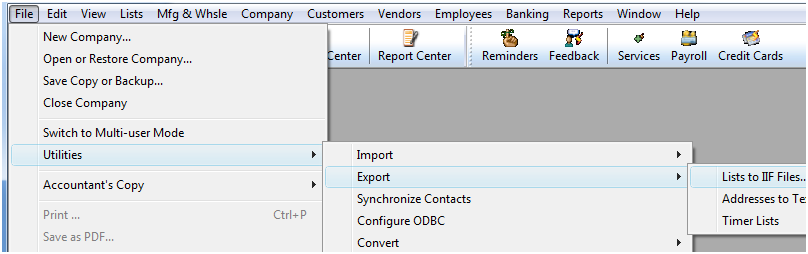
When you first start the interface, it prompts you to import a chart of accounts from QuickBooks. To complete this first task, go to your QuickBooks company, click File, Utilities, Export, List to IIF File menu choice.
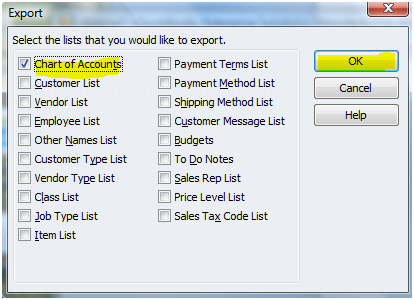
Choose to export Chart of Accounts and click OK.
Return back to the interface and browse for a file you have saved the exported chart into. After the import is completed, the interface screen will open. Click on the QuickBooks Settings tab and select an appropriate account for each field. As soon as it is done, the interface is ready for work. See a sample account selection below.

The interface settings provide a flexible way of mapping accounts necessary for proper QuickBooks functionality. Short account description follows:
Accounts Payable. This QuickBooks account should have the Accounts Payable type in QuickBooks. This account participates in recording the Receipt Transactions in concert with the Special A/P Account (Vendor) defined below.
Accounts Receivable. This QuickBooks account should have the Accounts Receivable type in QuickBooks. This account participates in recording the Invoice Transaction together with the Special A/R Account (Customer) defined below.
Default Receipt. This account should have the Income type in QuickBooks. It may participate in recording the Receipt Transaction if the corresponding adjustment reason does not have an account defined for it. The typical receipt account can be a company's Sales Account. We suggest creating a special sub-account called Positive Inventory Adjustment under the Other Income Account. Again, this account will be in use only when a corresponding adjustment code does not have GL an assigned account.

Default Inventory. This account should have the Other Current Asset type in QuickBooks (usually called Inventory Asset). This account may participate in recording both the Receipt and Invoice Transactions if the corresponding inventory item does not have an account defined for it.

Negative Adjustment for Synchronization. This account should be of the Expense or Other Expense type in QuickBooks. It will be used during item synchronization whenever a negative adjustment to the inventory item quantity is needed. We suggest creating a special sub-account called Negative Inventory Adjustment under the Other Expenses Account.
Positive Adjustment for Synchronization. This account should be of the Income or Other Income type in QuickBooks. This account may be used during item synchronization whenever a positive adjustment to the inventory item quantity is needed. We suggest to use the Default Receipt account or create a special sub-account called Positive Inventory Adjustment under the Other Income account.
The special A/P and A/R accounts (Vendor and Customer) also need to be defined in order for the transfer to work:
Special A/P Account. This is a special "Vendor" that one has to create in QuickBooks in order to post to the Accounts Payable account. All positive adjustments are recorded for this special vendor. The default name for this vendor is Positive Inventory Adjustment.
Special A/R Account. This is a special "Customer" that one has to create in QuickBooks in order to post to the Accounts Receivable account. All negative adjustments are recorded for this special customer. The default name for this customer is Negative Inventory Adjustment.
When transferring invoices, the interface has an option to mark them to be printed. The "Mark Invoices for Print" check box enables this functionality.
The interface allows a direct transfer of receipts and customer invoices to QuickBooks. Switch to the Export to QuickBooks tab. Click on the Item Receipts or/and Invoices checkboxes. Modify the Cutoff Date if needed. Click the Run button.

You can always use the Count Transactions button prior to Run. This allows to see how many transactions of a type are pending.
Receipts. The interface Item Receipt Transaction uses two kinds of QuickBooks transactions Item Receipt and Bill Refund. The Item Receipt credits the QuickBooks Accounts Payable Special A/P account and debits individual items (or default) Inventory Asset account(s). The Bill Refund debits that Accounts Payable Special A/P account and credits the Default Receipt account.
Invoice Transaction. The interface Item Invoice Transaction uses the explicit QuickBooks invoice transaction. The Invoice Transaction credits the QuickBooks Accounts Receivable account for the invoiced customer and debits individual item's (or default) Inventory Asset account(s).
If you have updates to the Customer, Supplier, and Item records in Almyta, check the corresponding boxes as well. It is a good practice not to changes customer, supplier, and item lists in QuickBooks when this interface is used. Update these lists only in Almyta and check these three boxes to update QuickBooks list with the receipt/invoice transactions. If you choose to update these lists in QuickBooks, use Import into Inventory System tab to transfer QuickBooks' latest data to Almyta.
The result of the transactions will be a special text file. You need to specify the file's name when prompted after the Run button is pressed. After the file is created, go to QuickBooks, select File, Import, IIF Files.

There is no need in using this option when Receipts and Invoices are imported from Almyta on a regular basis. However, if the interface has been added later on a road, export Customers, Suppliers, Items, and Terms and then synchronize the inventory once. The steps to synchronization are outlined on the screen.

Export Item List in QuickBooks. Return to interface, specify two file names and click the Run button. When the process is finished, return to QuickBooks. In the QuickBooks File/Utilities menu, select Import/IIF, browse to the feedback file for import to QuickBooks.
During the process, the interface generates both positive and negative adjustment transactions in order to equalize the quantities in both systems. Positive adjustment transactions are structurally identical to the Item Receipt transactions. The only difference is for the Bill Refund. Instead of the Default Receipt account, the interface uses the Positive Adjustment account specified on QuickBooks Settings tab. The negative adjustment transaction is a different matter. The interface negative adjustment transaction uses two kinds of QuickBooks transactions Invoice and Cash Refund. The Invoice transaction credits the QuickBooks Accounts Receivable Special A/R account and debits individual item's (or default) Inventory Asset account(s). The Cash Refund one debits the Accounts Receivable Special A/R account and credits the Negative Adjustment account. All these QuickBooks accounts must be selected on QuickBooks Settings tab before synchronizing.